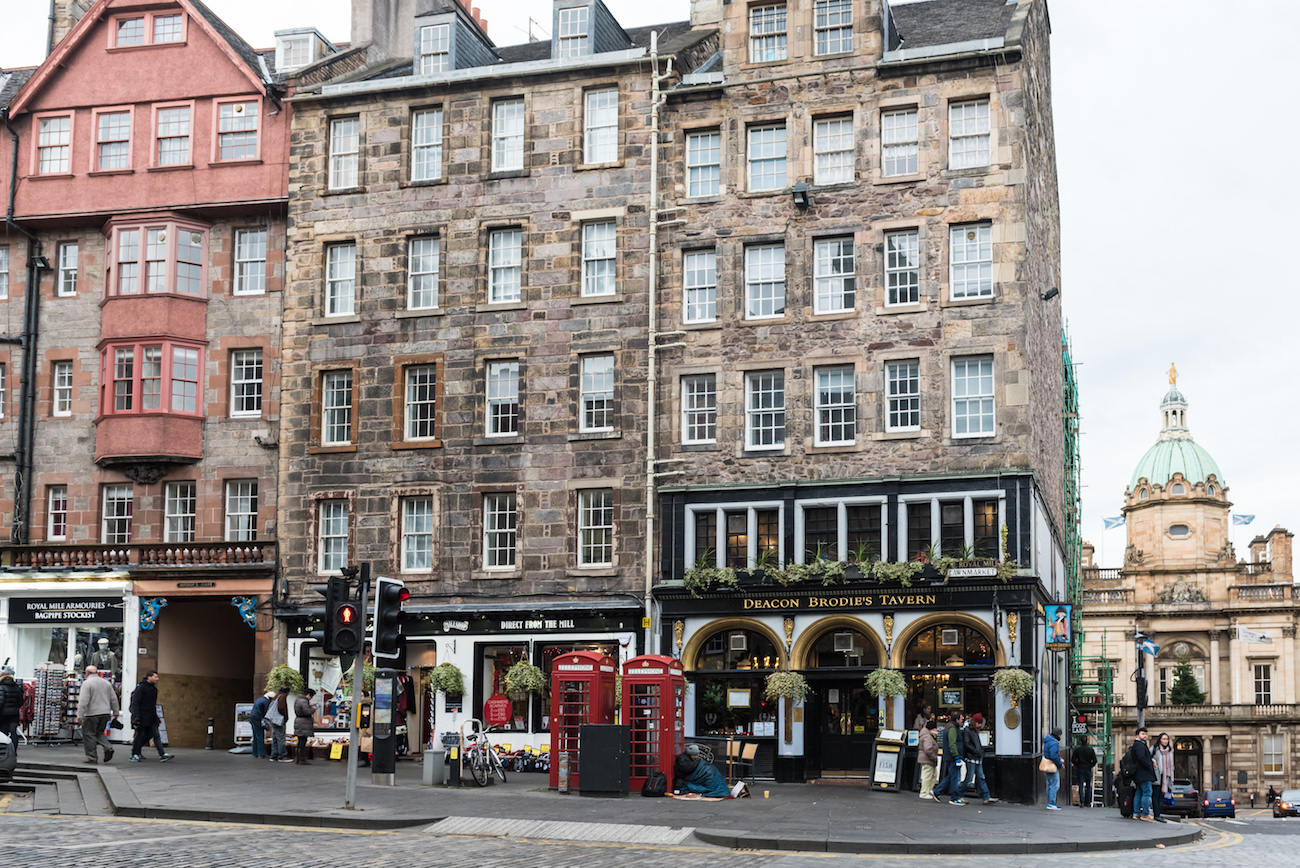
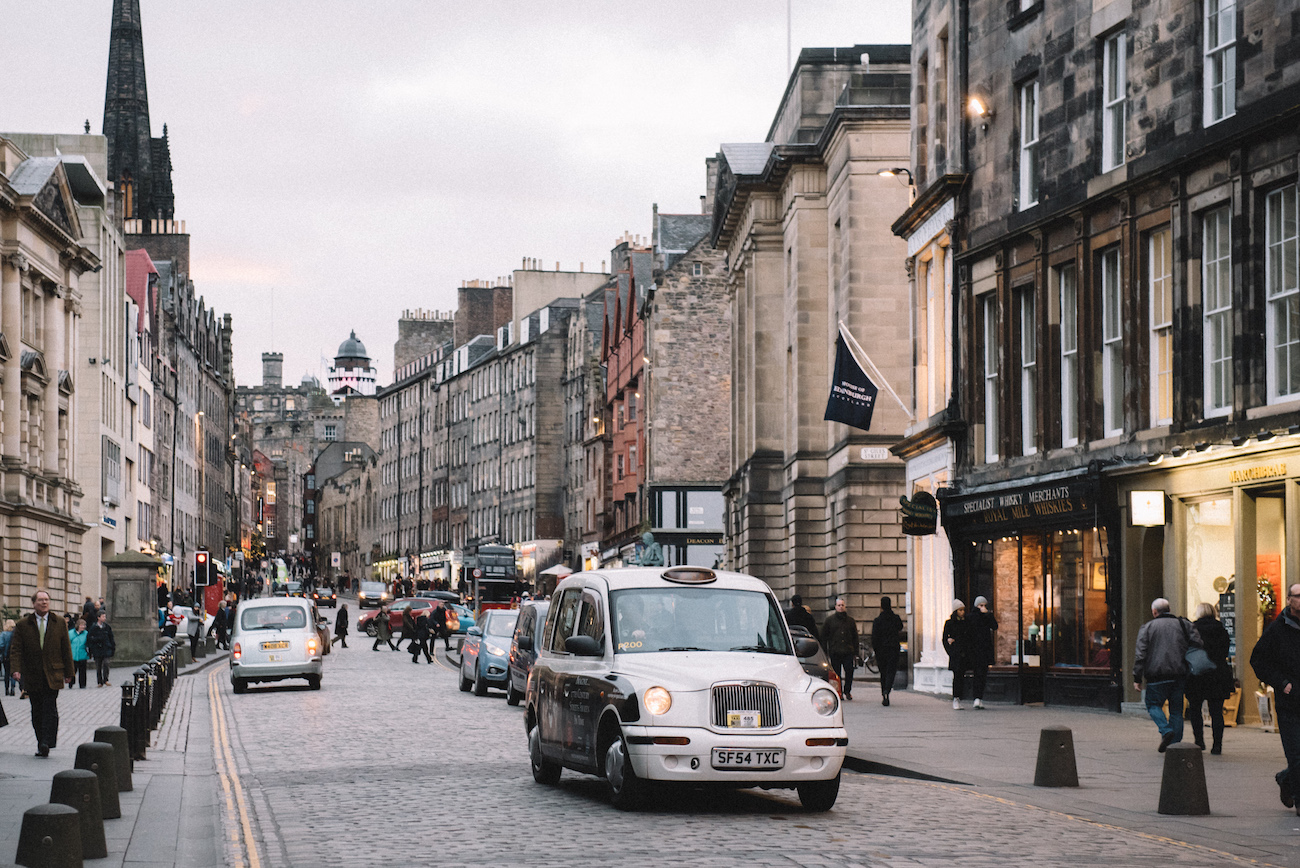
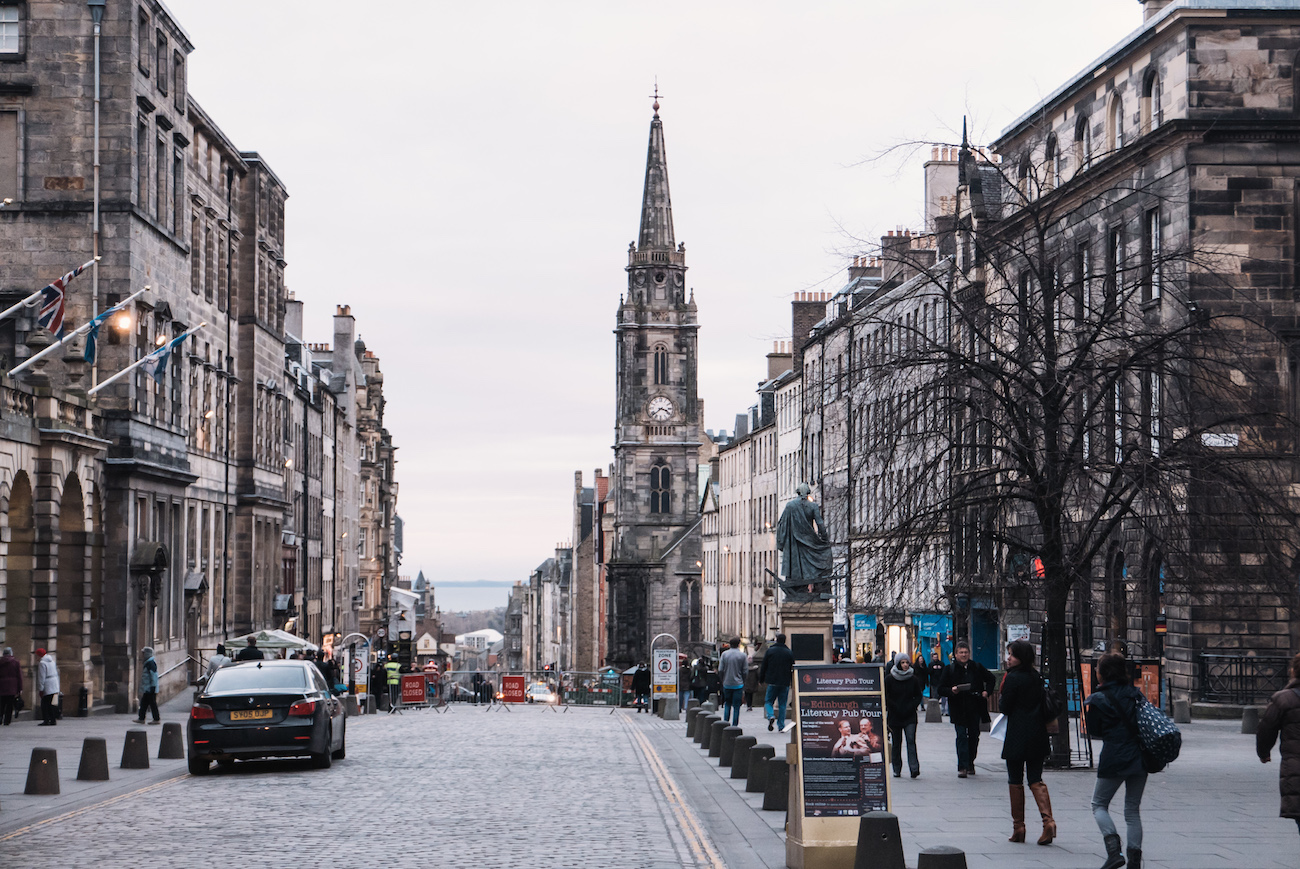
What I really enjoyed about visiting Edinburgh, Scotland was how charming the city was in just about everywhere we went. We would walk down any street or around every corner and we would find something interesting, whether it was the architecture, Scottish shops, small restaurants/cafes, whisky bars, or a unique attraction. With so many things to do and see, it’s easy to get lost and fall in love with the city.
Unfortunately for us, we were only able to spend two days in Edinburgh and probably left with many things unseen. But even for such a short time, we still had an amazing visit and felt like we saw a lot and got to do a lot. So, we’ve listed out 9 things that you should definitely do during your visit to Edinburgh:
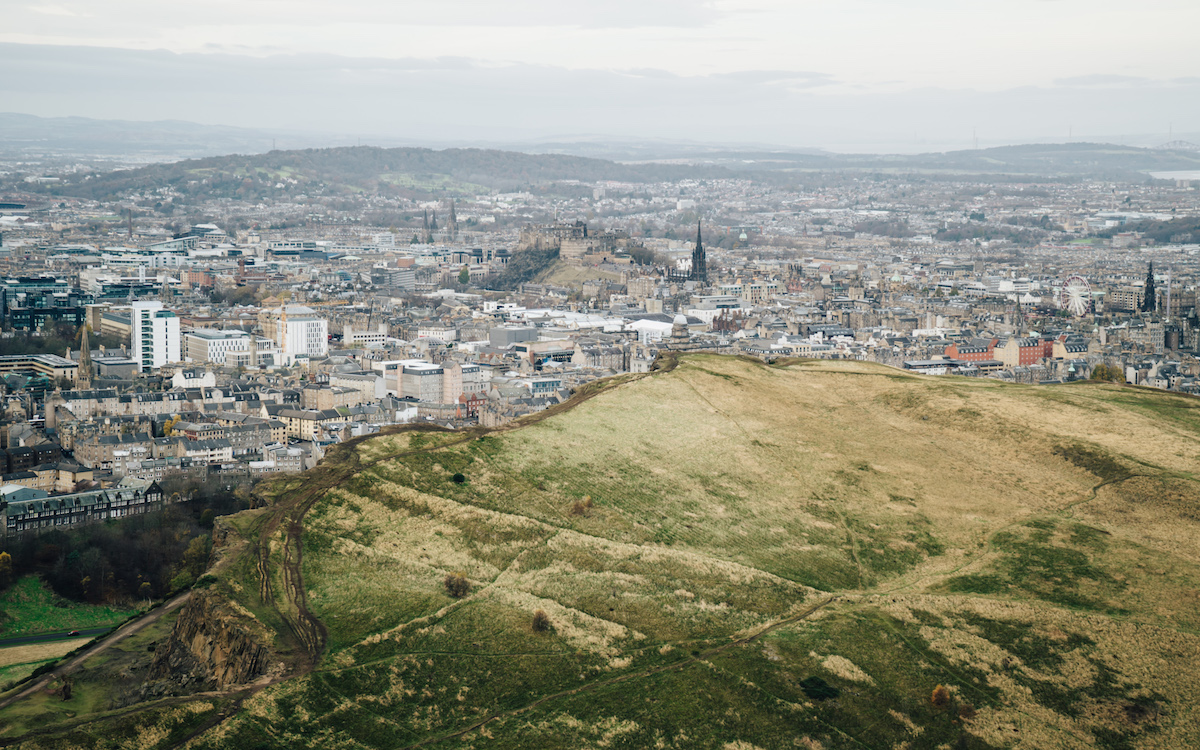
At 251 meters, Arthur’s Seat is the highest point in Edinburgh. It’s about a 30-45 minute hike to the top depending on your speed but is totally worth it for the amazing breathtaking views of the city. You can also explore the rest of the park, including St. Anthony’s Chapel and Salisbury Crags, massive cliffs that oversee the city. Click here to see more of the views.
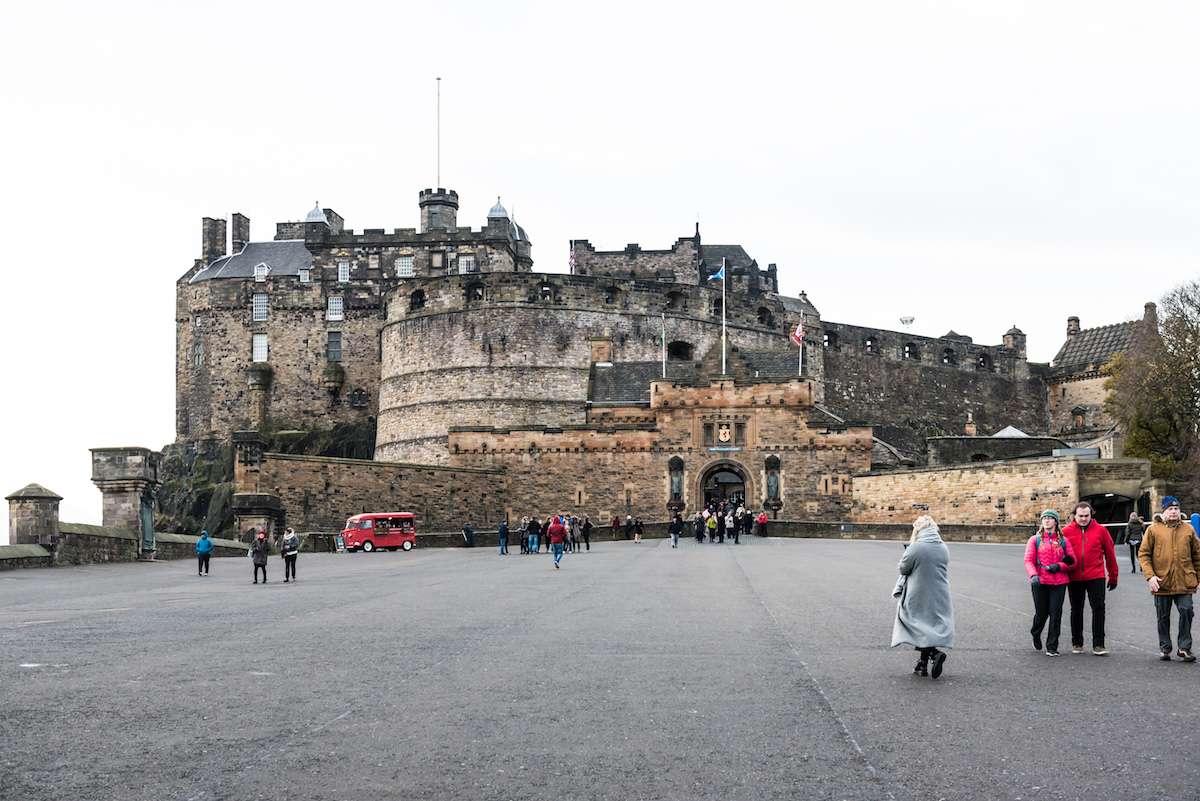
The Edinburgh Castle is an obvious choice, as it is the nationally recognized symbol of Scotland and one of the top attractions in the country. The castle sits atop Castle Rock and offers vast views of the city. See more of the castle here.
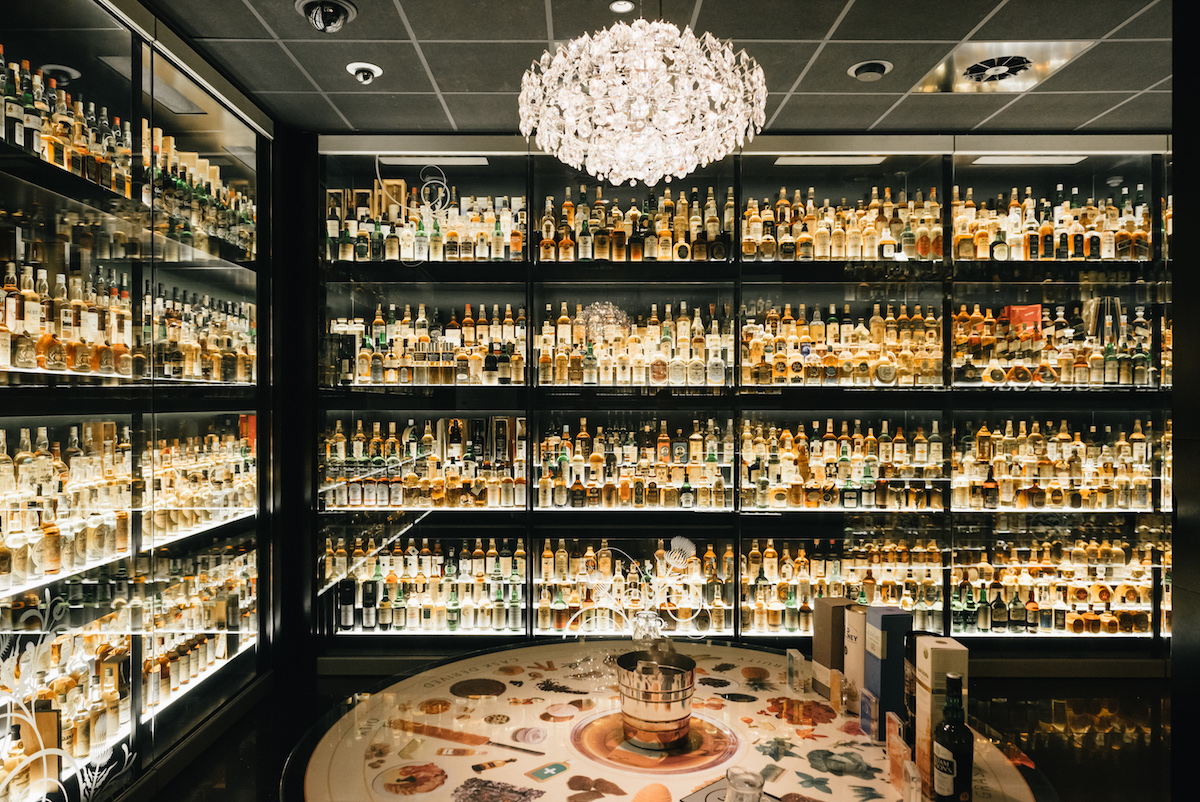
Scotch whisky is the pride and soul of the country so if you want to understand what goes into this craft or simply love whisky, then you have to do the Scotch Whisky Experience. There is an interactive ride, you’ll get to do some tasting, and see the largest scotch whisky collection in the world. For more of this tour, you can read here.
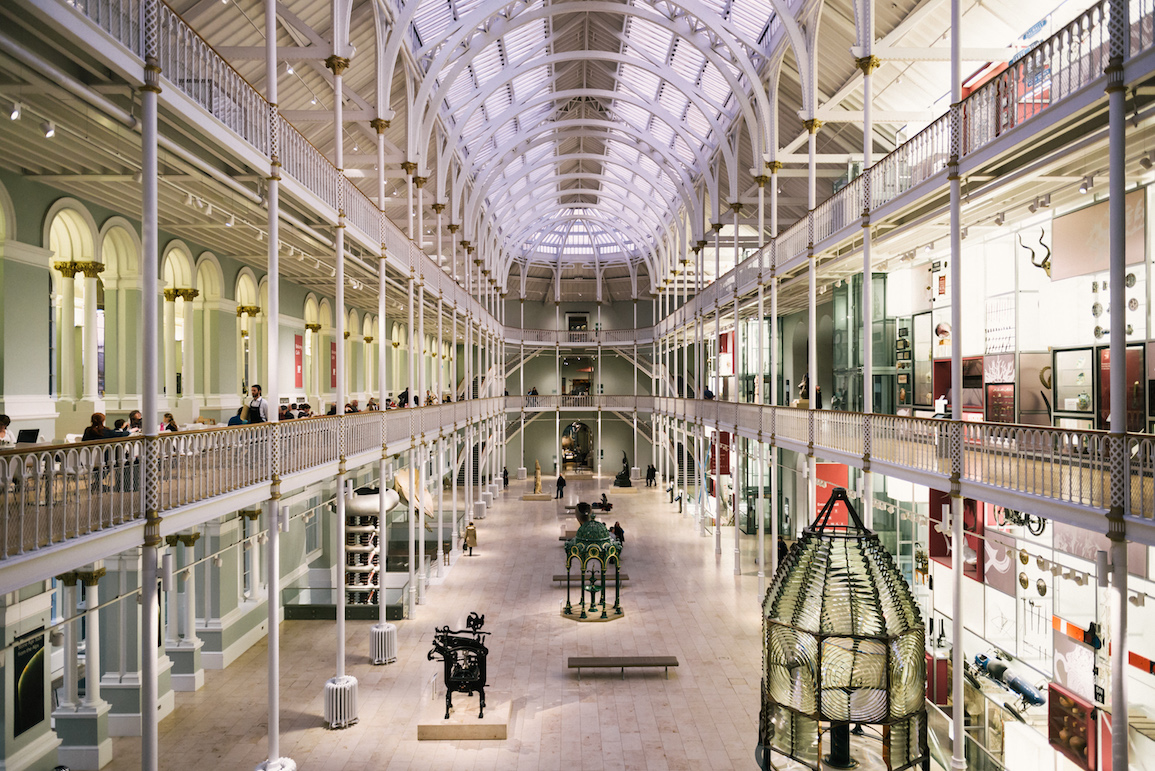
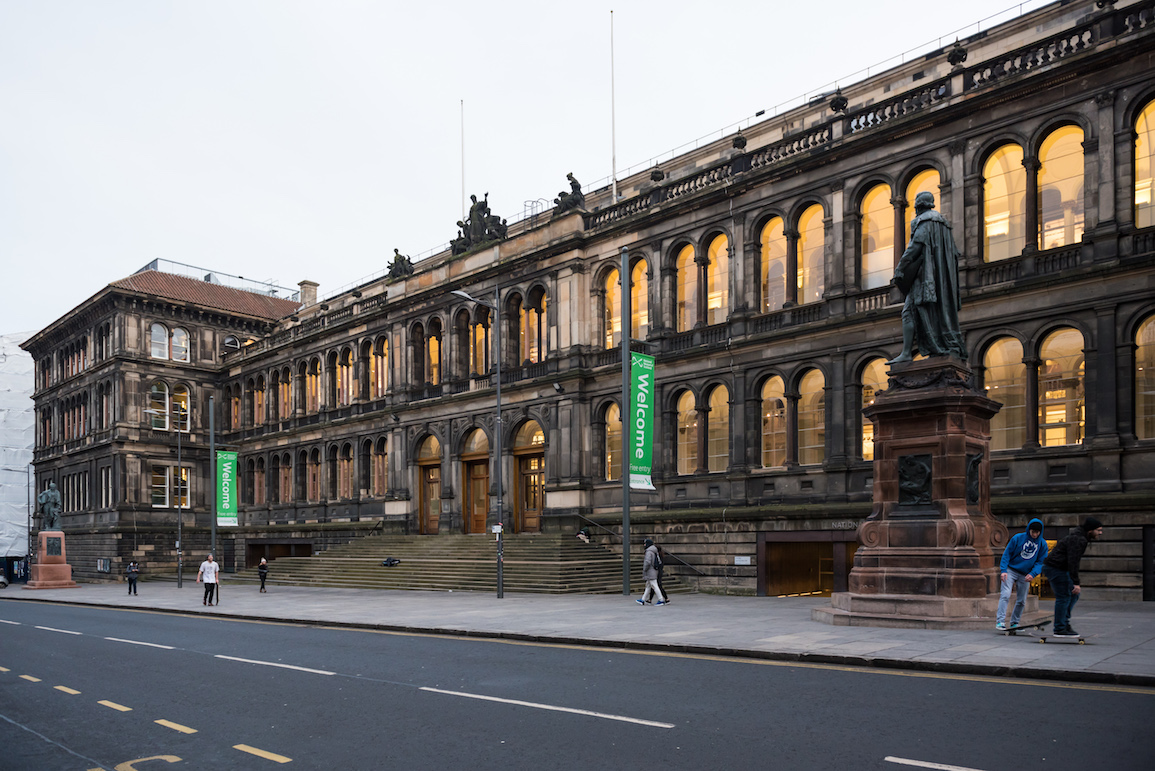
The National Museum of Scotland is actually the most visited attraction in the whole country and the best part is that it’s completely free to visit. Not only can you admire the architecture but the museum houses a number of really cool exhibits from biology, technology, fashion, Scottish history, astrology and much more. To see more of the other exhibits, you can find more photos here.
5. Stroll down George Street for some shopping
George Street is well-known for being the best place in the city to do some serious shopping. We weren’t planning to do much shopping when we started walking but there were some many interesting shops that we ended up buying quite a bit of stuff. If you are able to resist the temptation to shop, the street does offer some beautiful sites and architecture that you can enjoy.
Statue of William Pitt, George Street, Edinburgh
6. Eat at ANY restaurant/cafe
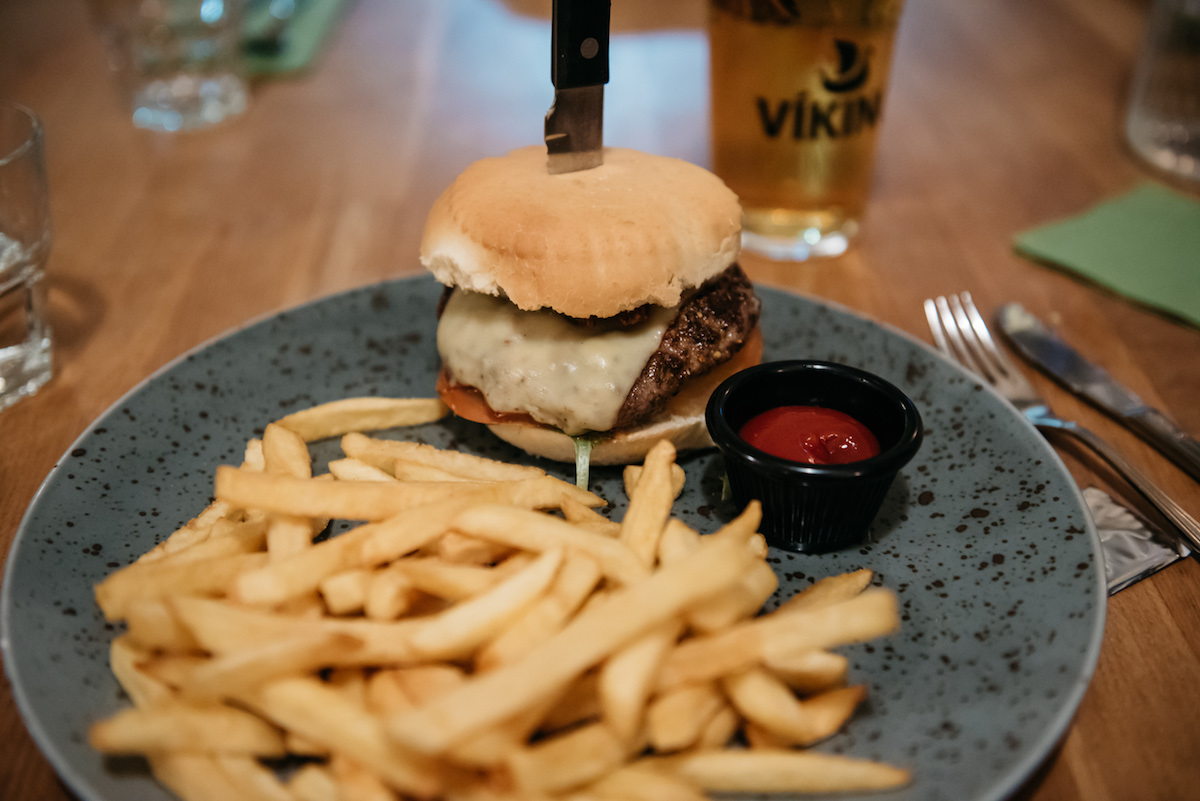
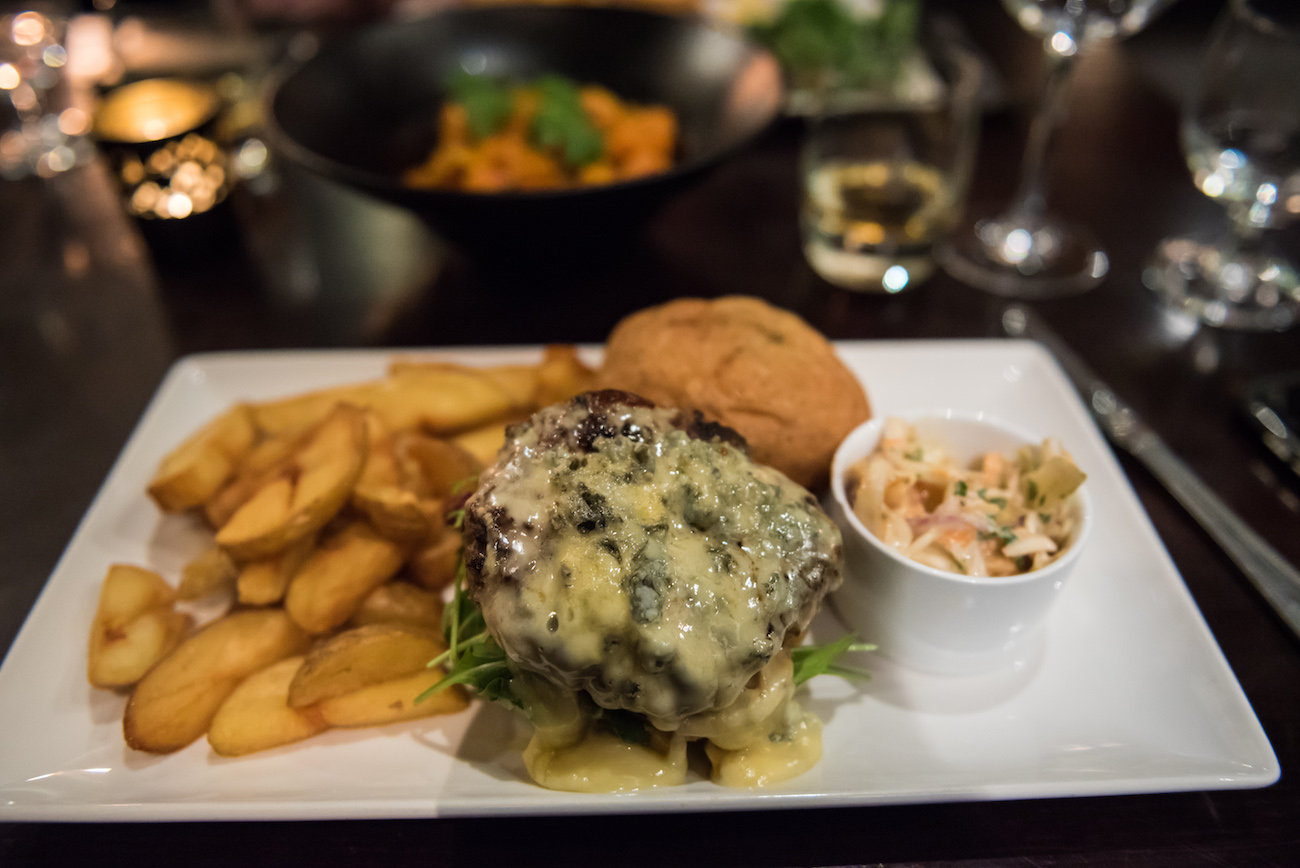
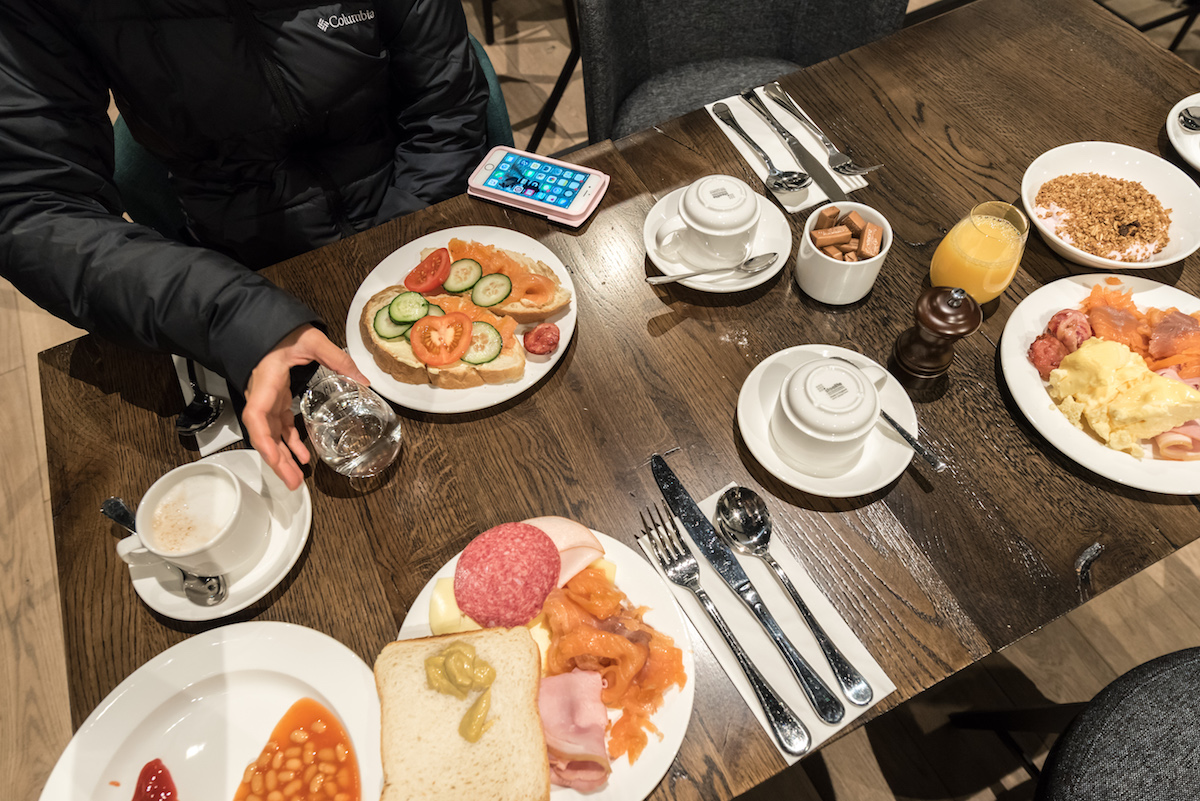
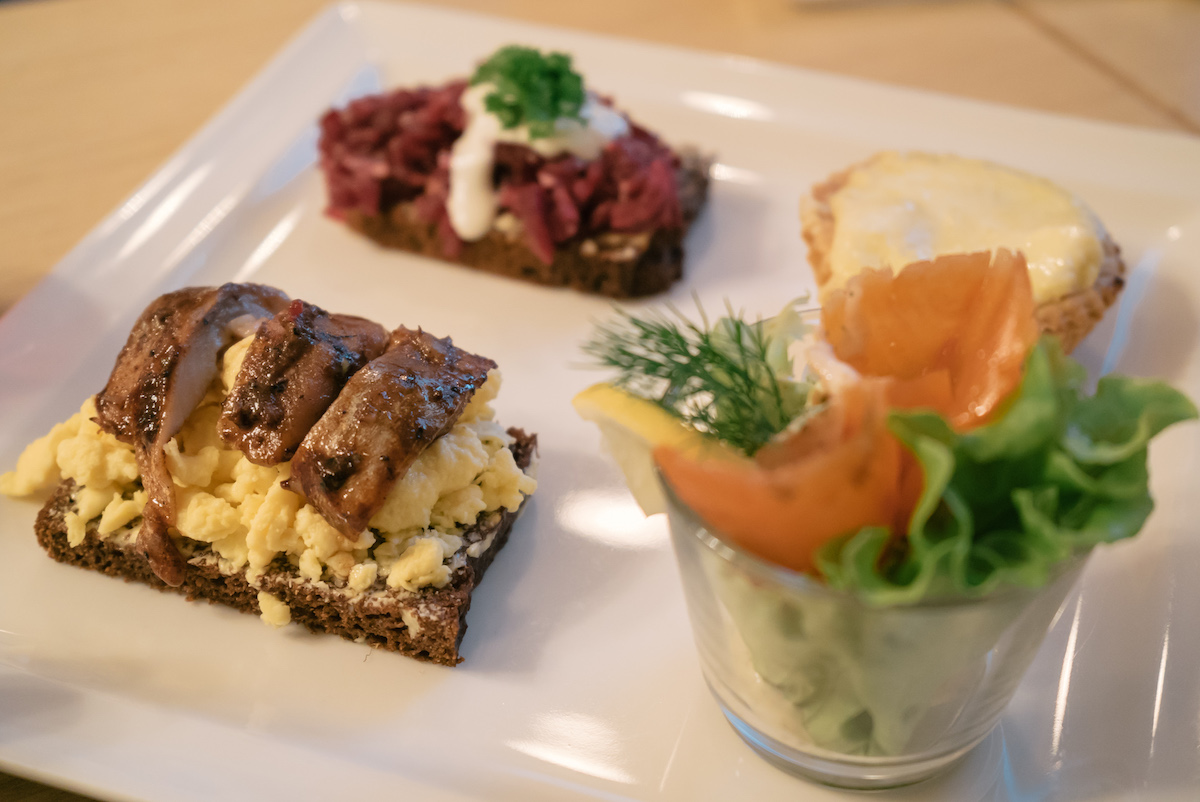
Many times when we go out to eat, we tend to use an app like Yelp or Tripadvisor to find the best spots. In Edinburgh, you really don’t have to worry about that (unless you’re looking for something specifically). Just about any restaurant or cafe you pass by is probably a great place to eat. We just walked around and picked places near our hotel and each of those places just had amazing food, such as the Magnum Restaurant & Bar, which is where I had the best burger that I’ve ever had (or at least it was really darn good). We also loved The Square, where they had delicious breakfast items and sandwiches.
Maybe the best burger I’ve ever had at the Magnum Restaurant and Bar
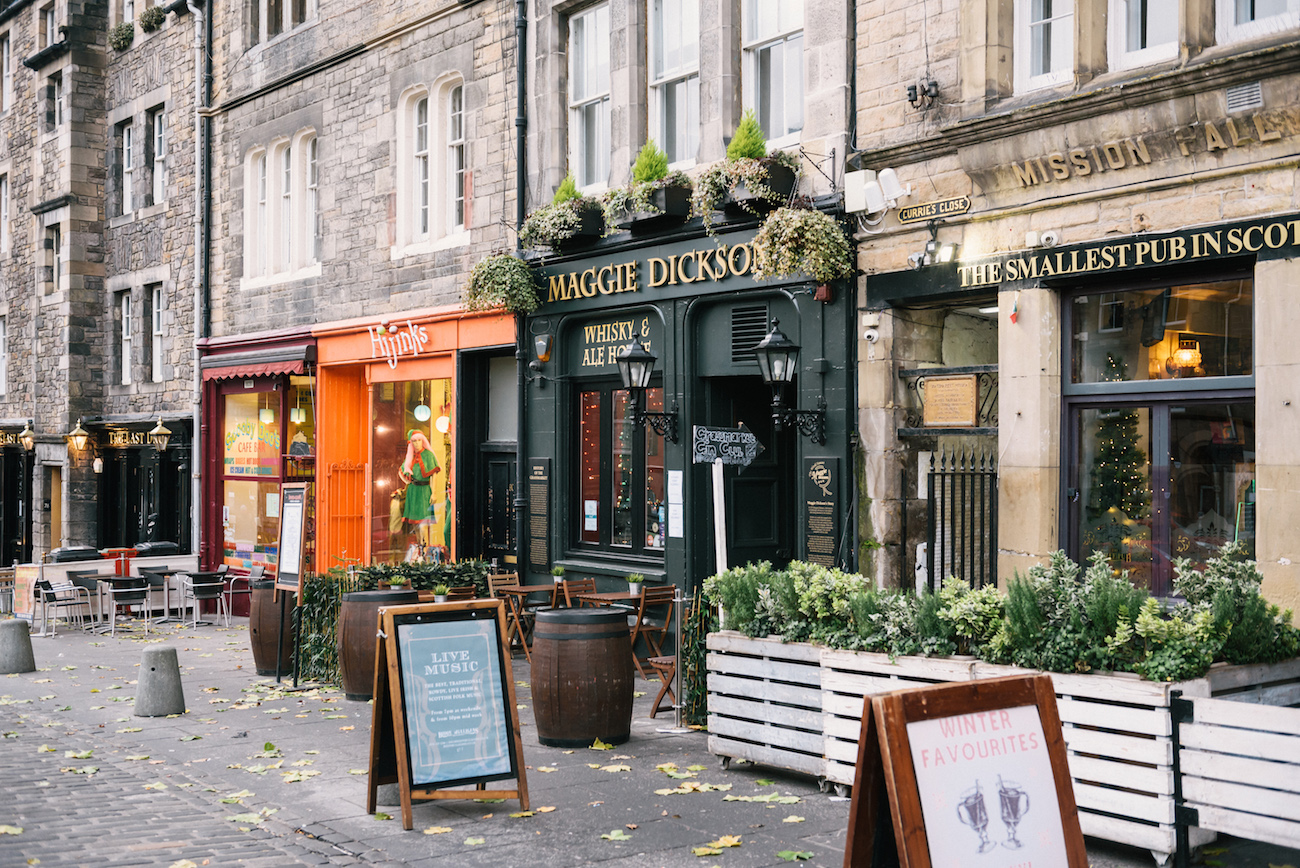
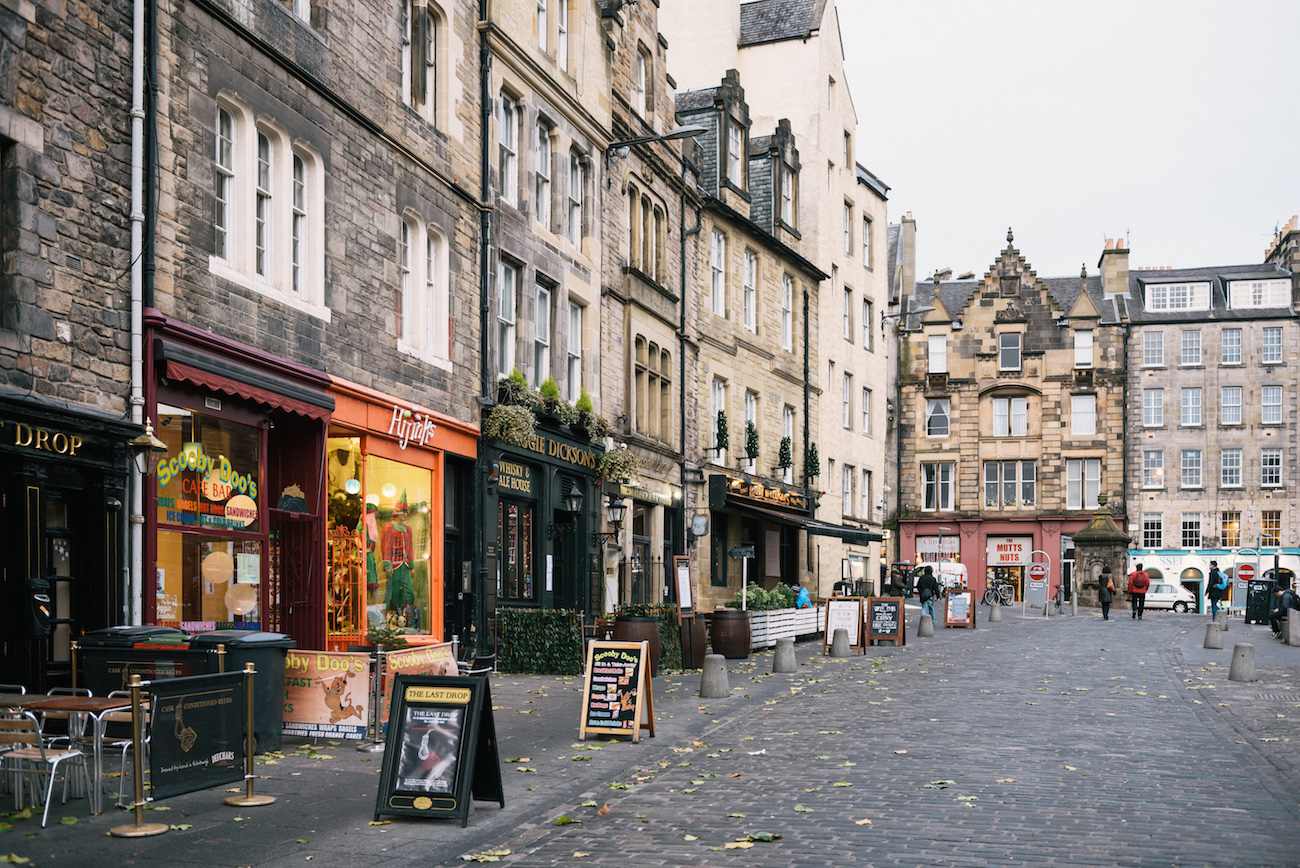
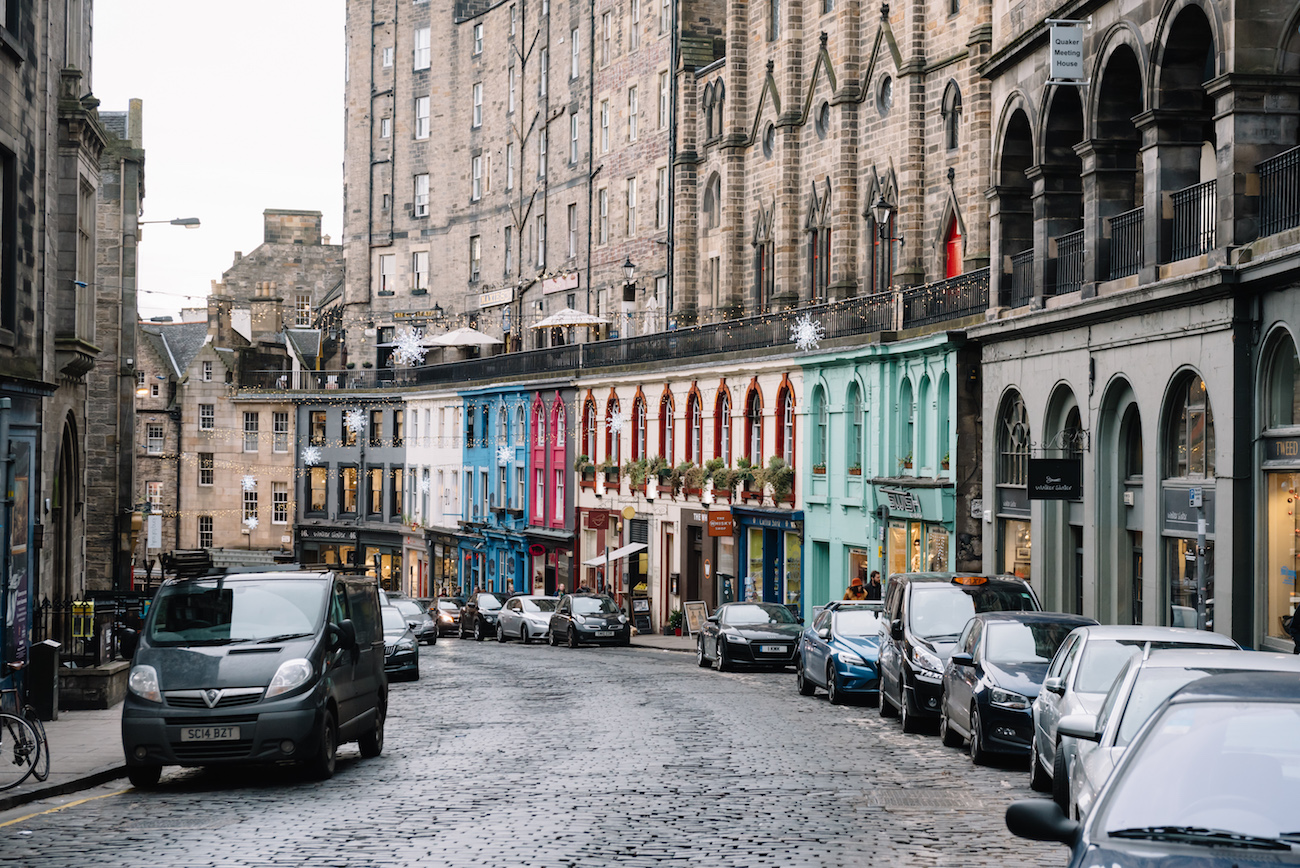
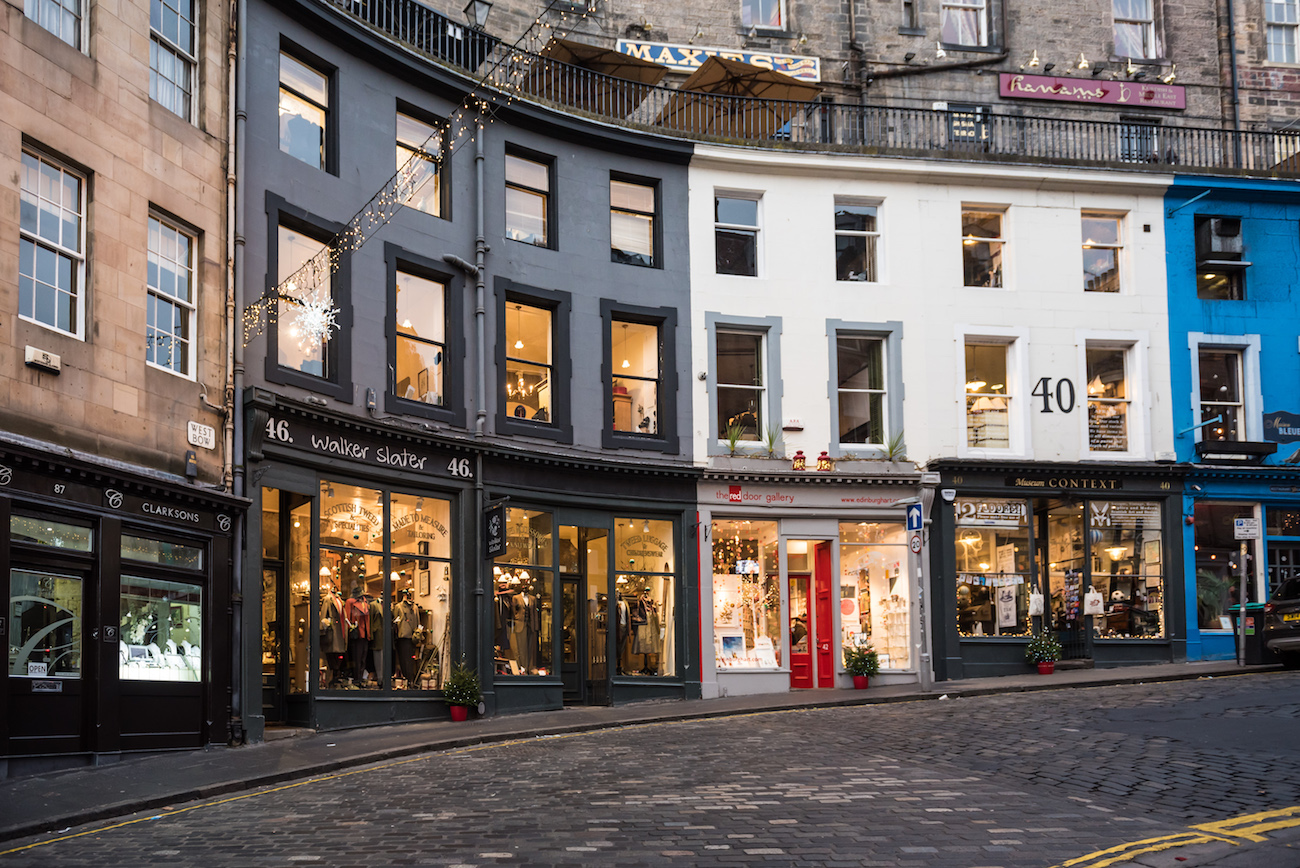
7. See the Colorful Buildings on Victoria Street
Located in Old Town, Edinburgh and close to the Edinburgh Castle is Victoria Street, where you can find some very colorful buildings mixed with the old architecture. Within this street are many small stores, cafes, bars and restaurants, a perfect little place for your shopping, eating, and drinking needs.
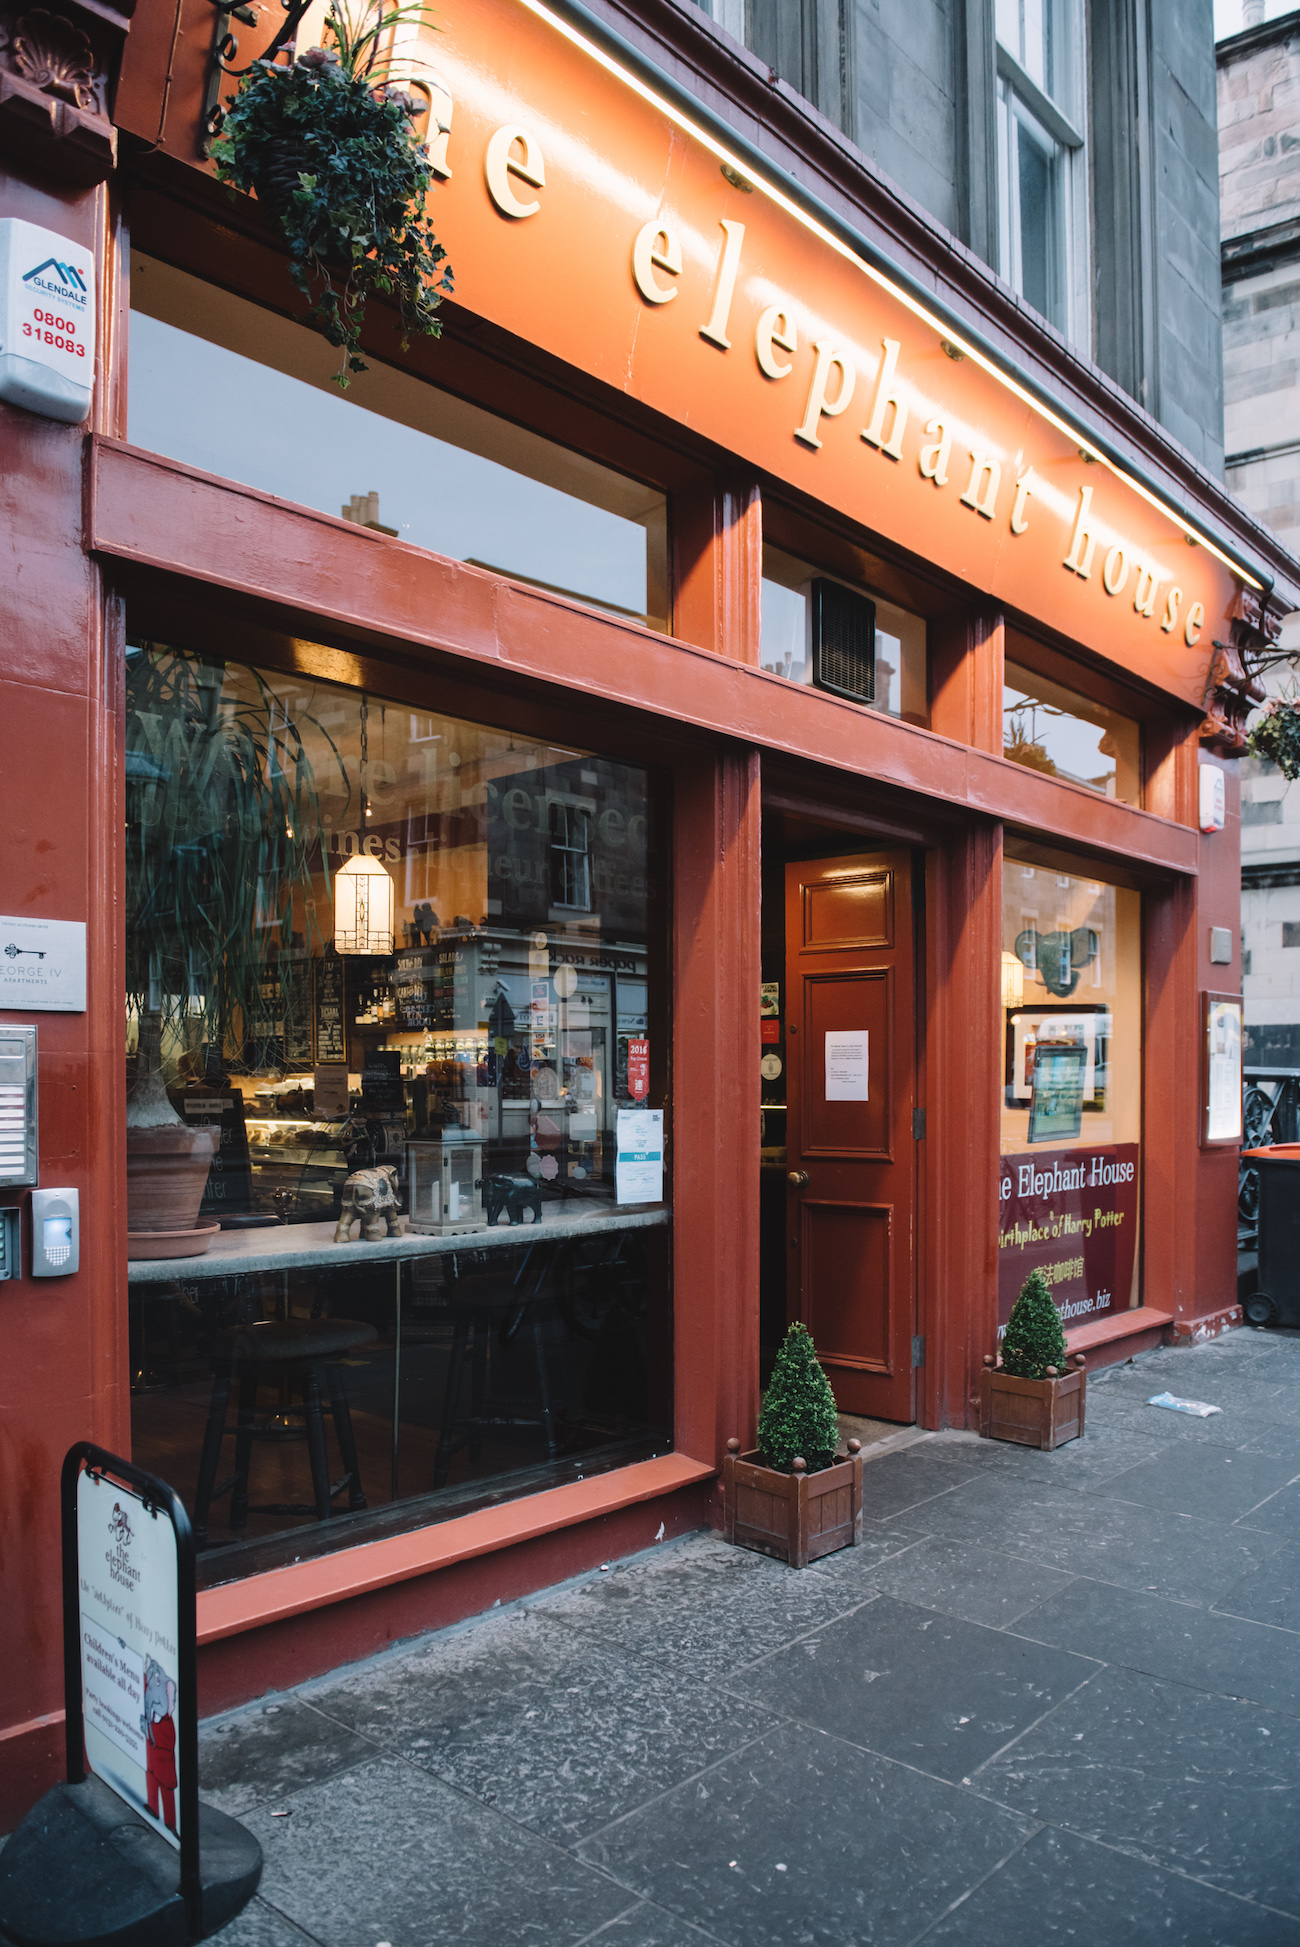
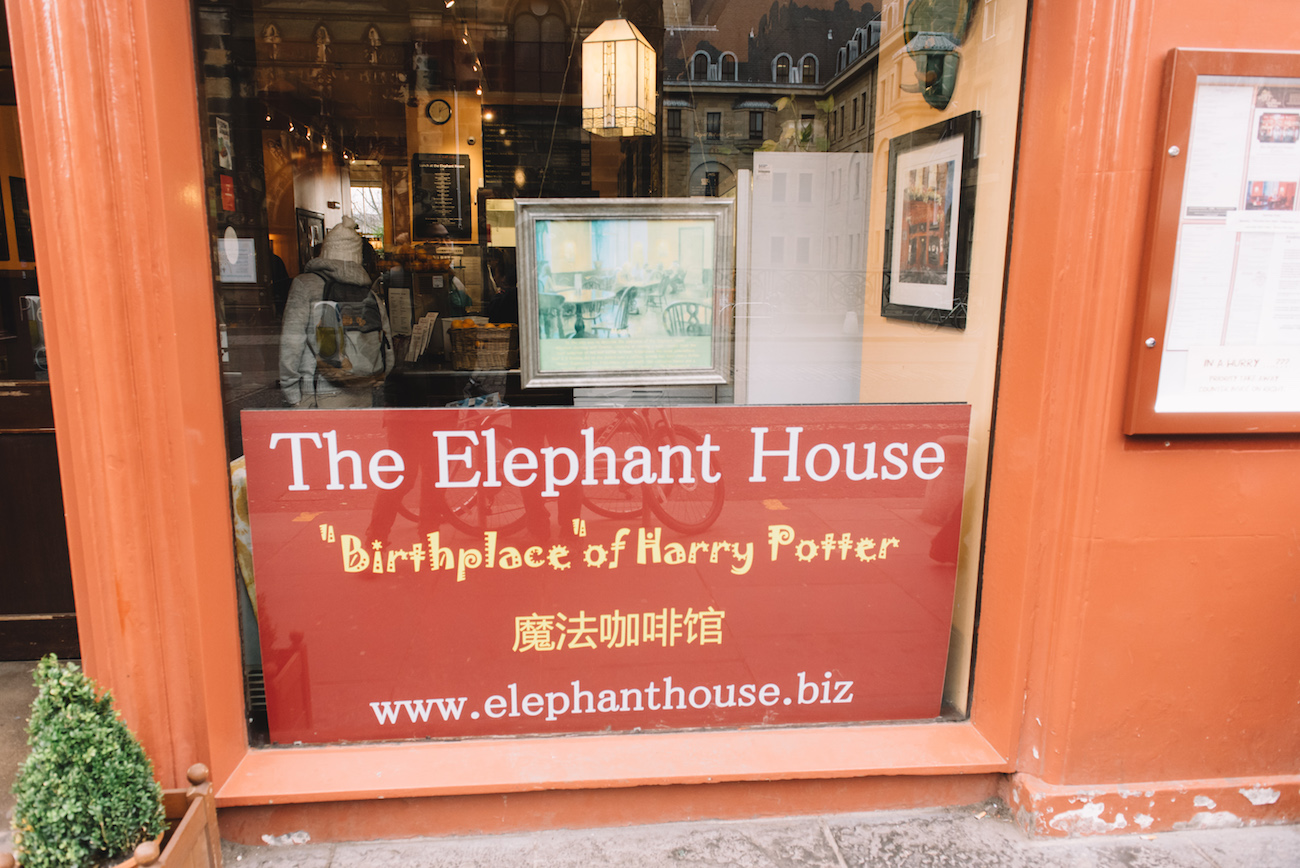
From the outside, the Elephant House looks like an ordinary coffee house. But if you look at the signs carefully, you’ll see it says “The Birthplace of Harry Potter.” This coffee house is where JK Rowling would be writing “Harry Potter” on their napkins in the back room with views of the Edinburgh Castle. Just don’t expect anything wizarding decor or magical themes; it still looks and operates as an ordinary coffee house serving ordinary (but good) coffee and food. There’s also a Harry Potter “grave” nearby, where you can visit the graves of all of the deceased characters.
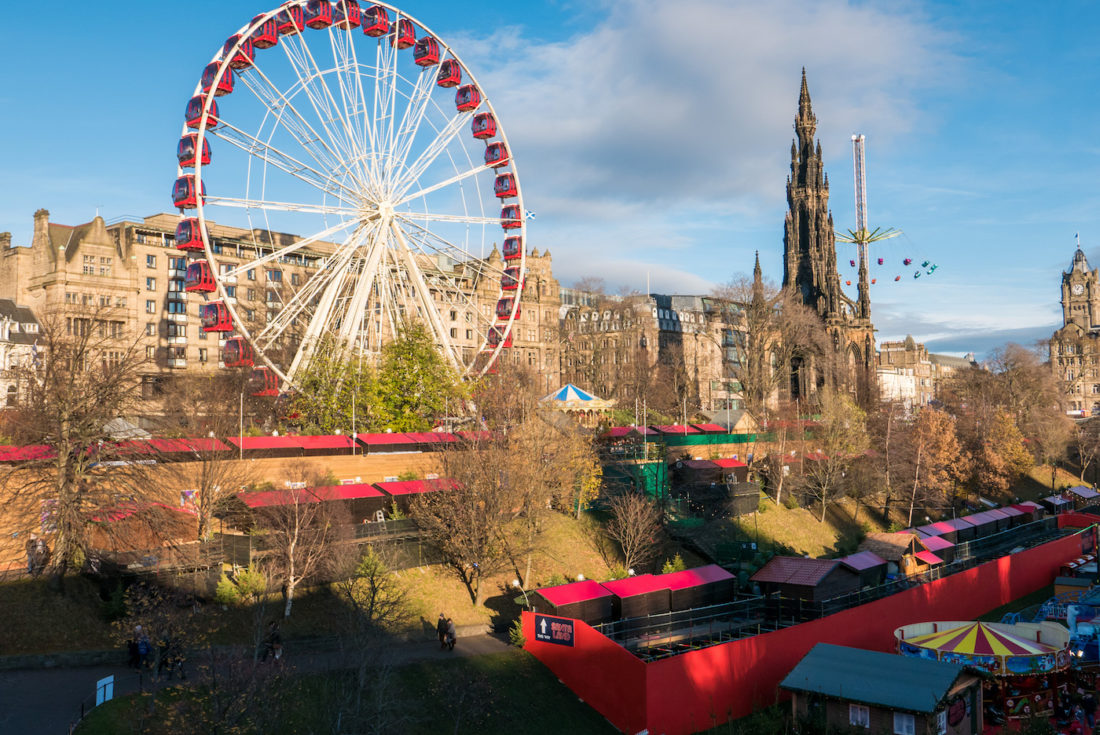
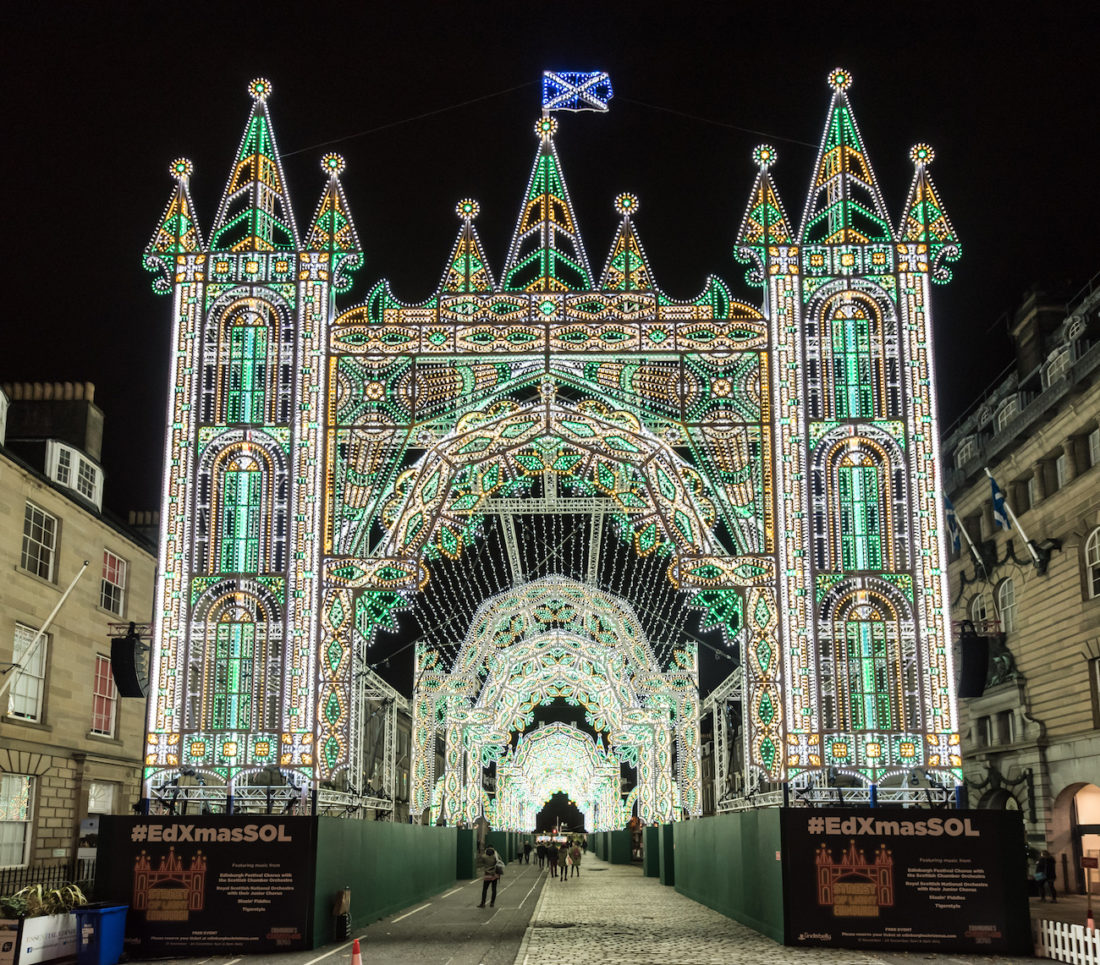
Obviously, this depends on when you decide to visit Edinburgh, but if you happen to be visiting around November or December, you can delve into the festivities the city has to offer. There are many holiday-themed events and shows throughout Edinburgh, as well as various Christmas markets where you can spend plenty of time shopping, eating, and enjoying a family outing.
Here are also a few things didn’t do but you can add to your list:
Holyrood Palace
Camera Obscura and World of Illusions
Calton Hill
Climb to the top of Scott Monument
What other activities would you recommend in Edinburgh? Let us know in the comments and if you like this post, give us a pin below!
Scotland is best known for many things, such as beautiful landscapes, castles, and producing the finest scotch whisky. But if you had to guess what was Scotland’s most visited attraction, what would you guess? Maybe the country’s stunning landscapes? Perhaps one of the country’s spectacular castles? Or possibly Loch Ness where “Nessie,” the infamous Loch Ness Monster, was allegedly sighted? Actually, it’s none of those answers; many would be surprised that the most visited attraction in Scotland is really the National Museum of Scotland in Edinburgh.
There are several reasons why the museum is the most visited attraction. For one thing (and maybe the biggest thing) is the museum is completely free! Yes, you read that right, FREE!! It’s funded through the lottery and donations, thus no charge is required. Any free activity is a good activity in my book!
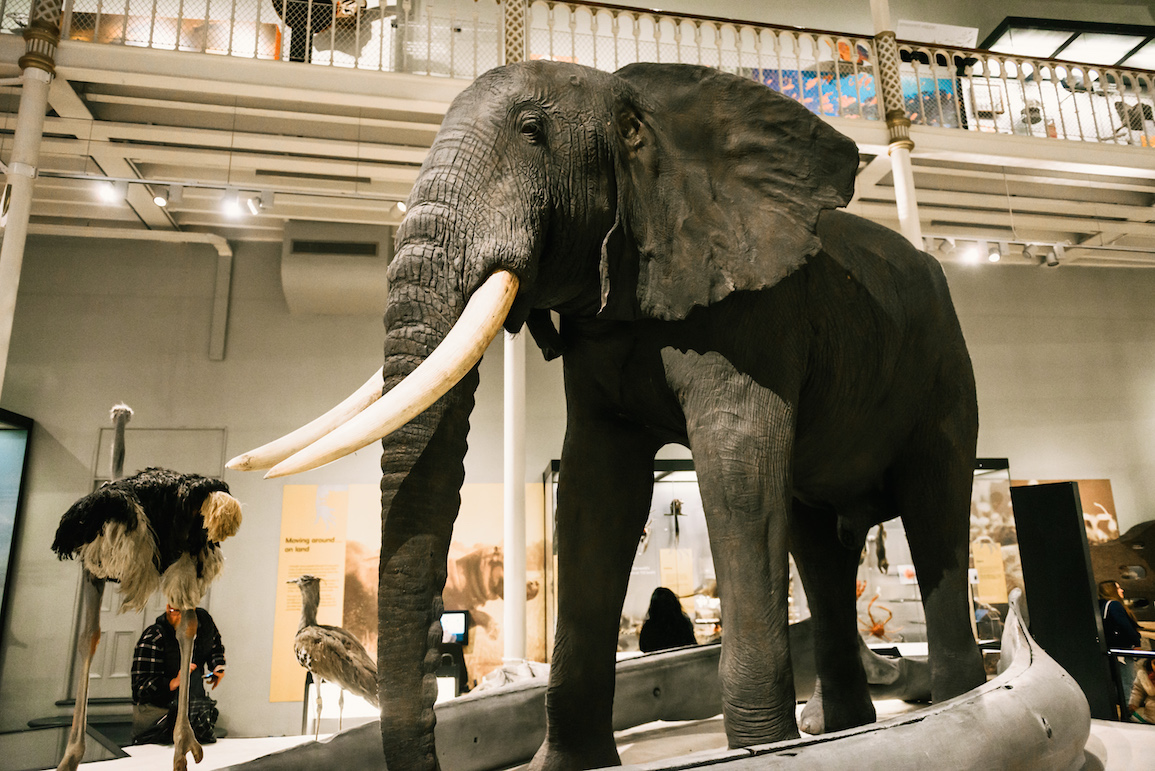
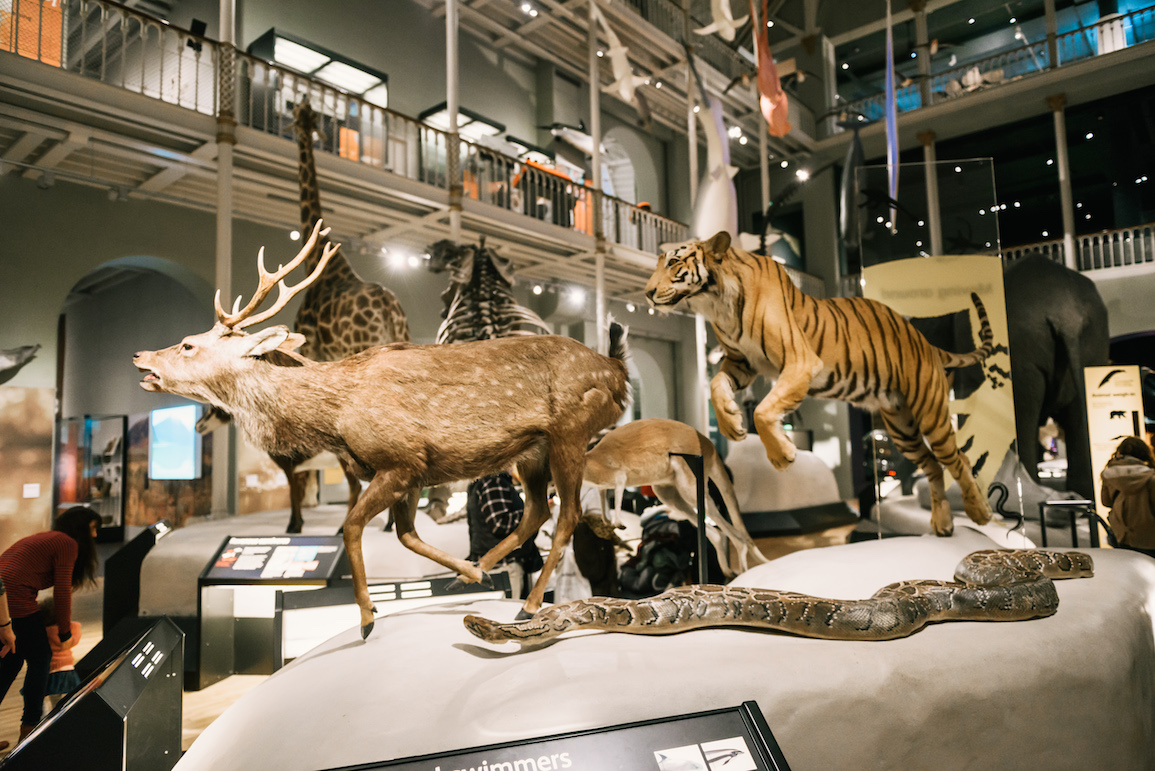
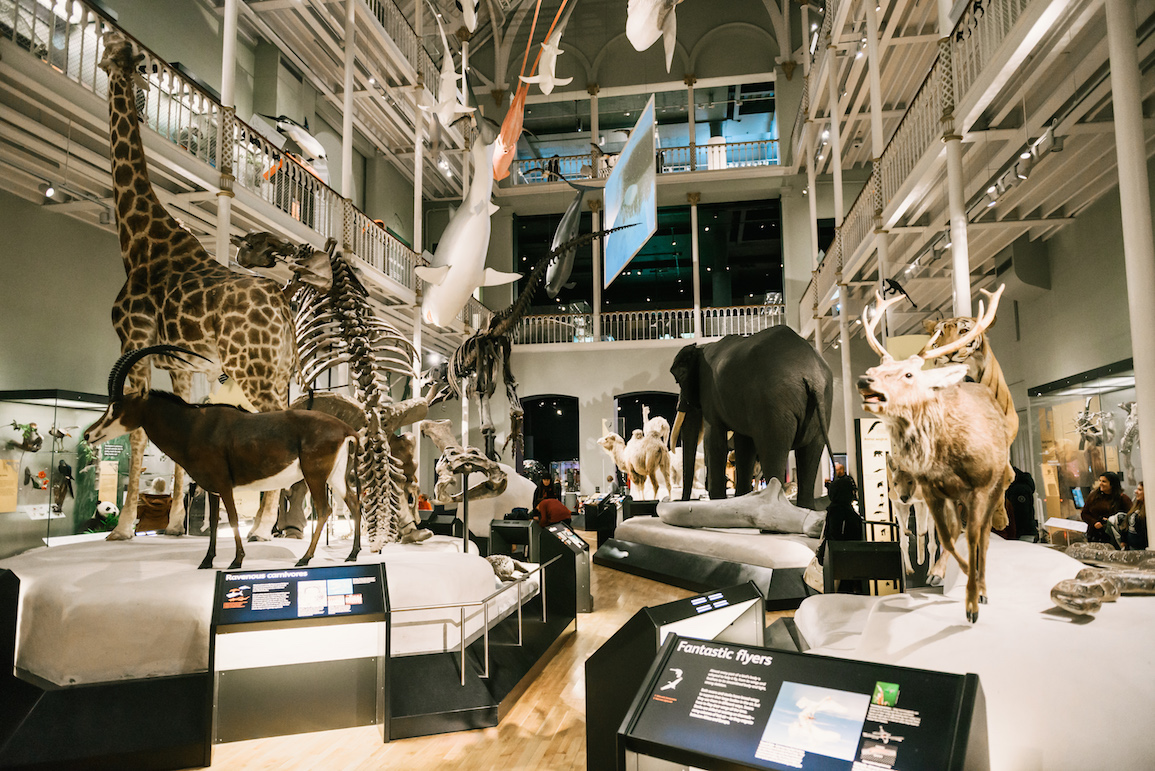
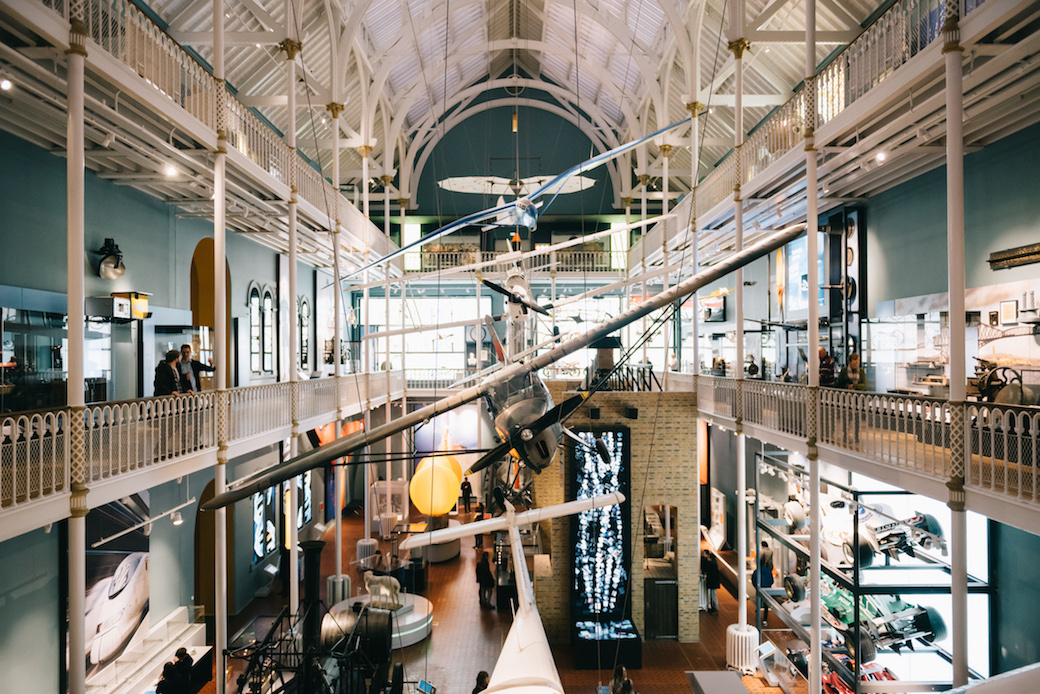
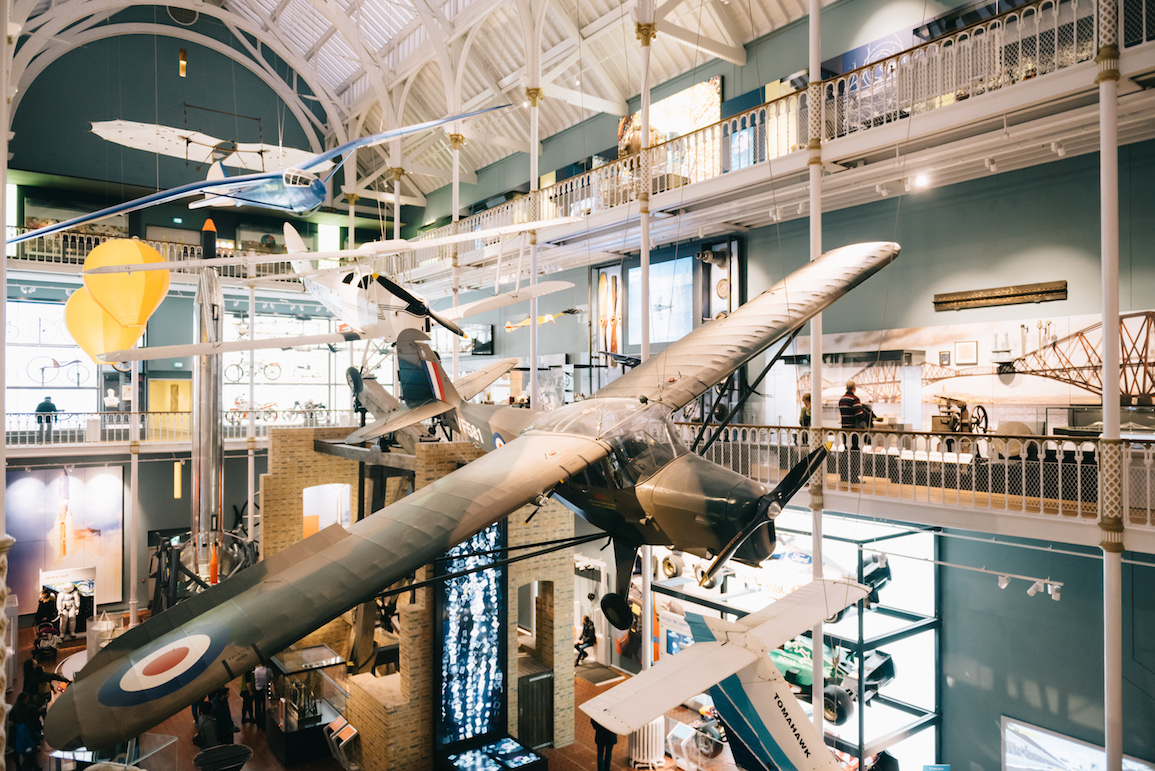
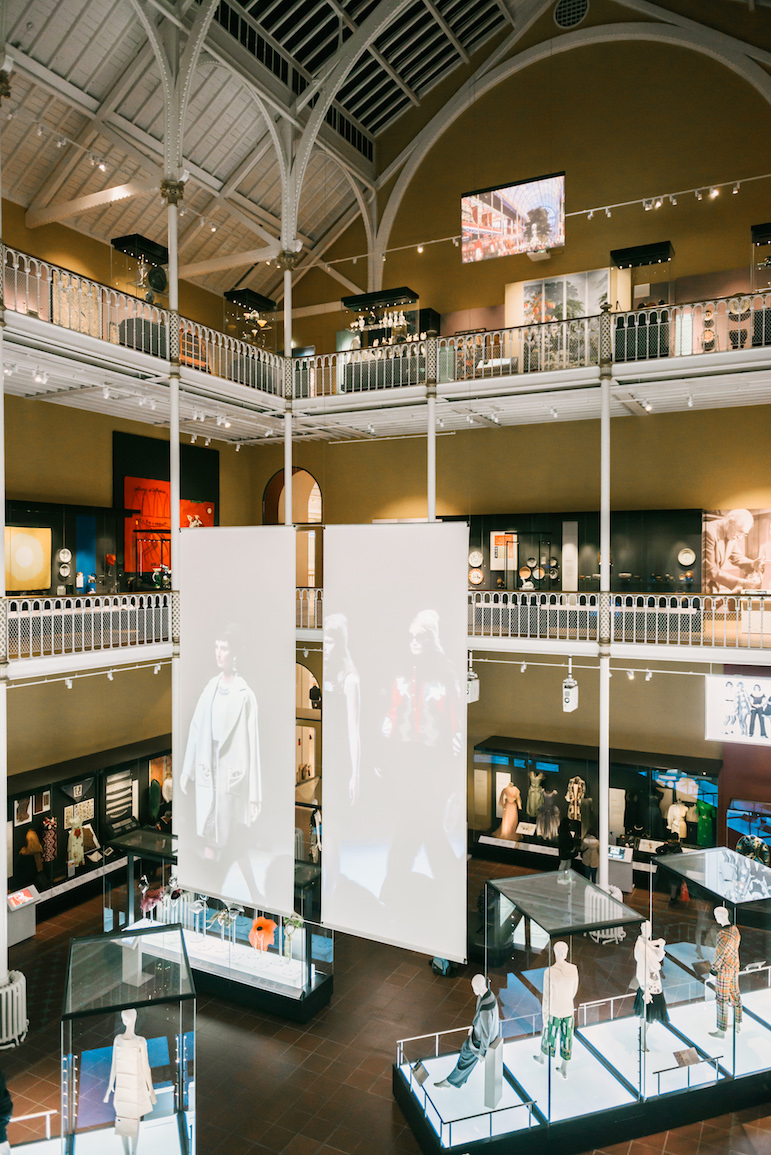
Aside from being free of charge for admission, the National Museum of Scotland also houses an impressive collection of exhibits of numerous major subject matters, including biology, geology, astrology, fashion, technology, architecture, aviation, world history, arts, Scottish history, and much more! Even the museum itself has architectural and historical significance being over 230 years old! For all the museums I’ve visited, I don’t remember any of them covering such a broad range of topics so I am amazed at content the museum provides.
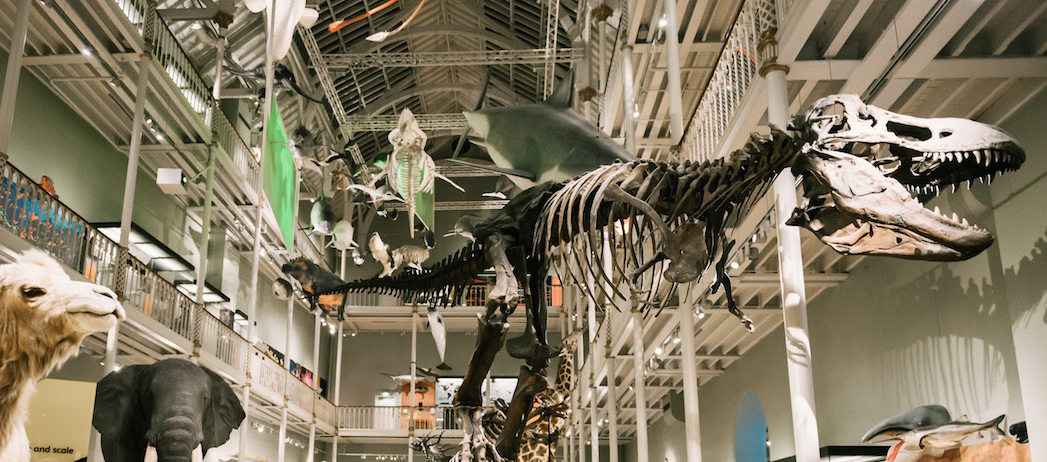
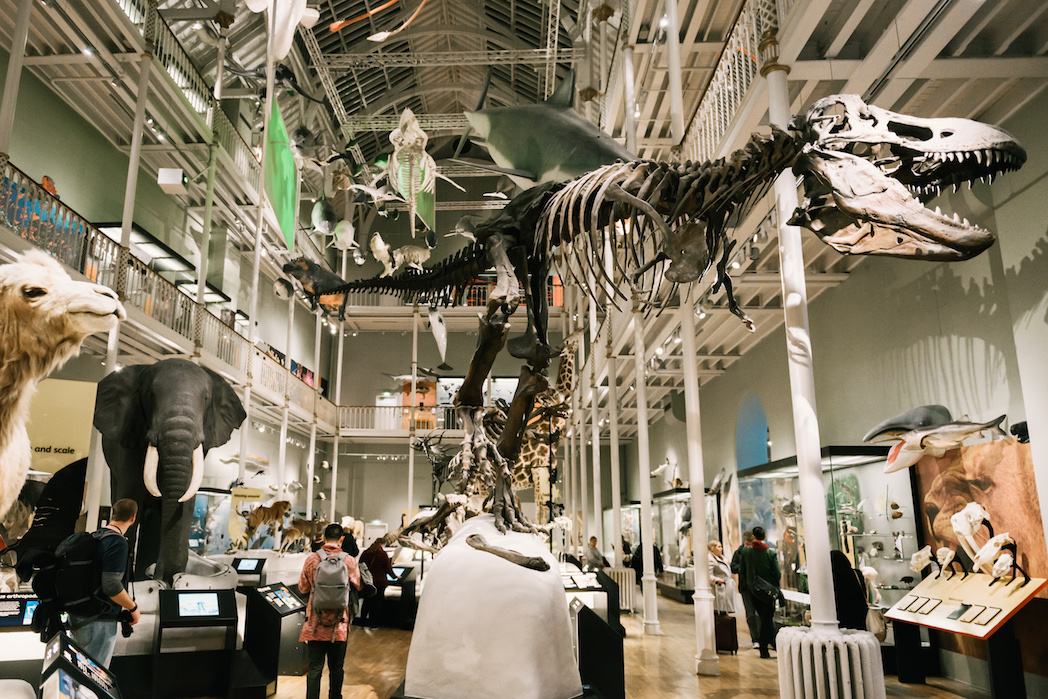
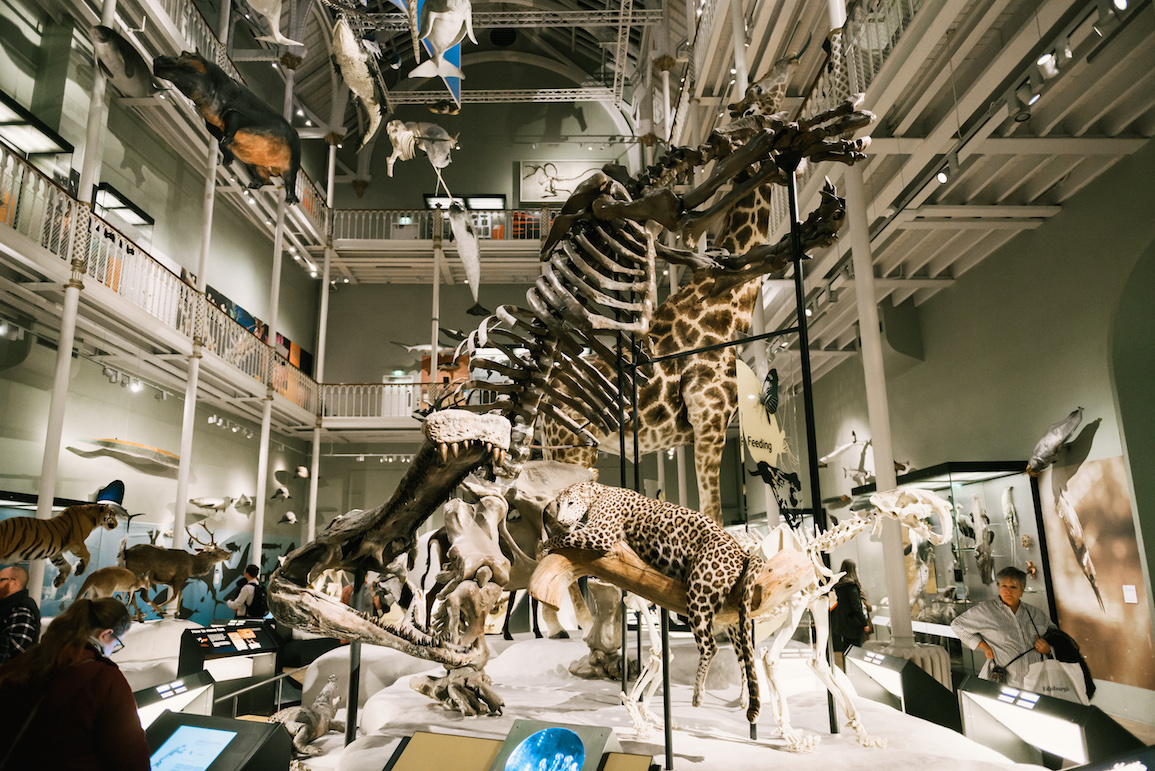
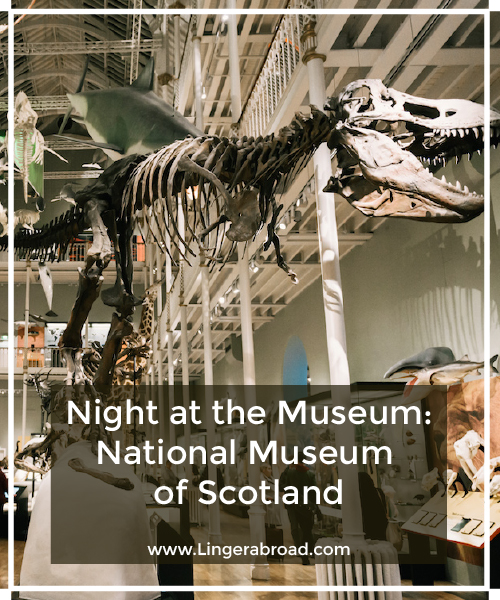
We visited the museum during the late afternoon, which was already getting dark by then, and the first exhibit we went into was the animal world exhibit, which was easily my favorite since I love animals. If anyone has seen the movie series, “Night at the Museum,” you may remember that there’s a Tyrannosaurus Rex skeleton, named “Rexy,” that comes to life and acts like a dog. Well, when we walked into the exhibit, the first thing we came upon was a huge T-Rex skeleton. And for a moment I was hoping it’d come to life so I could play fetch with it (though there was that possibility of a not-so-fuzzy outcome either with a giant dinosaur skeleton with sharp teeth and claws).
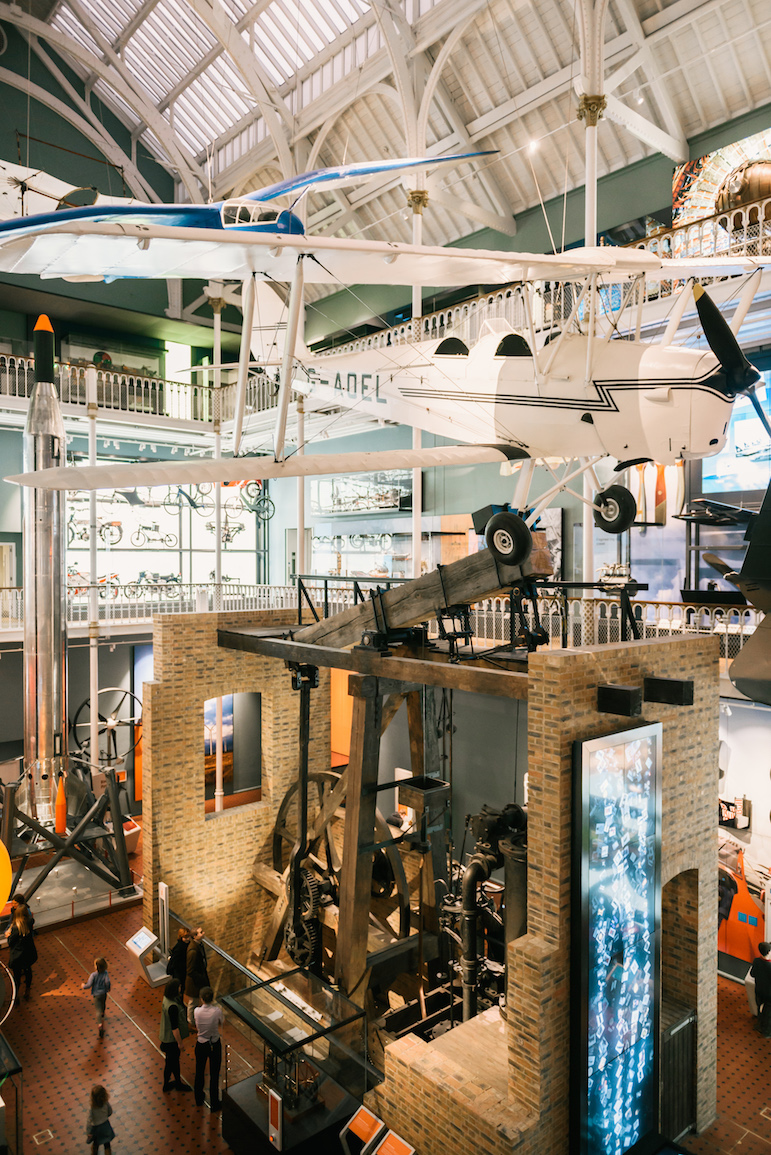
Beyond the T-Rex were other dinosaur skeletons before it moves onto animals in more modern times. The exhibit covers many animals groups, from mammals to reptiles, herbivores to carnivores, land animals to marine animals, and just about everything in between. You can also find the famous sheep, “Dolly,” which was the first ever cloned mammal (though in another exhibit). If you like animals, this is the place to check out!
Like many large museums, you would need several visits to adequately go through all of the different exhibits. Unfortunately, we didn’t have that kind of time so we only spent a little over two hours until closing time. We mostly just walked through the museum to see what other exhibits had but didn’t stay too long in each one.
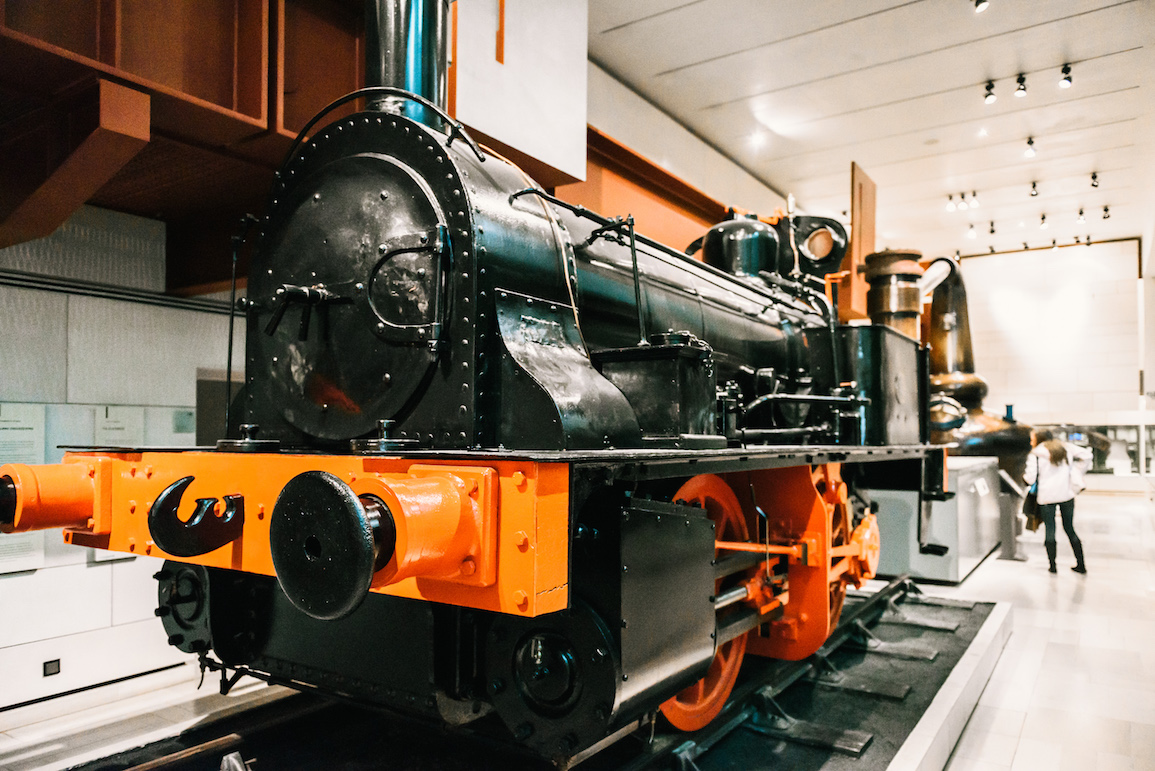
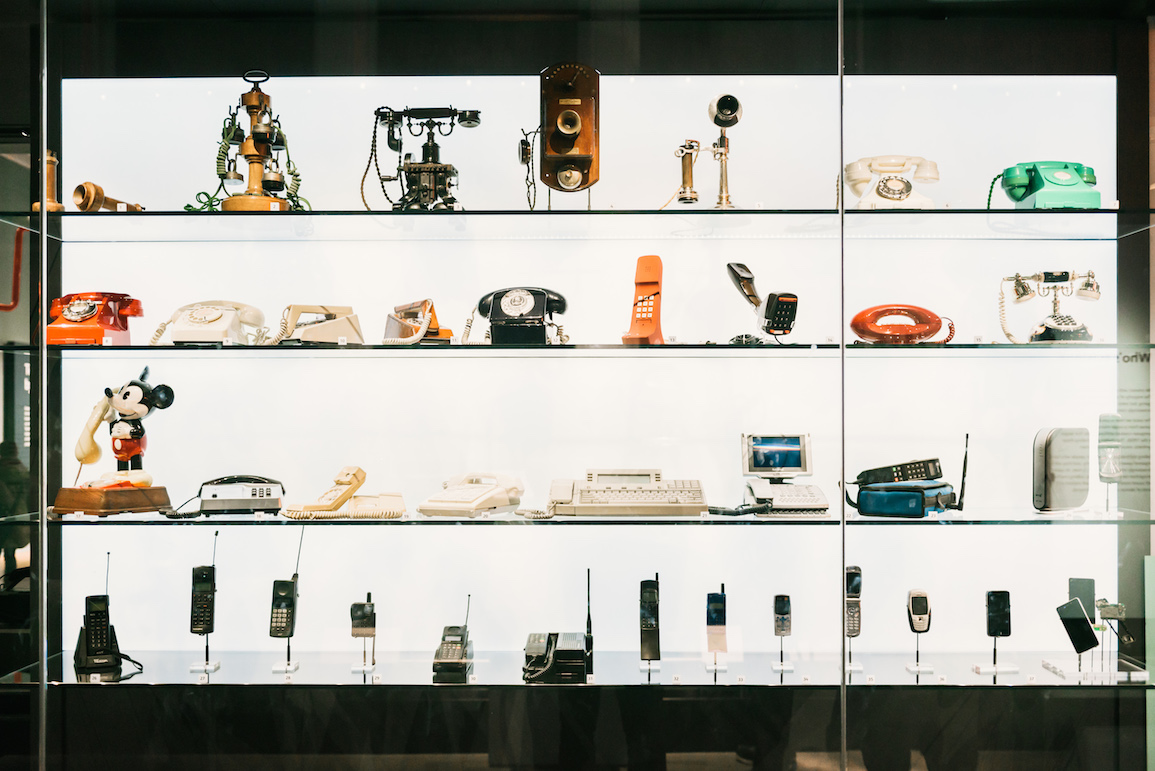
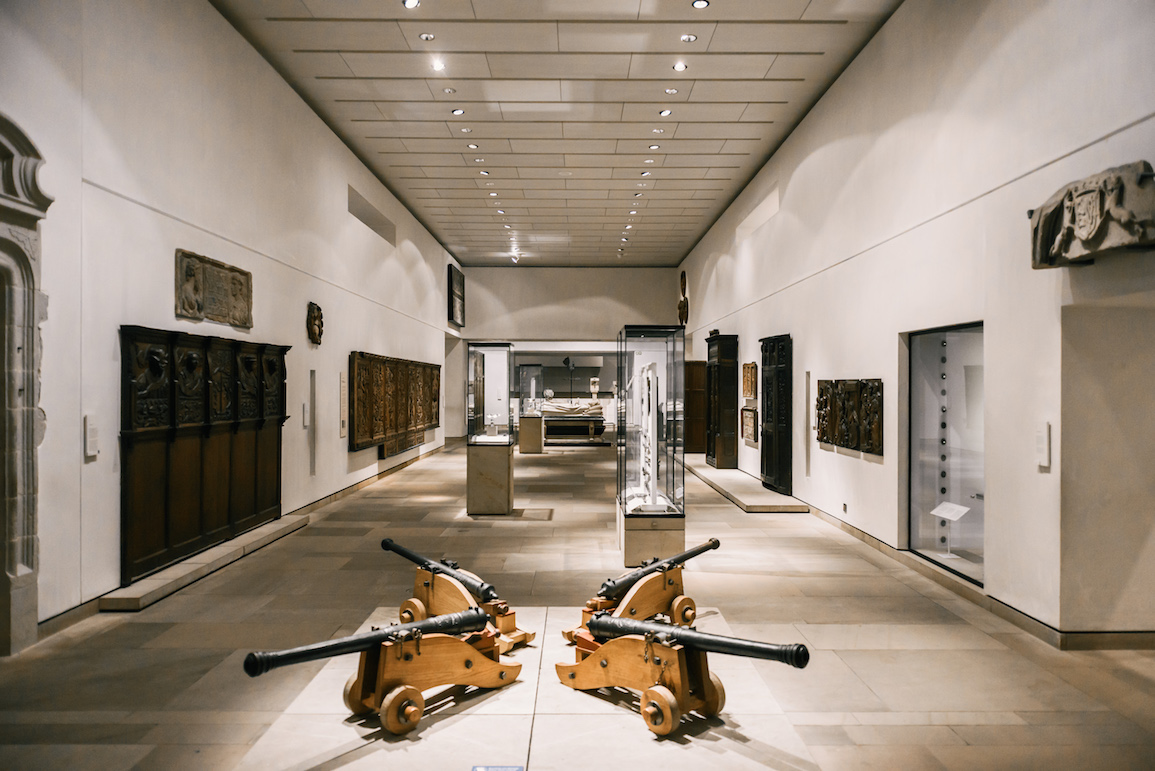
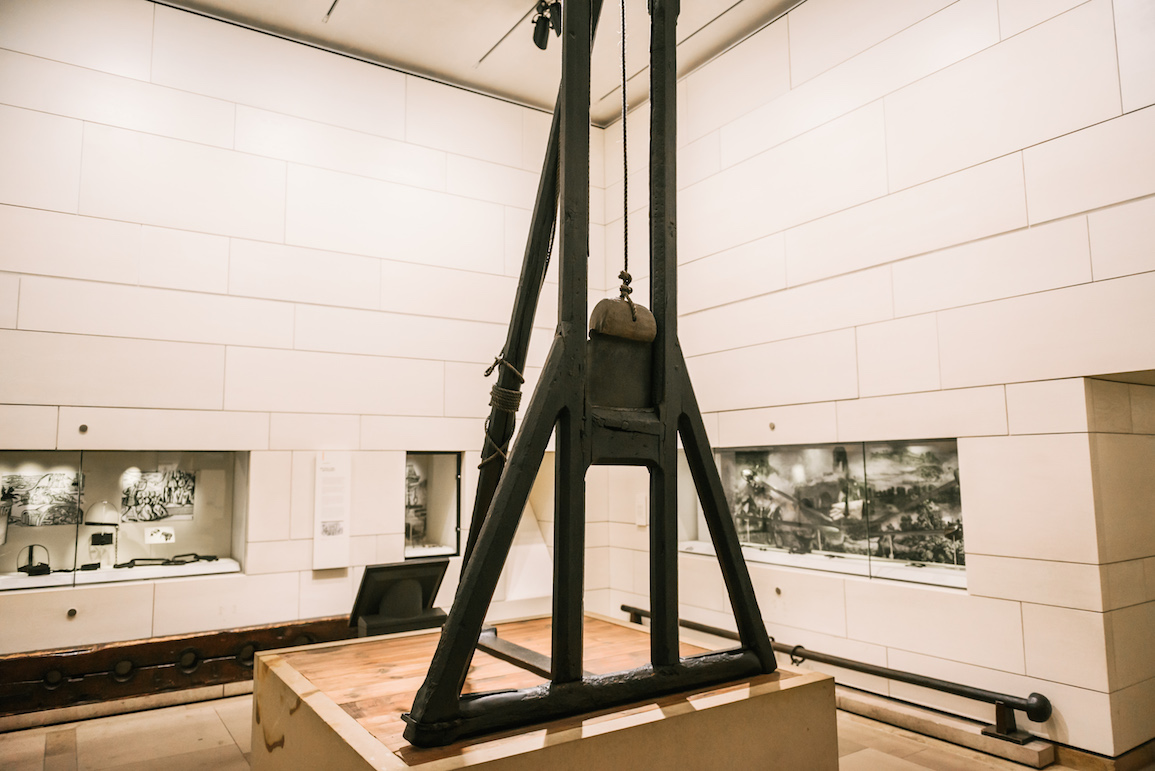
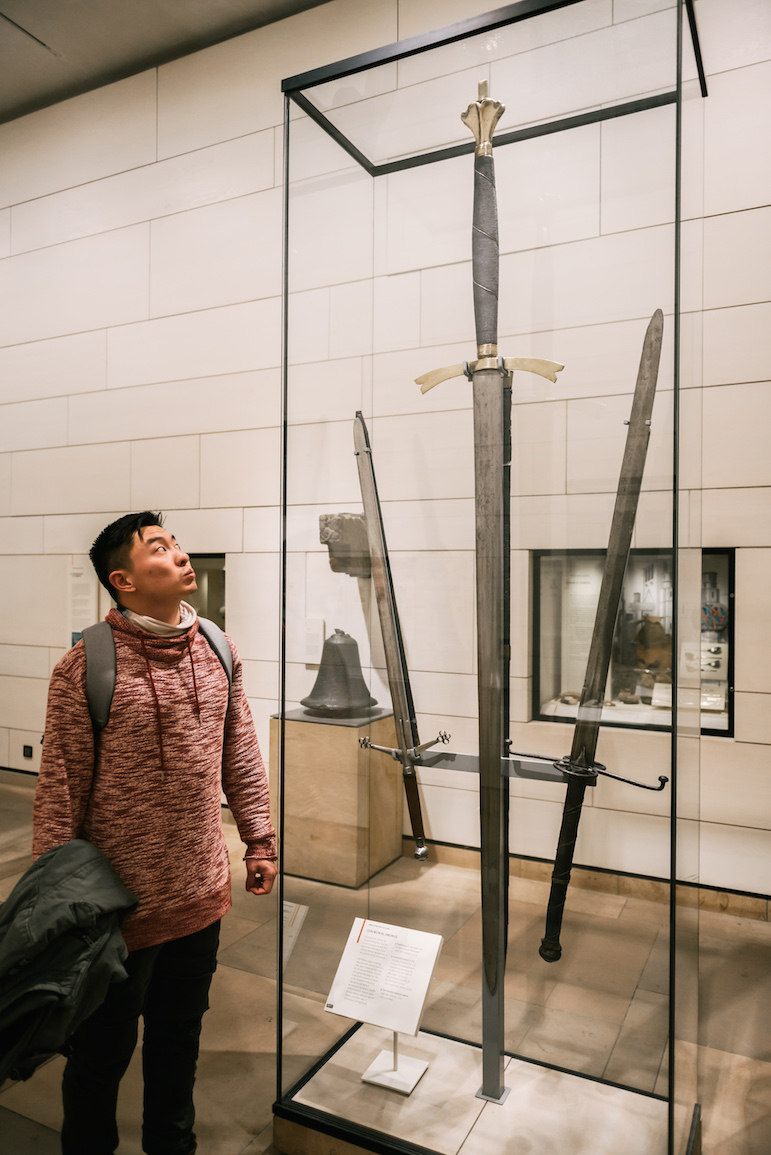
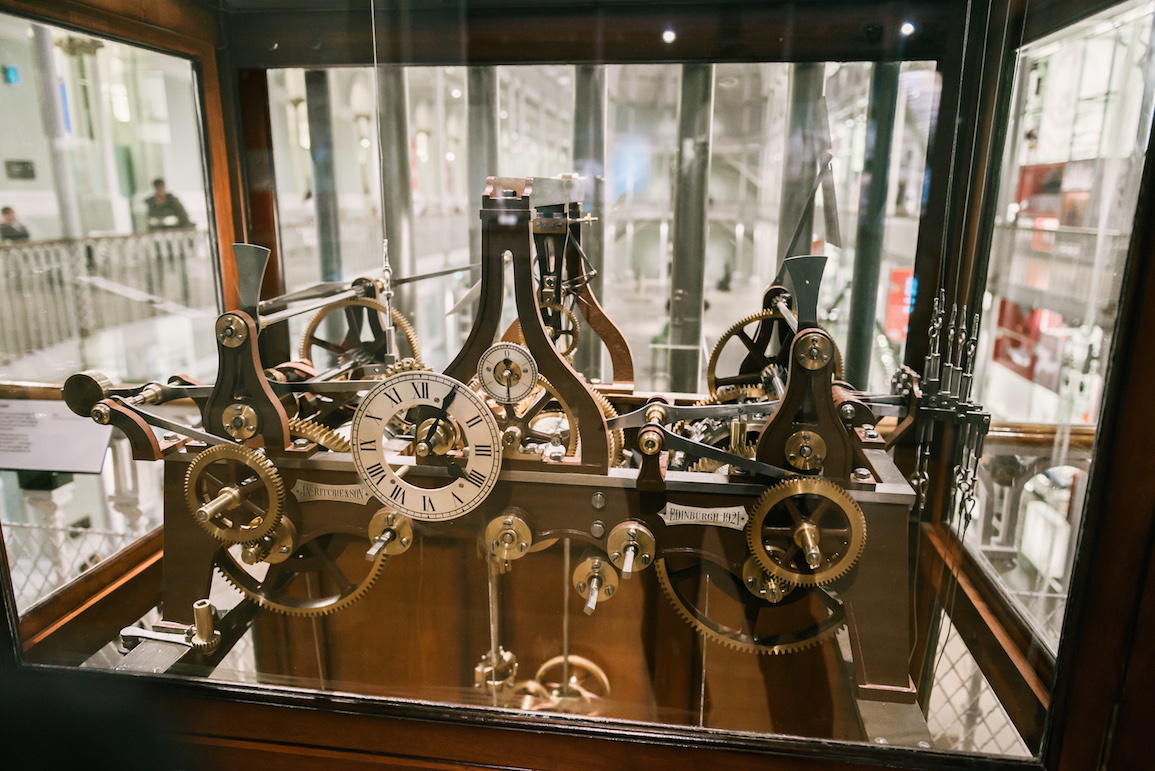
The only other exhibits we spent a bit more time were the technology and the Scotland history exhibits. The technology exhibit is really fun with many interactive pieces and displays ranging from planes, automobiles, locomotives, computers/phones, and other technological advances. I also liked the Scotland exhibits which go through the country’s history and has many historical artifacts on display, such as giant ceremonial swords and the “Maiden,” which is a guillotine used during executions.
The Evolution of Phones
The Maiden (Guillotine)
That is a huge sword!!
Fashion Exhibit
So, if you’re looking for a fun and free activity to do in Scotland, be sure to make a visit to the National Museum of Scotland in Edinburgh. Just don’t expect things to come to life like in the movies! Let us know what exhibit you would be excited to check out in the museum and be sure to visit their website for more information: http://www.nms.ac.uk/national-museum-of-scotland/
When you’re are visiting Iceland, you’re probably most interested in the variety of incredible landscapes or the Northern Lights. During your visit, however, you also need to eat/drink and find places to stay. Well, there are plenty of places to stay and more places to dine and drink. Icelandic cuisine offers a variety of delicious options that will satisfy your taste buds, these can come at a price if you don’t plan carefully. Iceland can be notoriously expensive, so you probably will need to budget a little bit so you don’t go overboard.
During our visits to Iceland, we wanted to try some Icelandic cuisine and do some activities while also staying within our budgets. It was a fine line to walk, but we had a pretty good balance and got to enjoy a little bit of everything. So, we put together a list of the places we stayed, dined, and also some tips at the end to help control your budget during your visit.
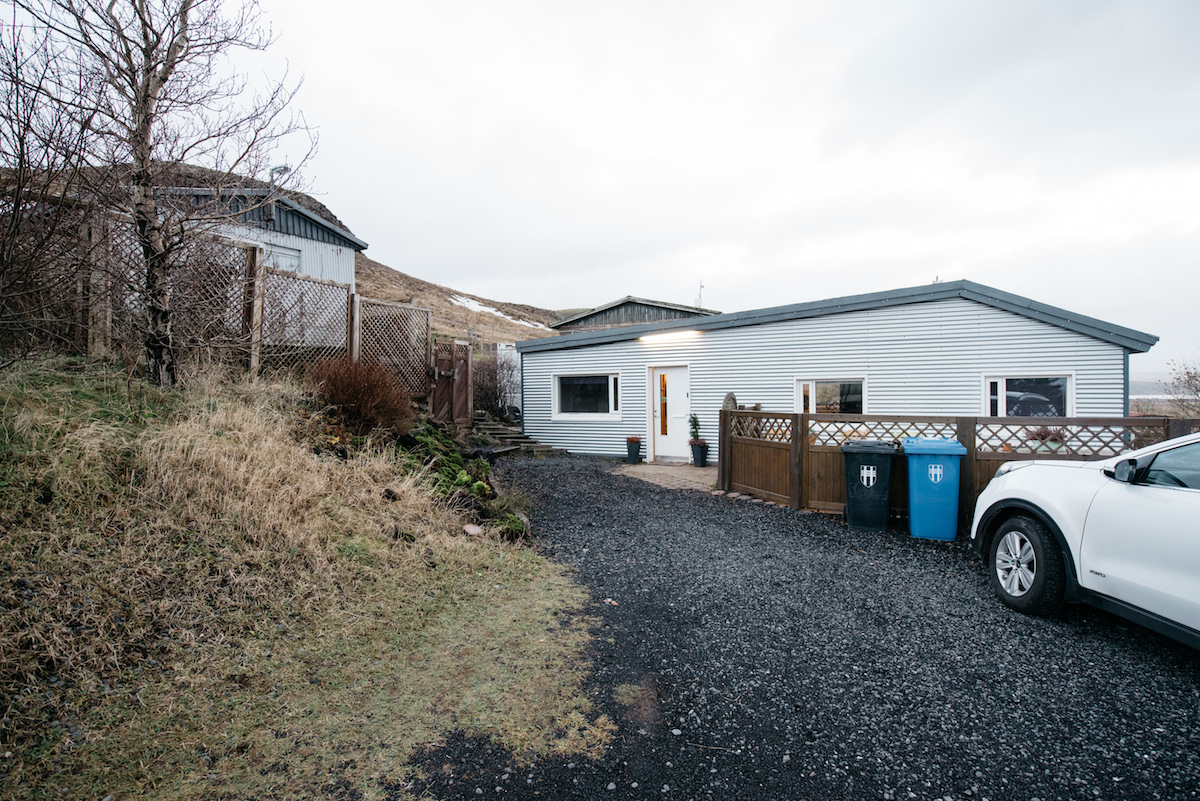
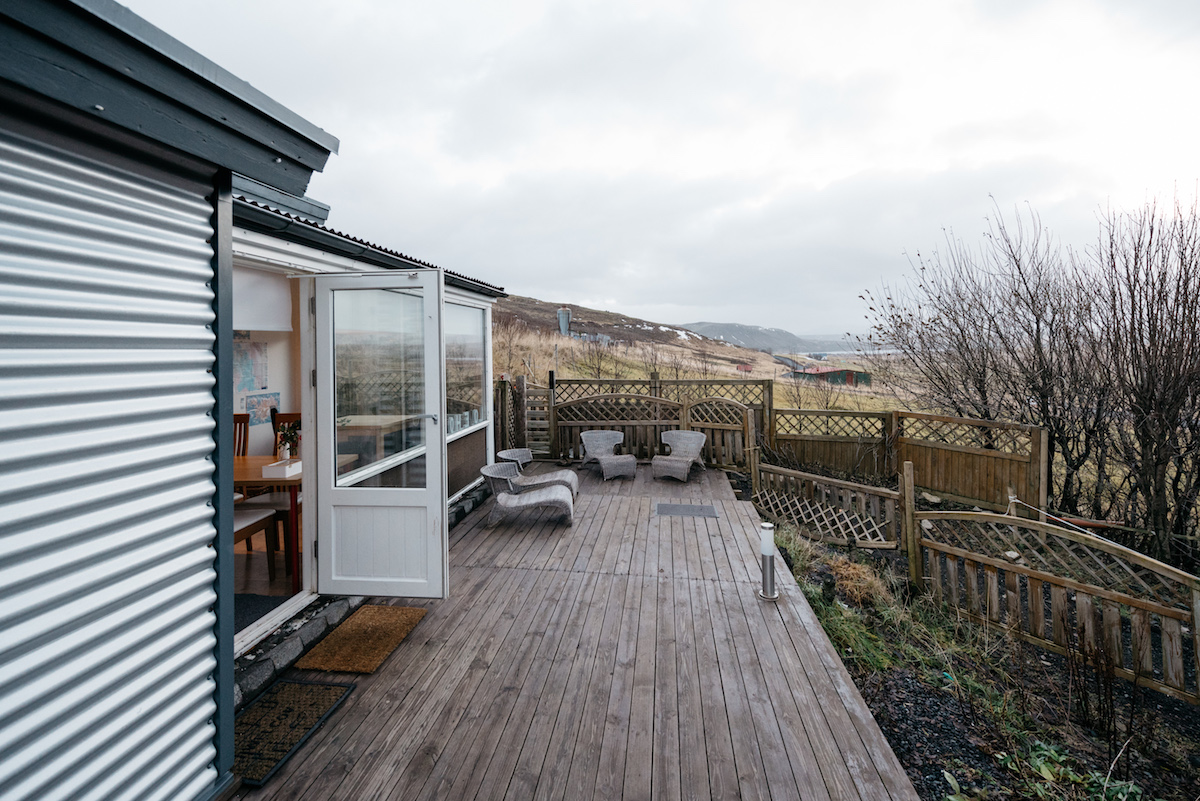
We stayed at this Airbnb just outside of downtown Reykjavik. At around $122/night for the three of us, it’s a great budget place. It’s a cozy single-story home with several bedrooms that each can be rented out, a full kitchen, and dining room. There is also horseback riding available with this Airbnb and other outdoor activities, and it’s in a good location to see the Northern Lights.
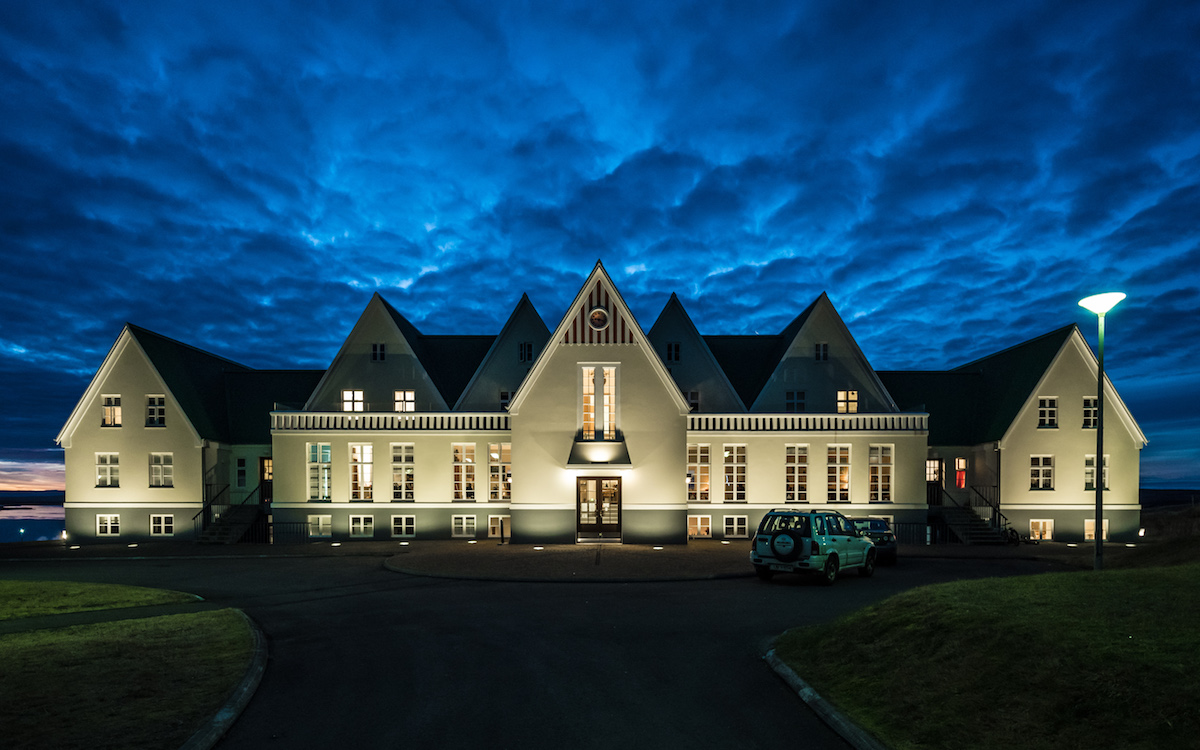
Laugarvatn is a small town that’s perfectly located near several main attractions, including Pingvellir, Geysir, and Gullfoss. While you’re here, you can stay at the Heradsskolinn Boutique Hostel. Starting as low as $90/night, the hostel has just about everything you need, from a mini-restaurant, reading area, entertainment room, and the front desk can help arrange nearby activities. It’s also right by the Laugarvatn Lake and you can check out the geothermal spa, Laugarvatn Fontana.
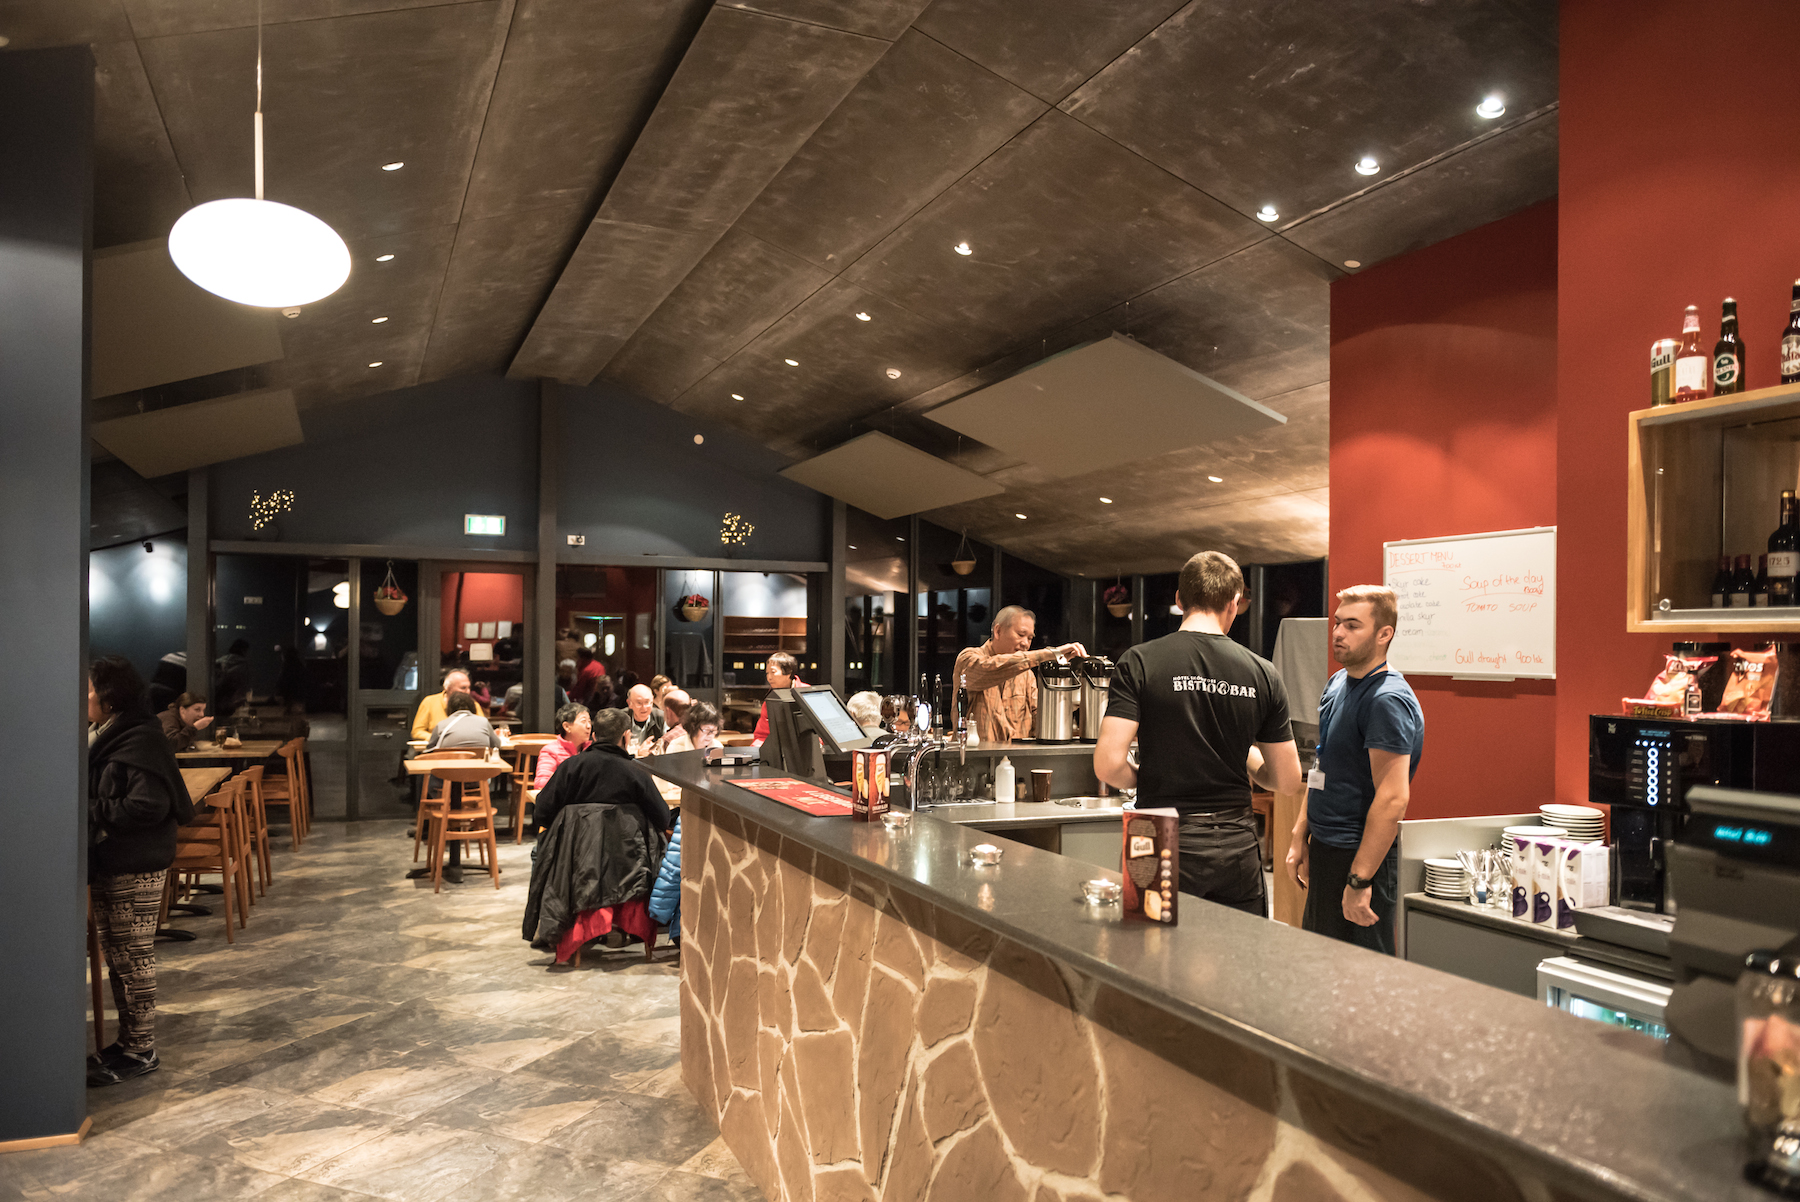
Literally right next to the Skogafoss waterfall is Hostel Skogar. We paid just over $100 for a 3-bed room, which is pretty much all it had. It’s definitely not fancy, but we could sleep, had Wi-Fi, shared bathrooms, and there was kitchen if you need to cook. There is also the Hotel Skogafoss Bistro Bar right next to the hostels, which has pretty decent food and drinks, but is a little pricey if you’re on a budget.
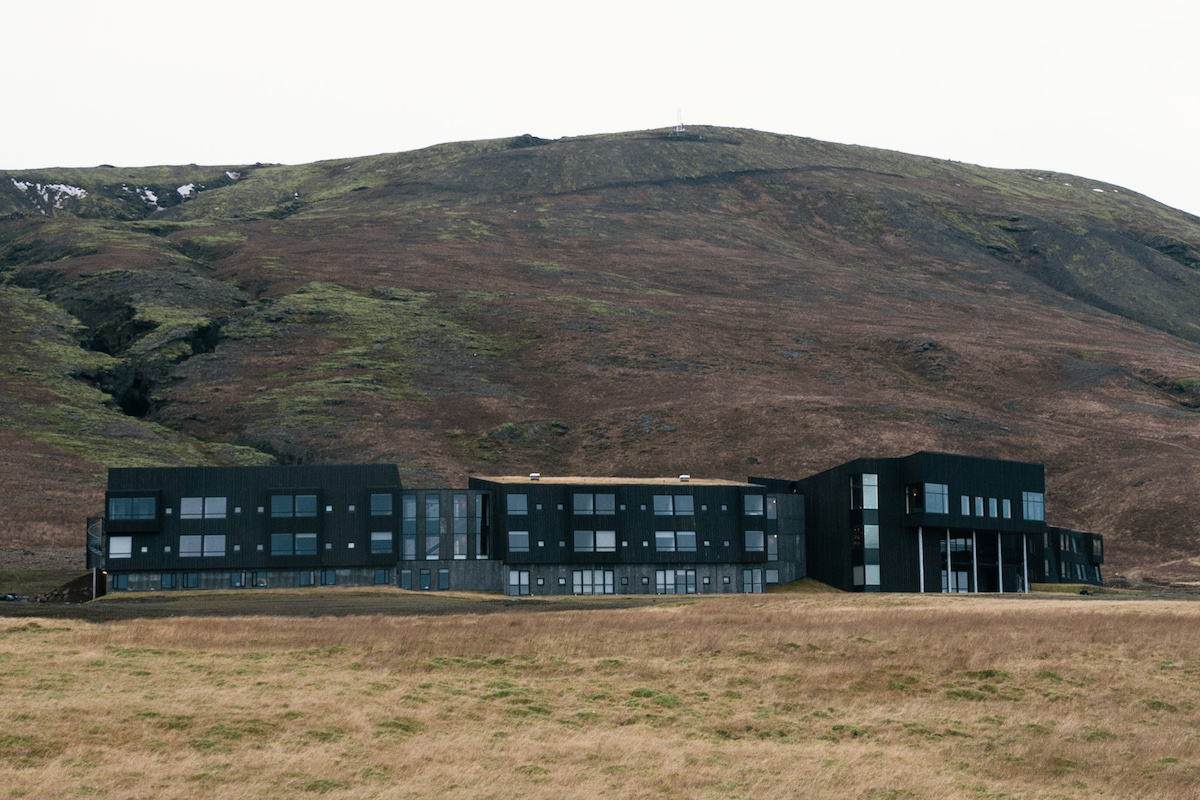
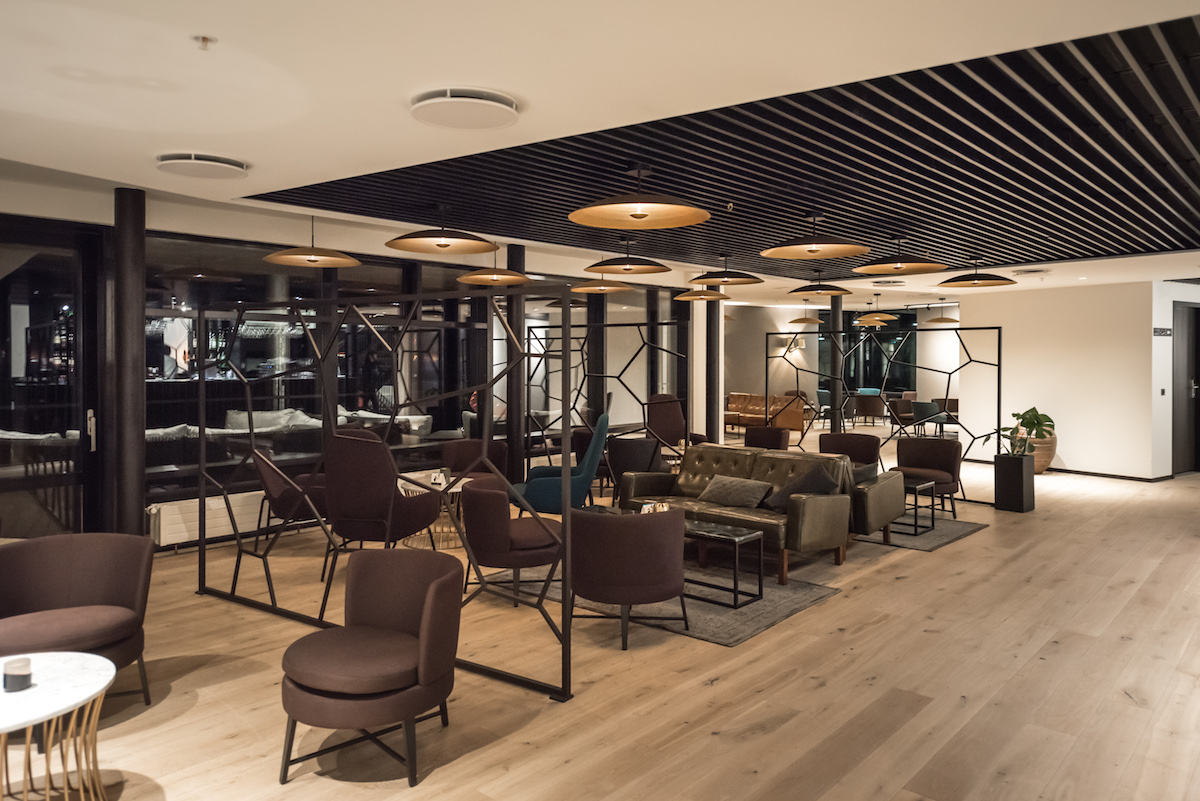
If you want to enjoy a bit of luxury, then check out the Fosshotel Glacier Lagoon. Although it’s expectedly priced higher than a hostel, it’s still relatively affordable. You can find prices ranging around $170-240 on most nights. The hotel has modern and contemporary touches throughout. There is also a bar that has happy hour and a restaurant, though menu prices were pretty expensive and we did not eat there. We did get a complimentary buffet-style breakfast and that was pretty fantastic. It’s also located close to Hof and Jokulsarlon Glacier Lagoon, so it’s a good place to rest after the long drive from west Iceland.
Bringing back one of my favorite places to eat, which is Cafe Loki. Located right across the Iceland church, Hallgrimskirkja, you can enjoy some of delicious traditional, Icelandic dishes. It’s not really the budget place to eat, as prices can range from $15-30 a person. But it’s homemade food with fresh ingredients and unique flavors. And if you’re adventurous enough, you can try their fermented shark (not very pleasant but it’s an Icelandic tradition).
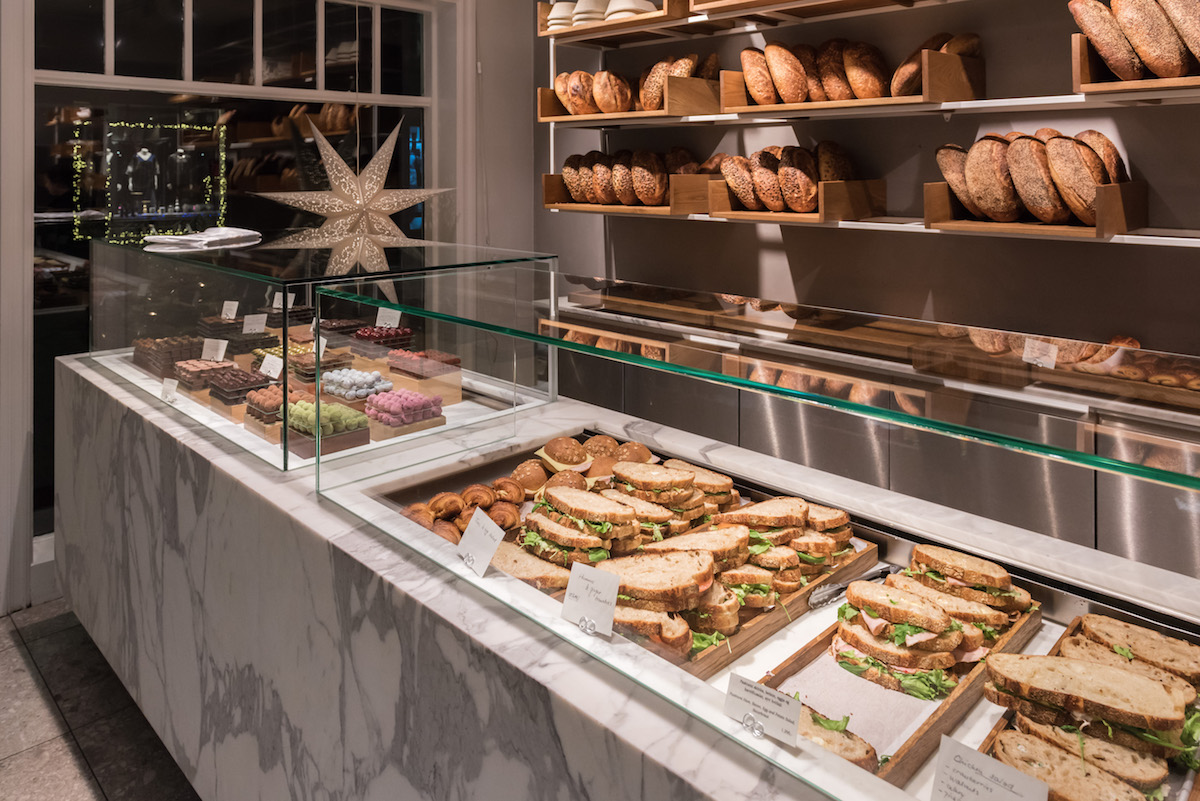
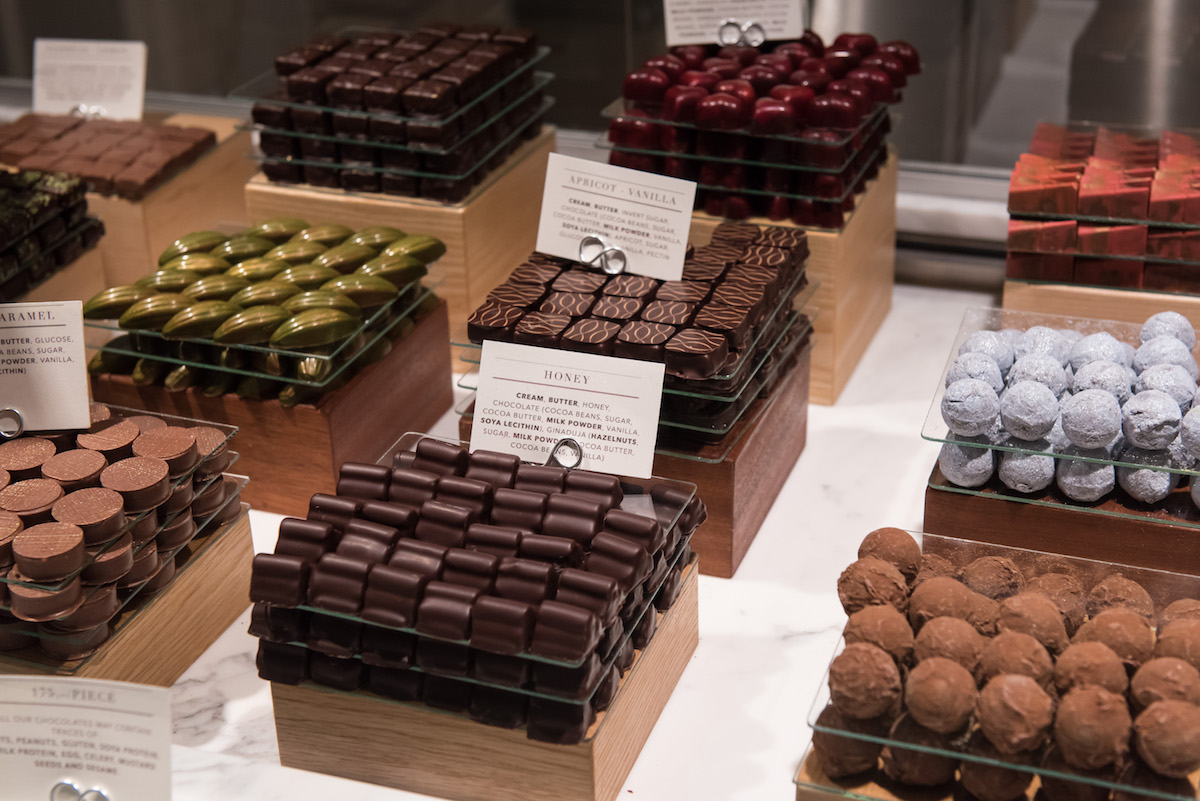
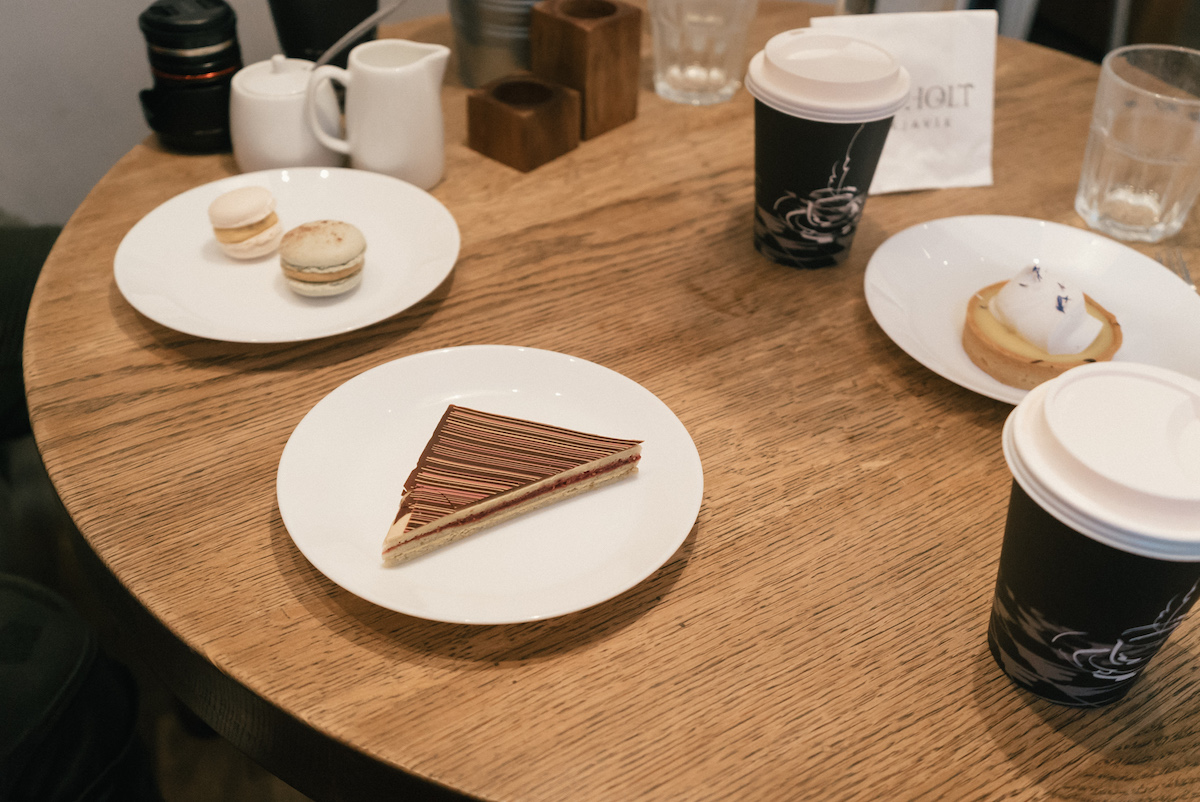
If you want the best hot chocolate in the world (in my humble opinion), you’ll have to check out Sandholt Bakery! I’m pretty serious, IT’S THAT GOOD, and you’d be hard-pressed to find me rave about something like hot chocolate! Will it run you about $6? Perhaps…but it’s totally worth it!
Ok, aside from its amazingly awesome hot chocolate (sorry!), they also have breakfast/lunch/dinner menus, make artisan bread, sandwiches, desserts, pastries, chocolates, and other beverages. Though not that cheap, it’s not terribly expensive either, and they deliver exceptional quality and tasty food…and hot chocolate!!
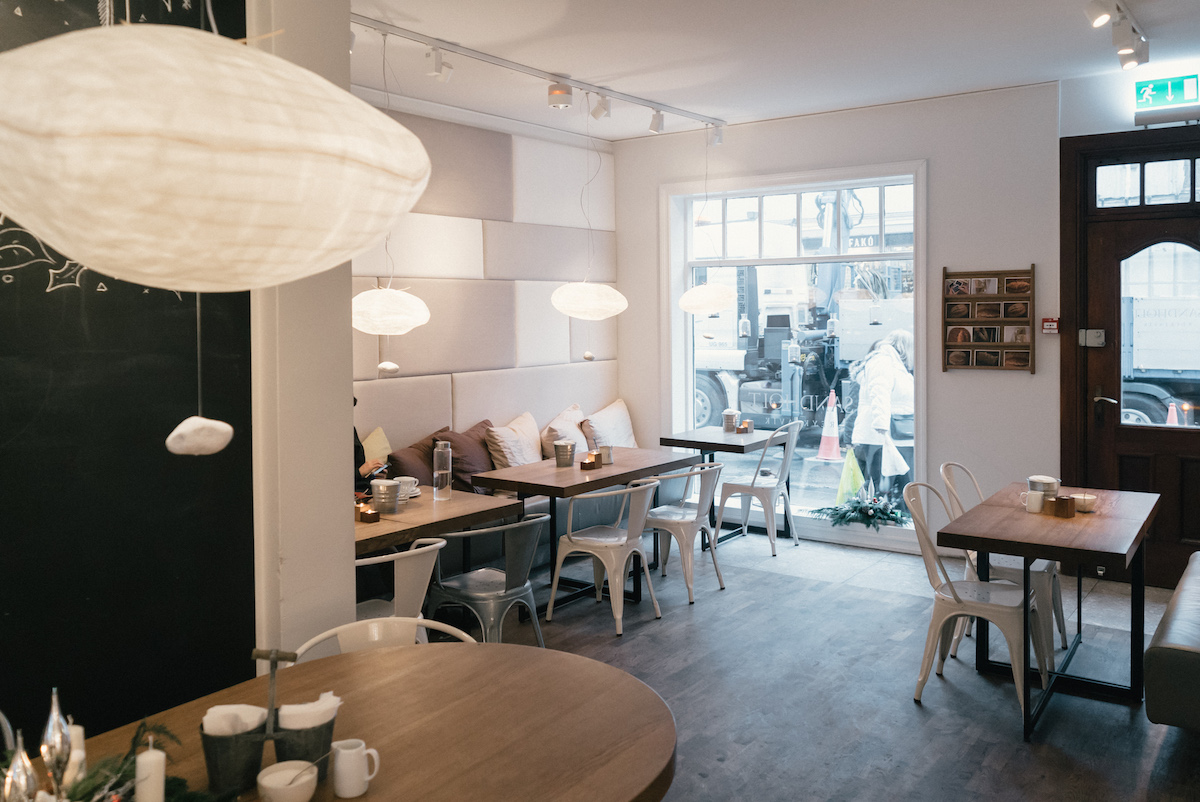
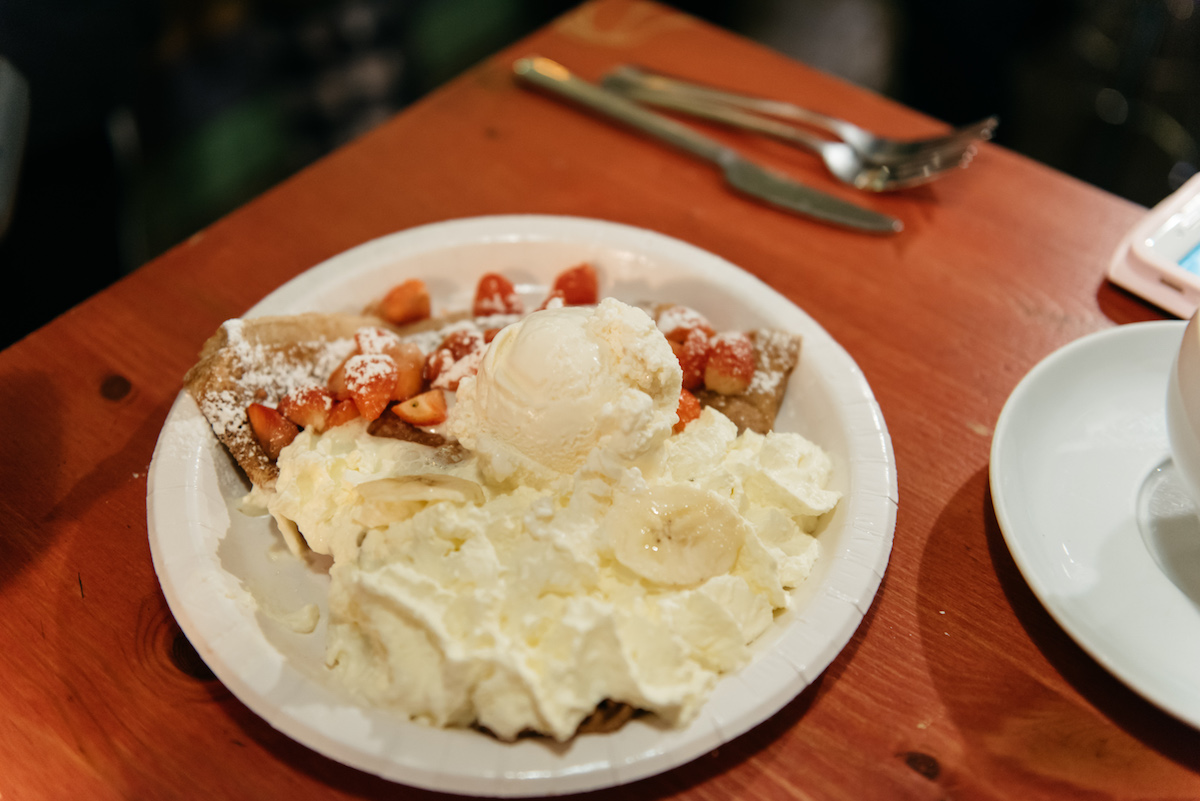
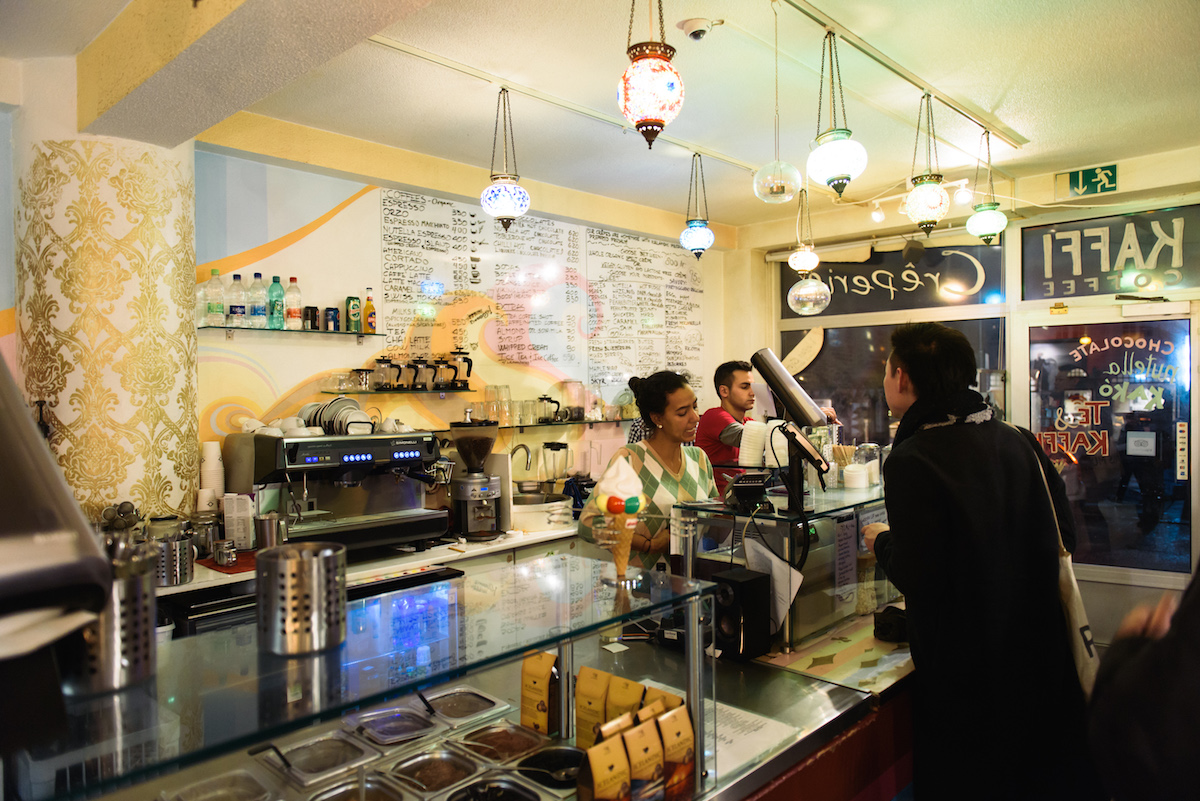
Another cafe to check out is Te & Kaffi, which also has good hot chocolate but is better known for its delicious crepes and ice cream. It appears to be a very popular place as even by closing time, it was still jammed pack with people. There are so many combinations for crepes to choose from; you can’t really go wrong with what you pick, but they all also look really good!
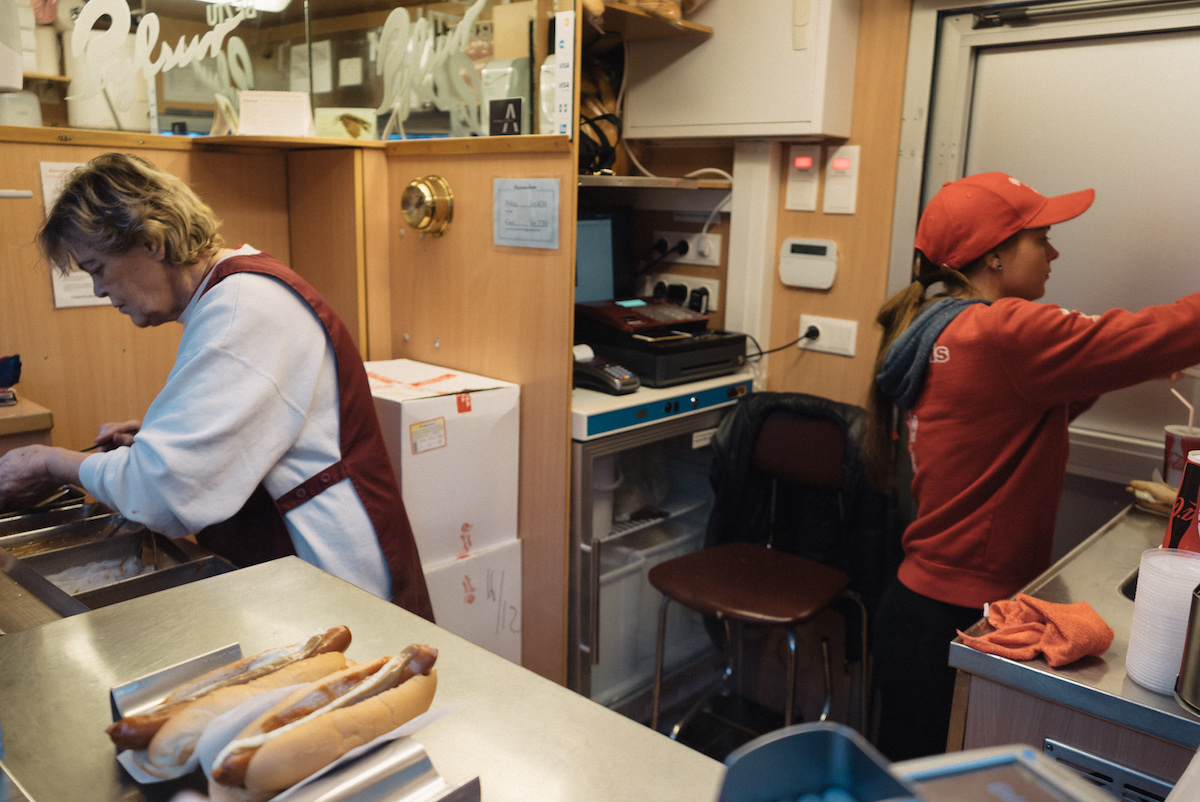
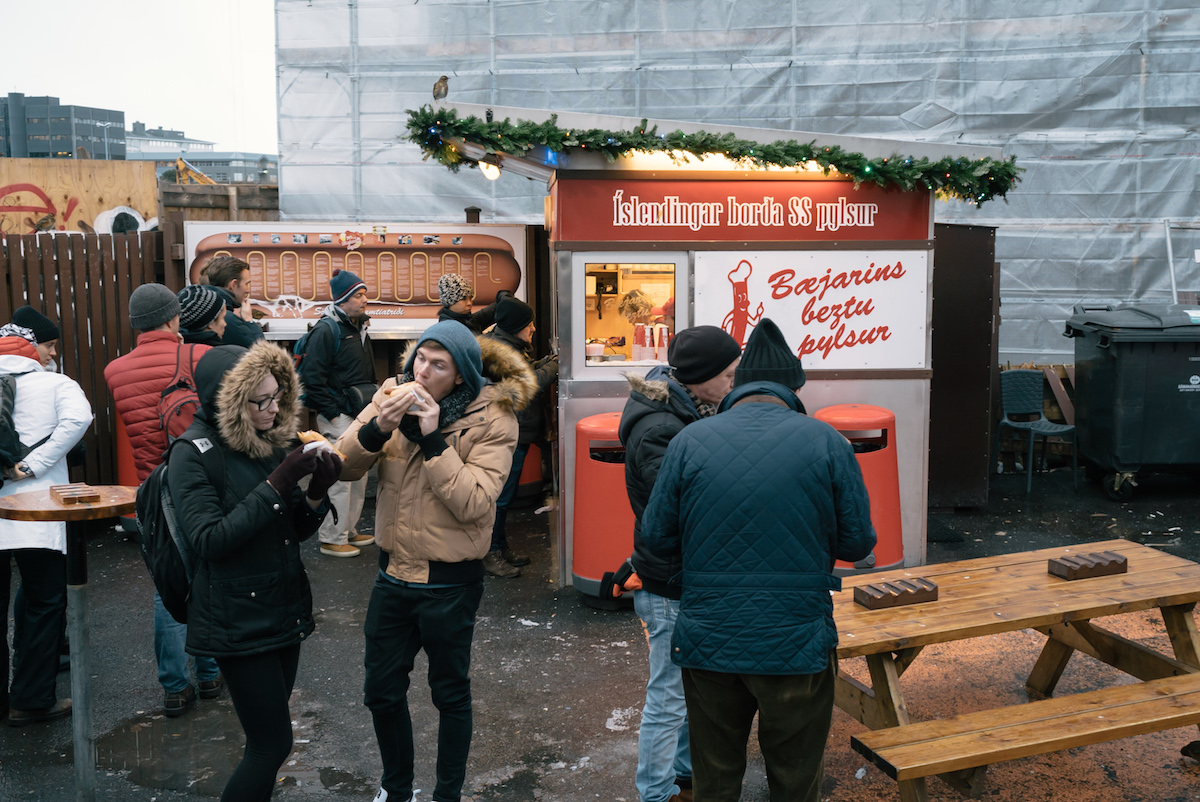
Apparently, Iceland takes great pride in cultivating the best hot dogs. The country has some sort of odd obsession with hot dogs as it’s sometimes considered the unofficial national food. We’re not going to argue why, as we honestly think Iceland may have one the best hot dogs in the world. You can check its most famous hot dog stand, Baejarins Beztu Pylsur, a spot that former President Bill Clinton ate at. At about $4 per hot dog, it’s probably the cheapest food item you can get in the country, which is great for your budget but terrible for your health. Nevertheless, you can find Icelandic hot dogs just about anywhere you go, and it doesn’t hurt to eat 1 or 2…or 3…once in a while…not like 2 or 3 times or something.
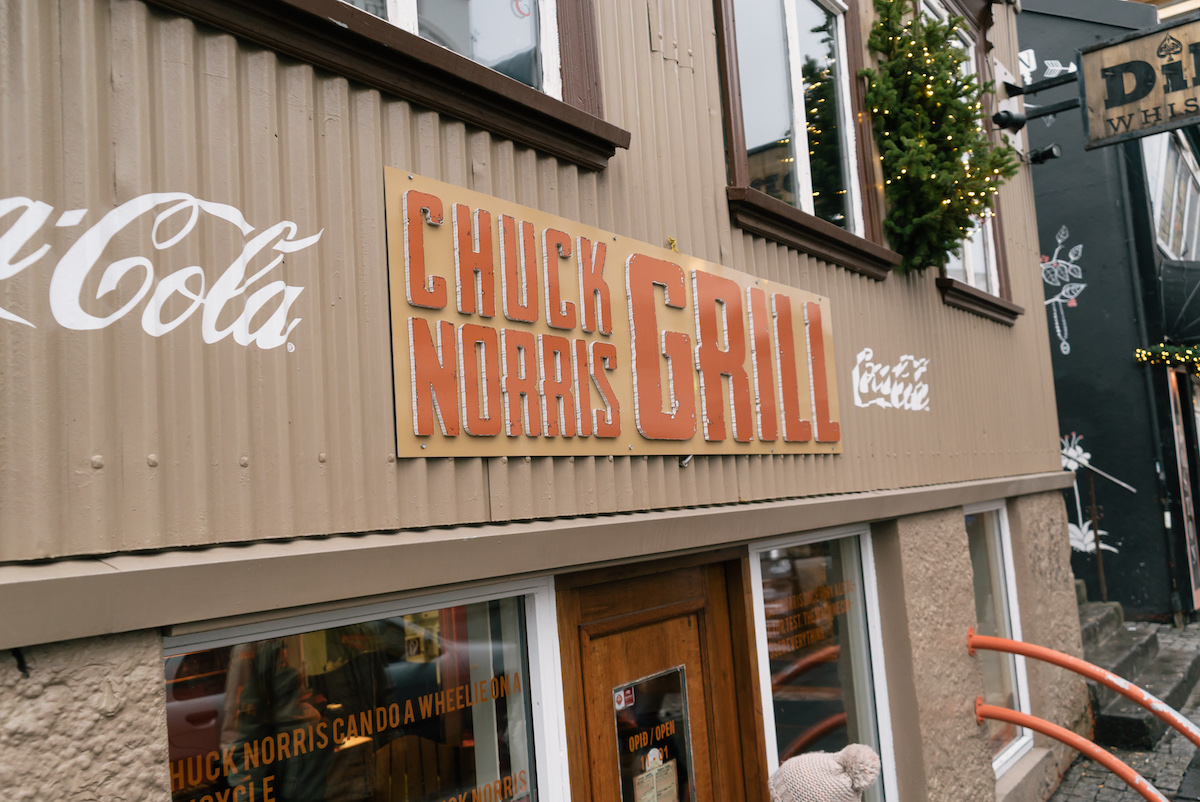
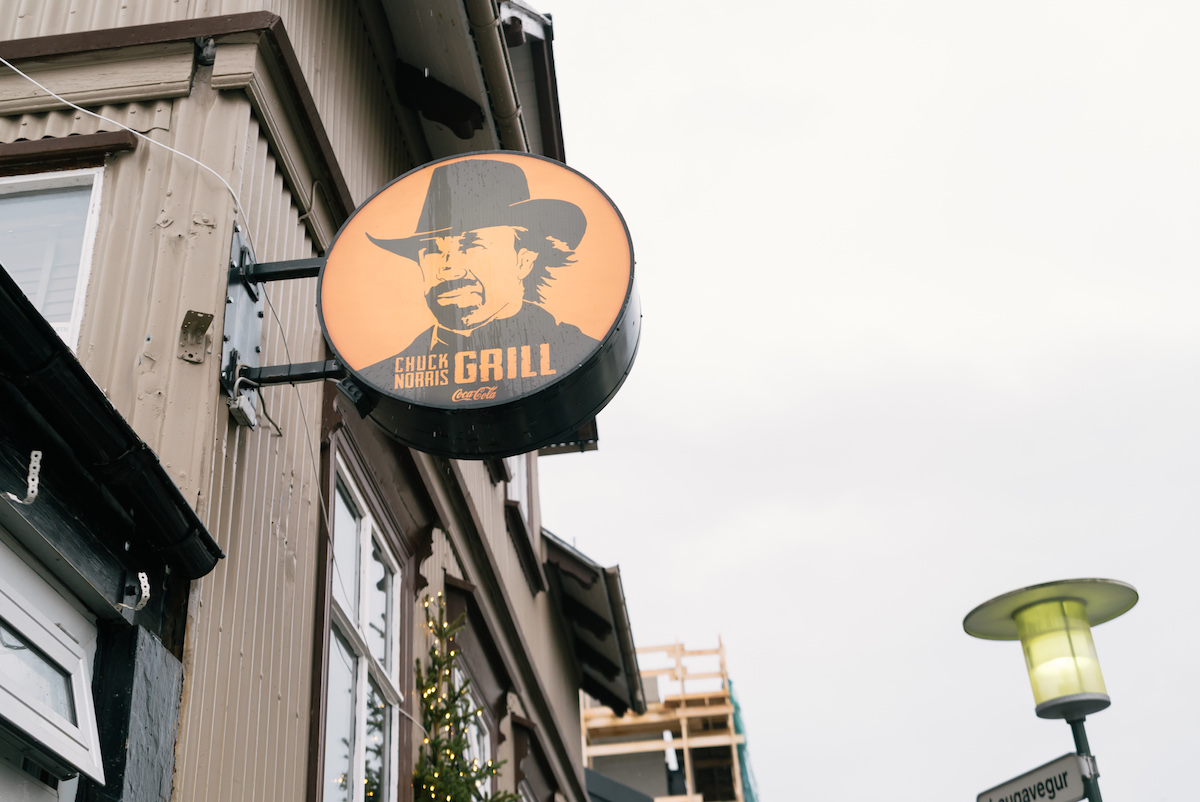
Chuck Norris Grill, Reykjavik
Honestly, we didn’t eat here; I just wanted to put this in because it’s Chuck Norris. They are known for crafting good burgers, as well as providing many entertaining Chuck Norris jokes. “There is no chin behind Chuck Norris’ beard. There is only another fist.”
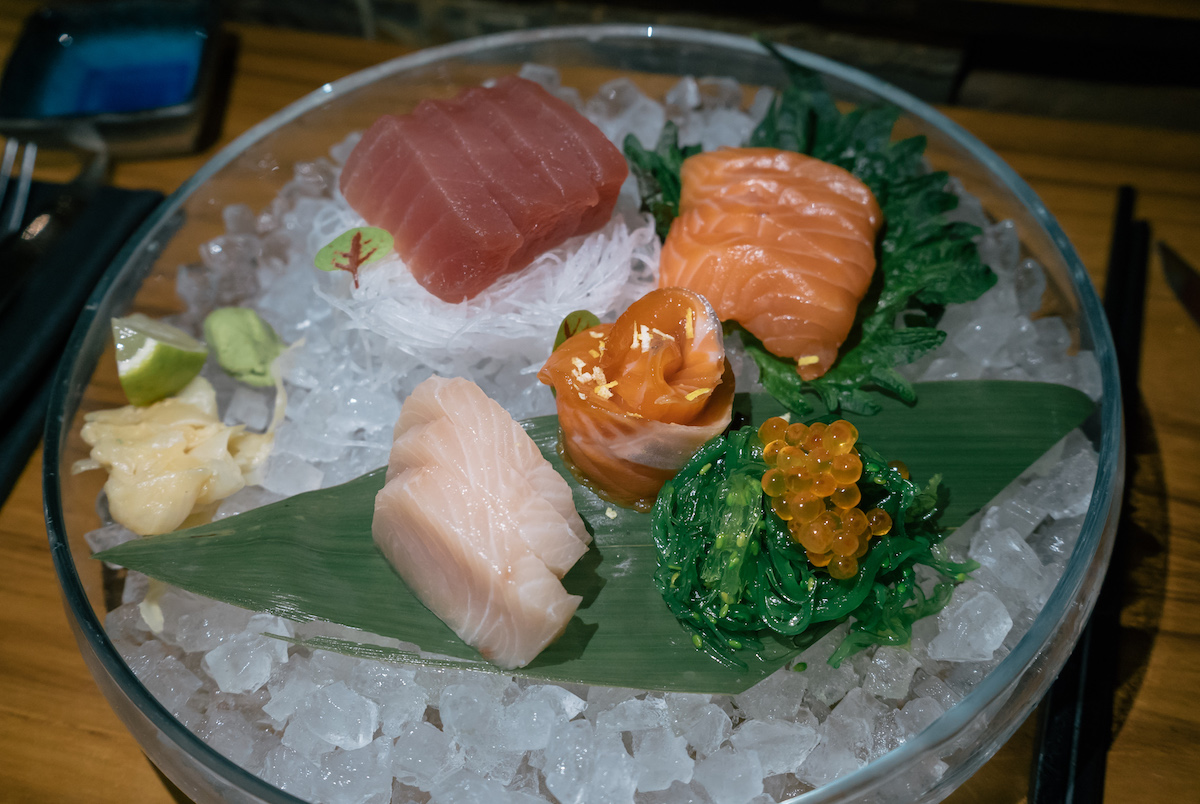
Sushisamba, Reykjavik
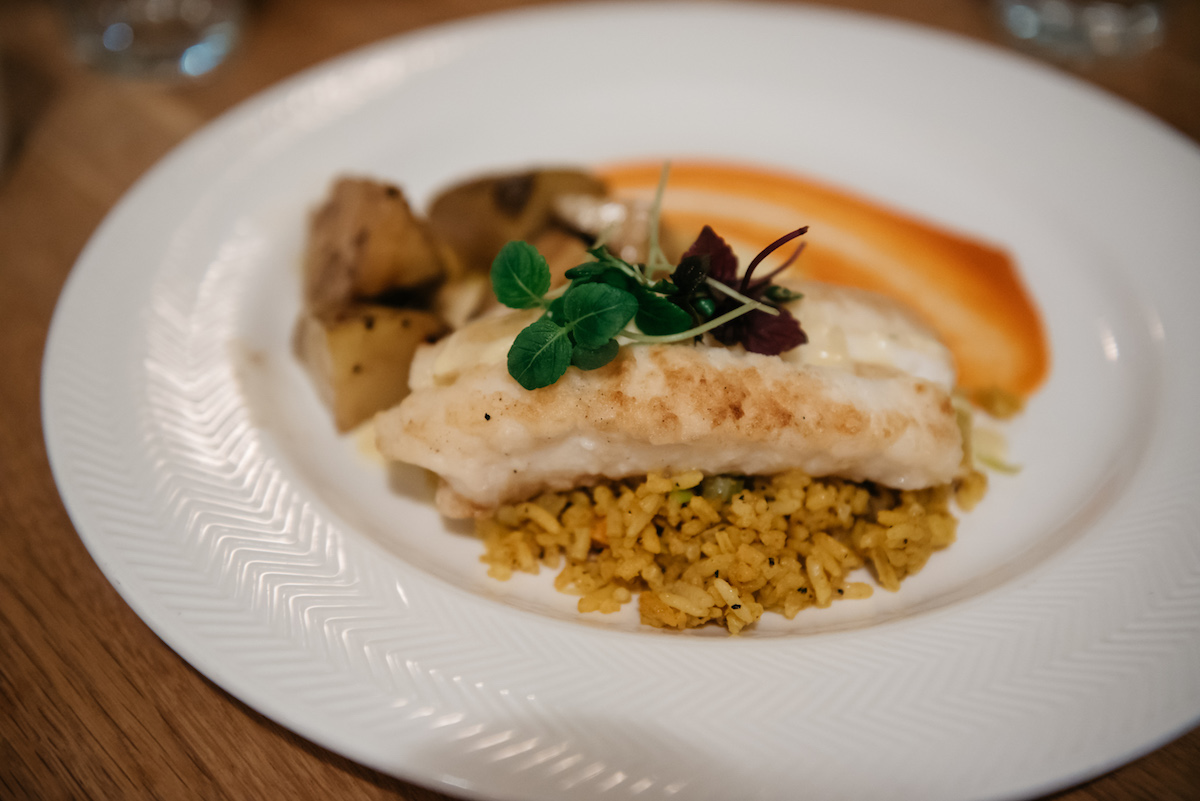
If you’re really looking to splurge on a luxurious meal, you can head to Sushisamba. The restaurant does serve traditional sushi and a variety of rolls but also prepares a number dishes with Icelandic traditions. The food here is really good, with the fish being some of the freshest I’ve ever had. It’s also the first time we tried puffin, which surprisingly tasted like smoked salmon, and there are other traditional Iceland dishes you can try. Expect to easily spend $30-50 per person, if not more for several dishes.
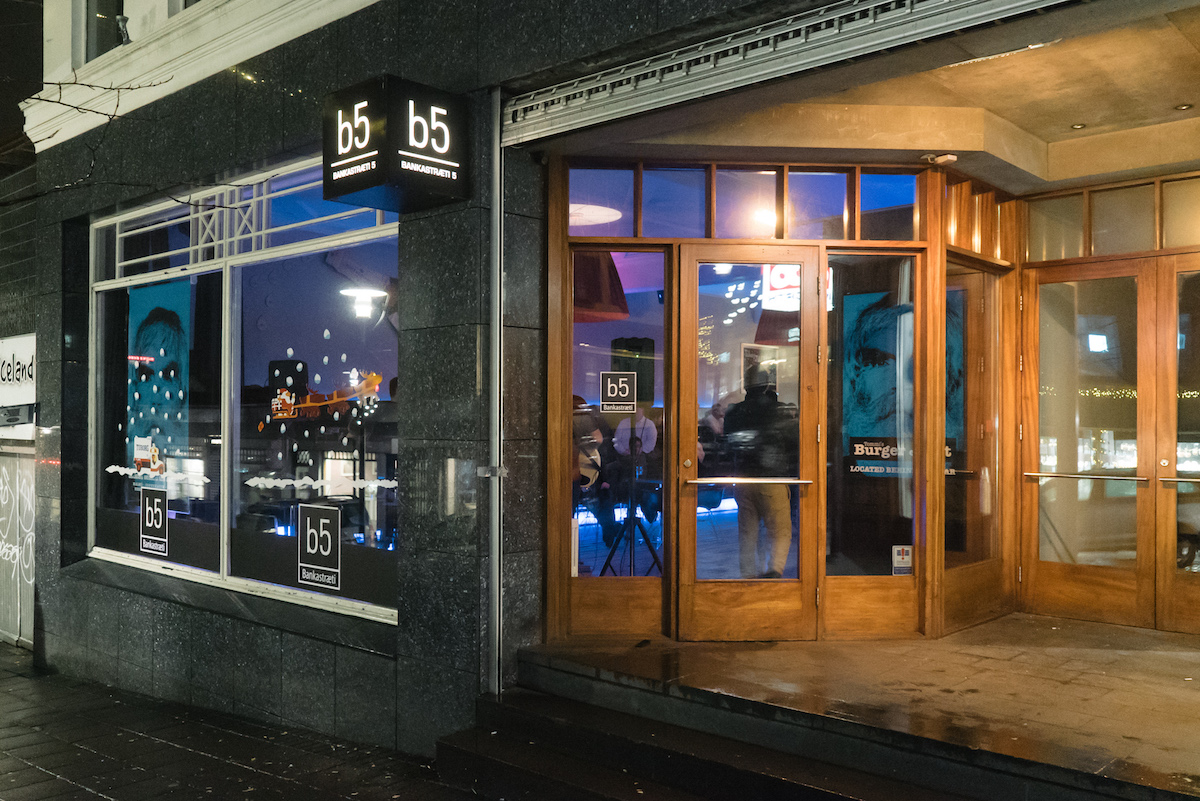
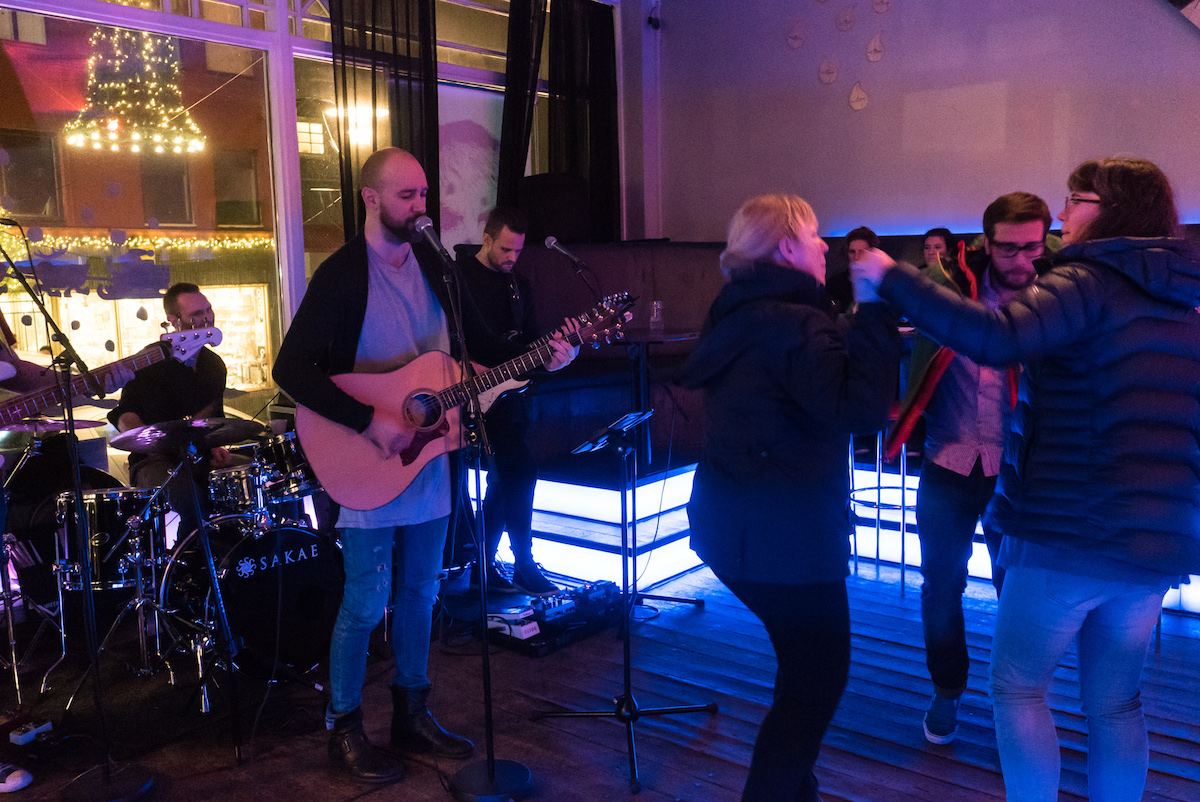
For such a small city, Reykjavik has a surprisingly active nightlife. Though you won’t find many “clubs,” there is a big selection of bars and pubs, many that are converted into mini-clubs during the weekends. One that you could check out is B5 Bar, a pretty trendy, more upscale looking venue compared to some other places. It supposedly has a dress-code but we walked in with our winter gear on a Friday (but it is right in the middle of winter). Drinks are pretty reasonably priced and the live music that was playing was pretty amazing.
There aren’t really many places to eat in Laugarvatn, so perhaps the best-known place is Lindin Restaurant. It was the first time I tried a reindeer burger and it was pretty good. Overall, the food is good but will run you around $30-40 a person for just a main course meal with pretty small portions, so I wouldn’t recommend it if you’re on a budget.
Budgeting Tips
Like we said, Iceland can be pretty expensive, especially for food as you won’t be finding many cheap restaurants around the country. So we’re going to drop a few tips to help you save some money for your visit.
Book with WOW Airlines – WOW Airlines has become the go-to budget airline for Iceland. With one-way and round-trip flights starting as low as $99 and $199, respectively, you won’t find better flight prices than WOW Air. However, you don’t get a lot of luggage to pack; any oversized carry-on and check-in will cost a fee each way, so check their website for luggage specifications and pack accordingly. They’ll also charge you for any in-flight requests, including water and food.
Pack or carry lots of nut bars/snacks, any kind of food – Because food is expensive in Iceland, you should pack snacks, bars or any acceptable food you can fit. If you don’t have a lot of packing space, you can bring a jacket and stuff them with your snacks. This is what I shamelessly did and I filled my jacket pockets with at least 30 granola/nut bars and leftover turkey from Thanksgiving dinner. You can imagine the looks I got from TSA agents, but those things were lifesavers.
Bring or reuse a water bottle – In Iceland, water is incredibly pure and clean wherever you drink it. Buying water will run you $2-3 a bottle, so instead of doing that, just reuse that first bottle and fill from the tap. It’s also good for the environment.
Camp, hostels, split renting a car – Though we didn’t do any camping, you can legally camp in many places for free (with abiding rules) or a small fee for campsites, which makes it the cheapest option available. If you’re not camping, the next best option is the split hostels/Airbnb, the cheapest forms of accommodation, and it’s best to split those. A car rental can run you as low as $60-70/day, usually not including insurance unless in winter, so splitting between 3-4 people can save quite a bit from tours.
Go grocery shopping – This is probably the best tip we have when it comes to saving money on food, hence being underlined. We got bread, cheese/jelly spreads, crackers, and fruits that would last us our road trip. This helped balance our dining out costs along with the bars/snacks we brought, but if you want to forgo dining out, then grocery shopping will really help save a ton. You can also buy things to cook, as hostels/Airbnbs will have kitchens to use. Grocery/convenient stores can be found all over Iceland.
Eat lots of Icelandic hotdogs – Not going to be the healthiest piece of advice I ever give, but at $3 a pop, this is by far the cheapest and most filling option compared to anything else. Even most sandwiches you find in a convenient store will even run you $8-10. Plus, they’re actually pretty delicious and you can find them just about anywhere.
Iceland impressively has plenty to offer outside of its beautiful landscapes. Let us know what are some of your favorite spots to visit and also some of your best budgeting tips!
Iceland is one of the few countries we’ve visited multiple times and it’s easy to understand why. The culture, people, animals and, of course, the absolutely stunning and breathtaking landscapes keep tugging at my heart, wanting to go back again and again. Despite being a small country, there are simply too many things to see in any short time period, but we’ve done our best to put together a 7-day Iceland itinerary for an epic road trip!
Though it is possible to go around the country in 7 days, this itinerary focuses primarily in southern Iceland, where many famous sites are located. What I like about this itinerary is that it can be done at any time of the year, whether you have 21 hours of daylight in summer or only 4 hours of daylight in winter (yes, the days are that short)! We will highlight all of the locations in bold font to help you track these sites.
We’ve also mapped out the directions for the major sites to put into your Google Maps:
Let’s take a look at the awesomeness you’ll see over the next week:
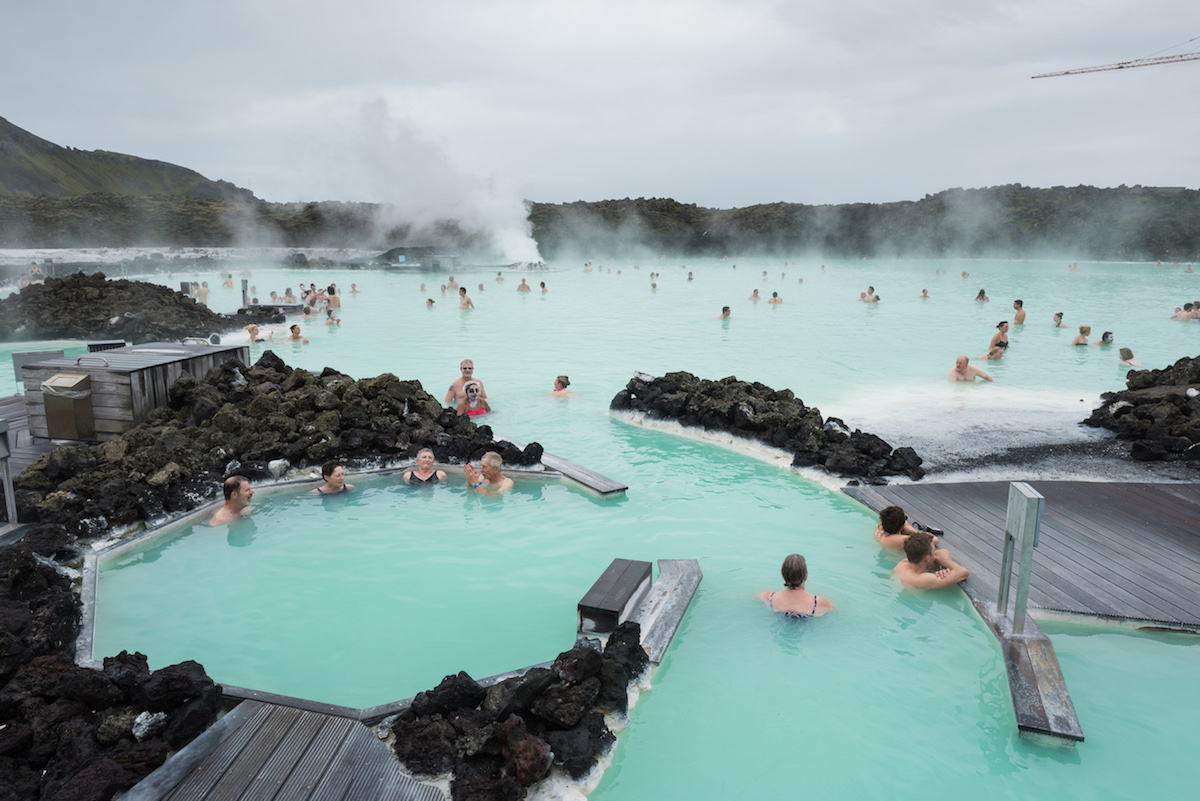
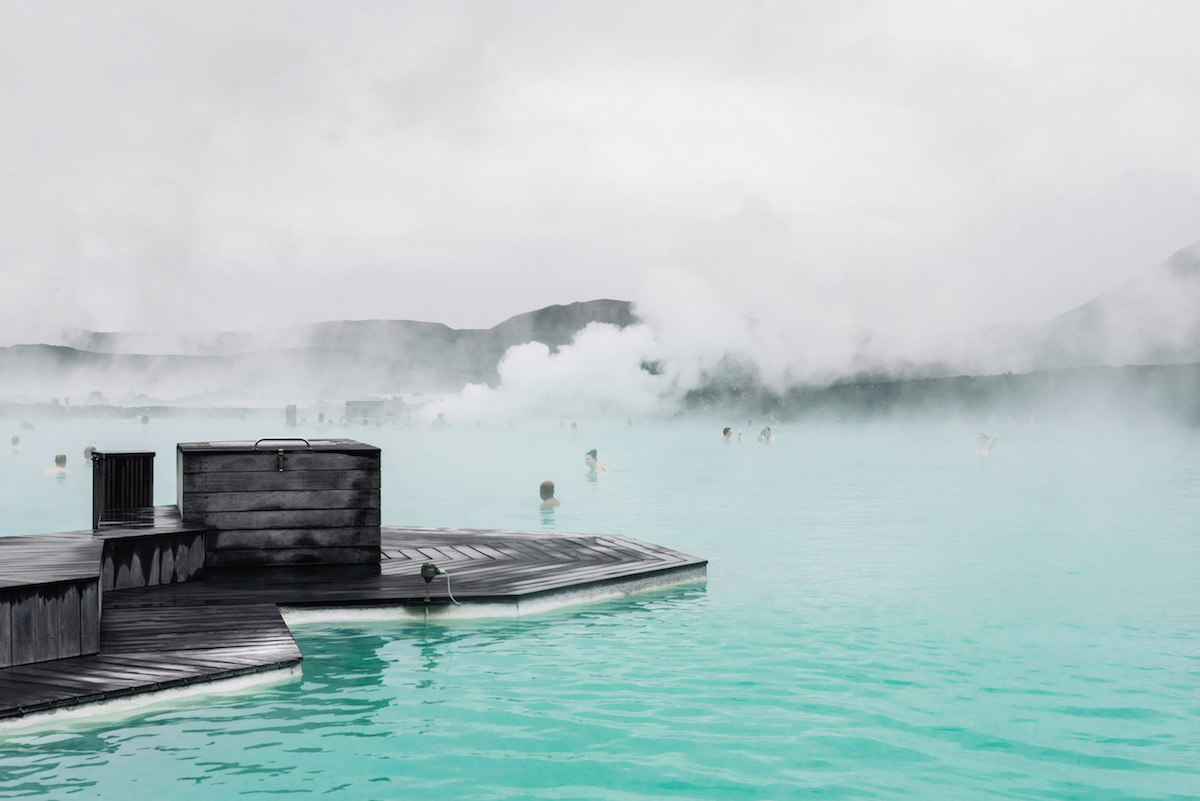
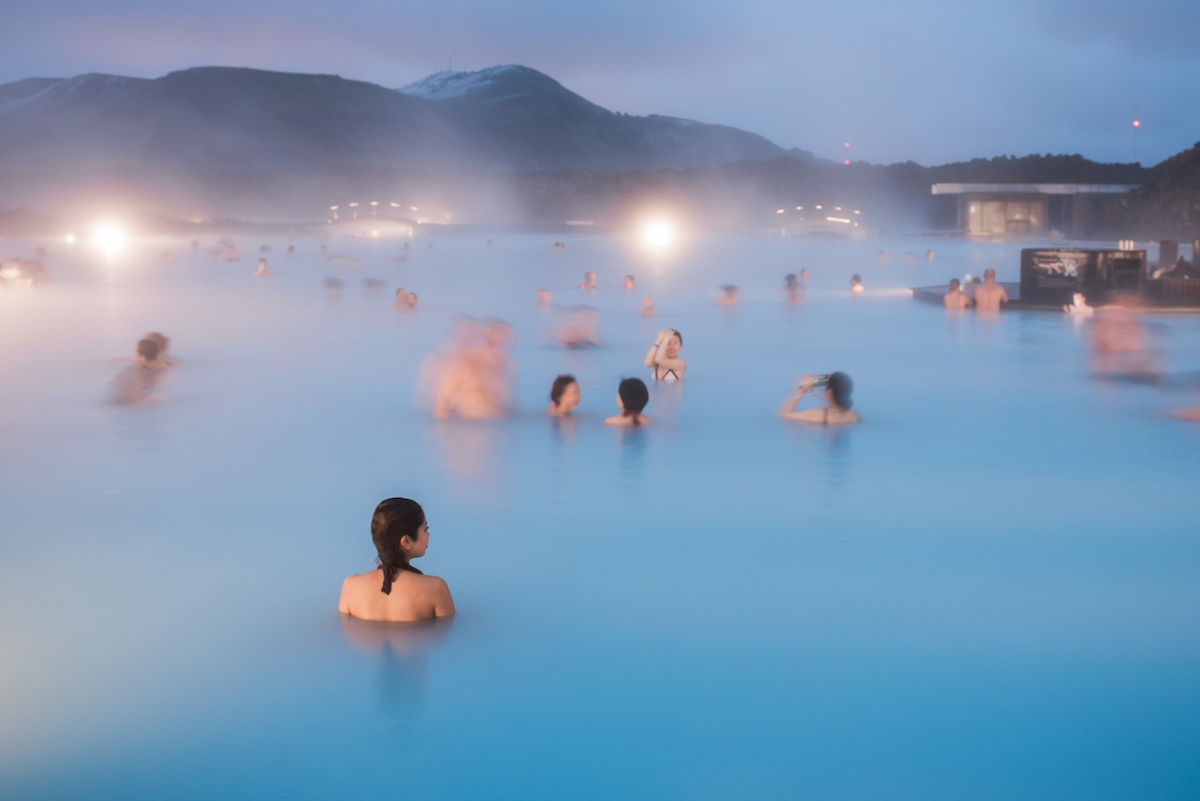
Day 1: Reykjavik & Blue Lagoon
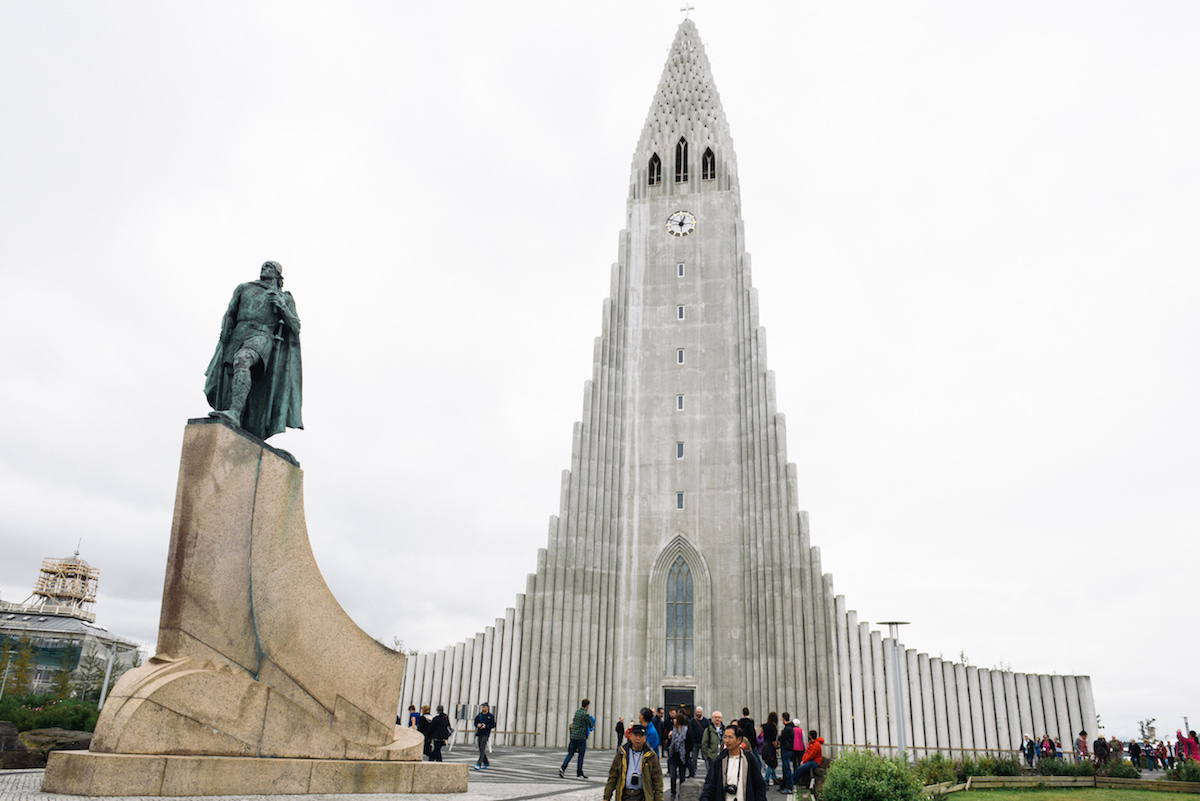
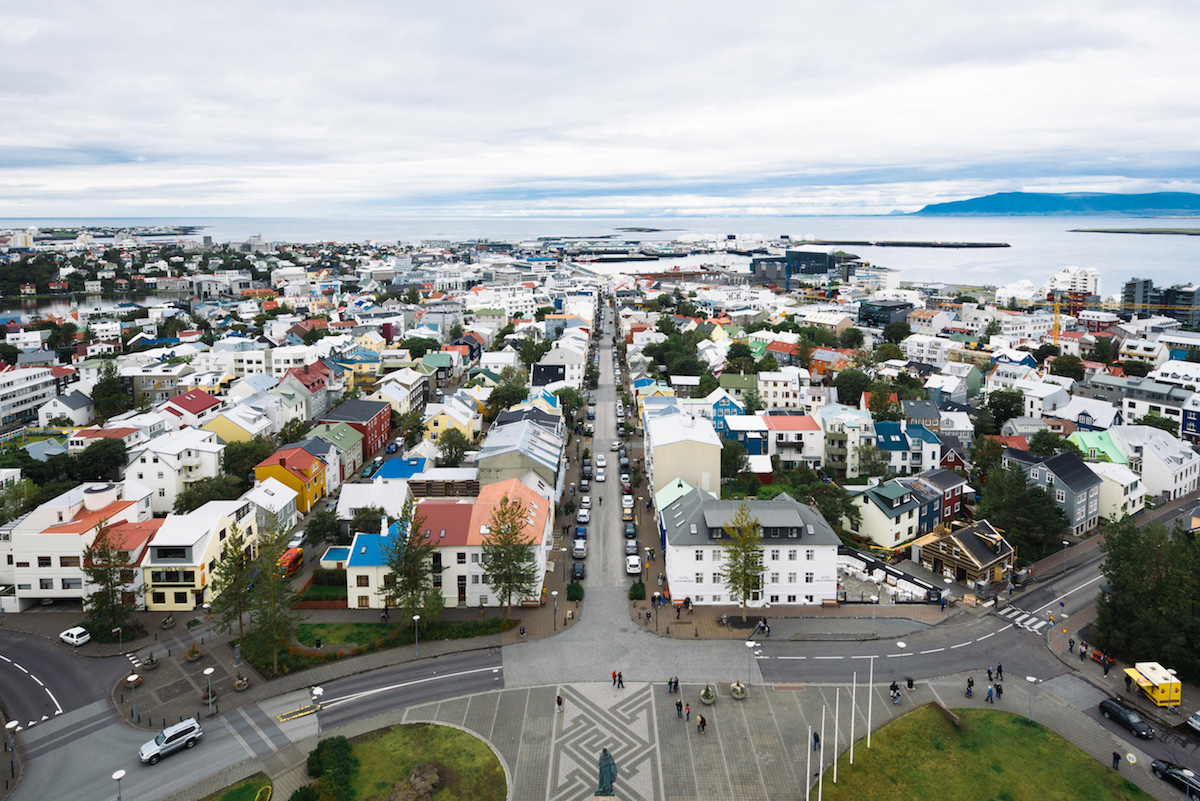
After you pick up your car from the Keflavik Airport, you can start your trip to Reykjavik. Though Reykjavik is the largest city in Iceland, it still has the charm of many small towns and there are very few tall buildings. You’ll walk by many small shops and cafes and many of the main attractions are walking distance apart. Perhaps the most well-known attraction in the city is Hallgrimskirkja, the tallest church in all of Iceland. It’s built to look like the basalt rock formations and has amazing views of the entire city. Right across the church is one of our favorites, the Loki Cafe, where you can get delicious traditional Icelandic dishes, but also try the dreaded fermented shark if you’re adventurous enough.
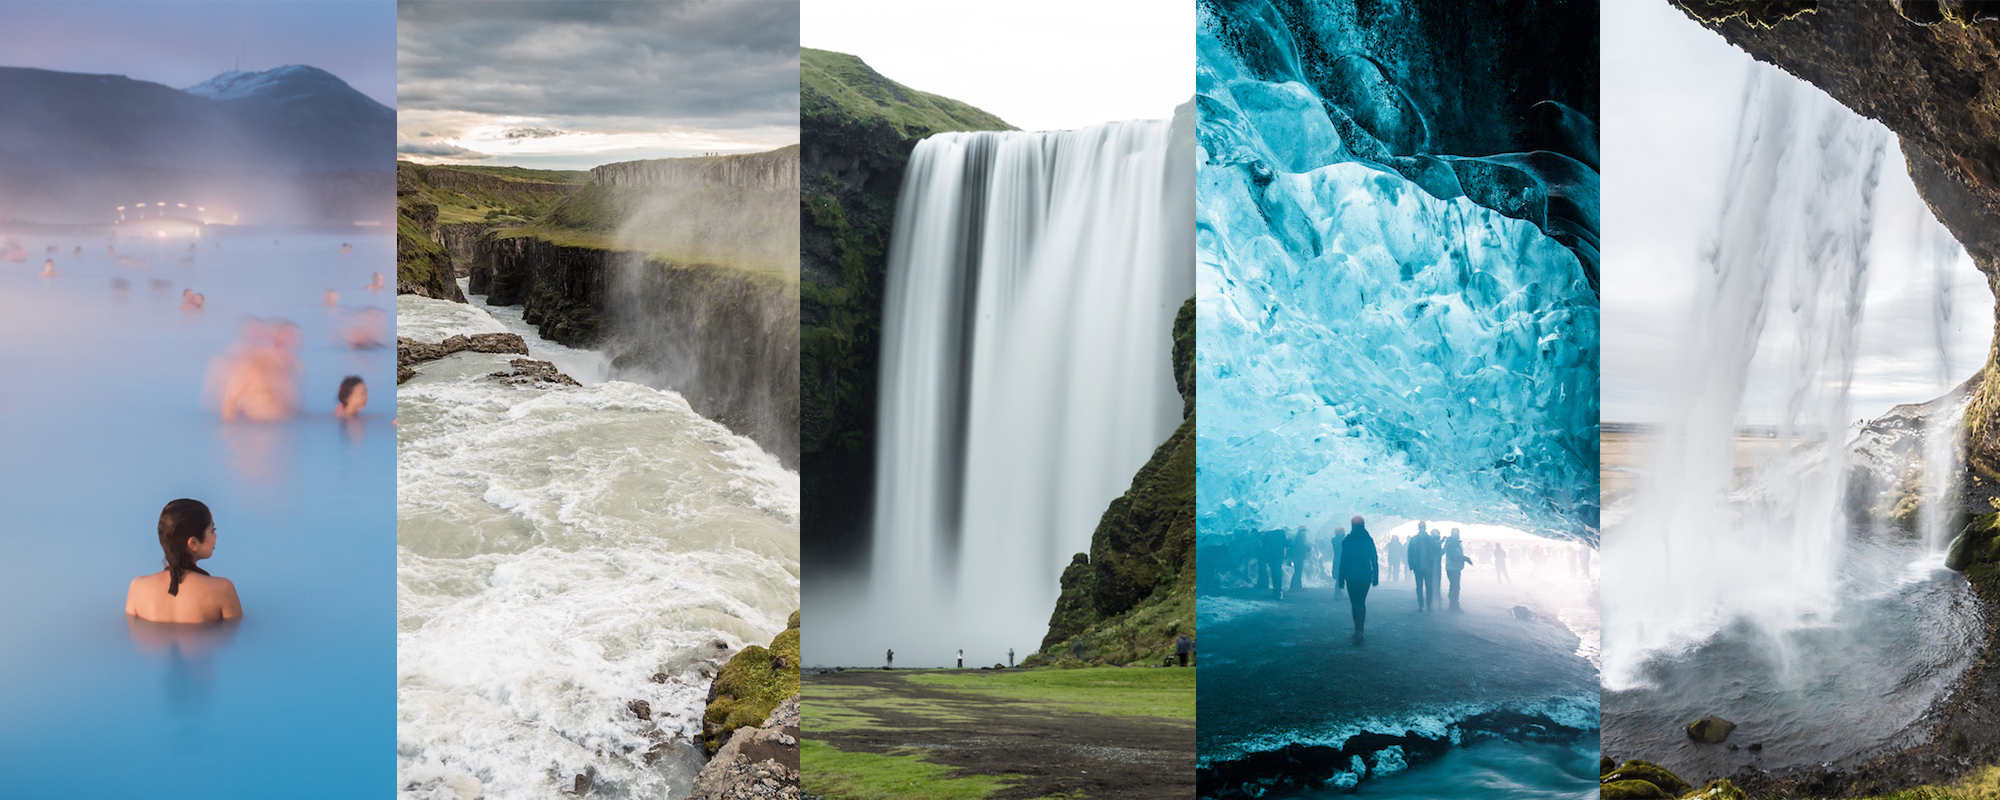
From Reykjavik, you can make the 45-minute drive to one of Iceland’s premier destinations, Blue Lagoon, for a relaxing soak in its natural springs. Be sure to book this in advance because time slots can fill up fast. In the spring and summer, the timeslots may not matter as much, but in winter with short daylight hours, it’s important to book early to go during the day. We made this mistake during our second visit, as they only had 4:00 PM reservations available, which is pretty much dark by then. However, there were far fewer people and experiencing the lagoon at night is pretty unique.
Other places to check out: Harpa Concert Hall, Bæjarins Beztu Pylsur (famous hot-dog stand), Sandholt Cafe (best hot chocolate!), Eldur and IS (for awesome crepes and ice cream)
Day 2: Kirkjufellsfoss to Pingvellir
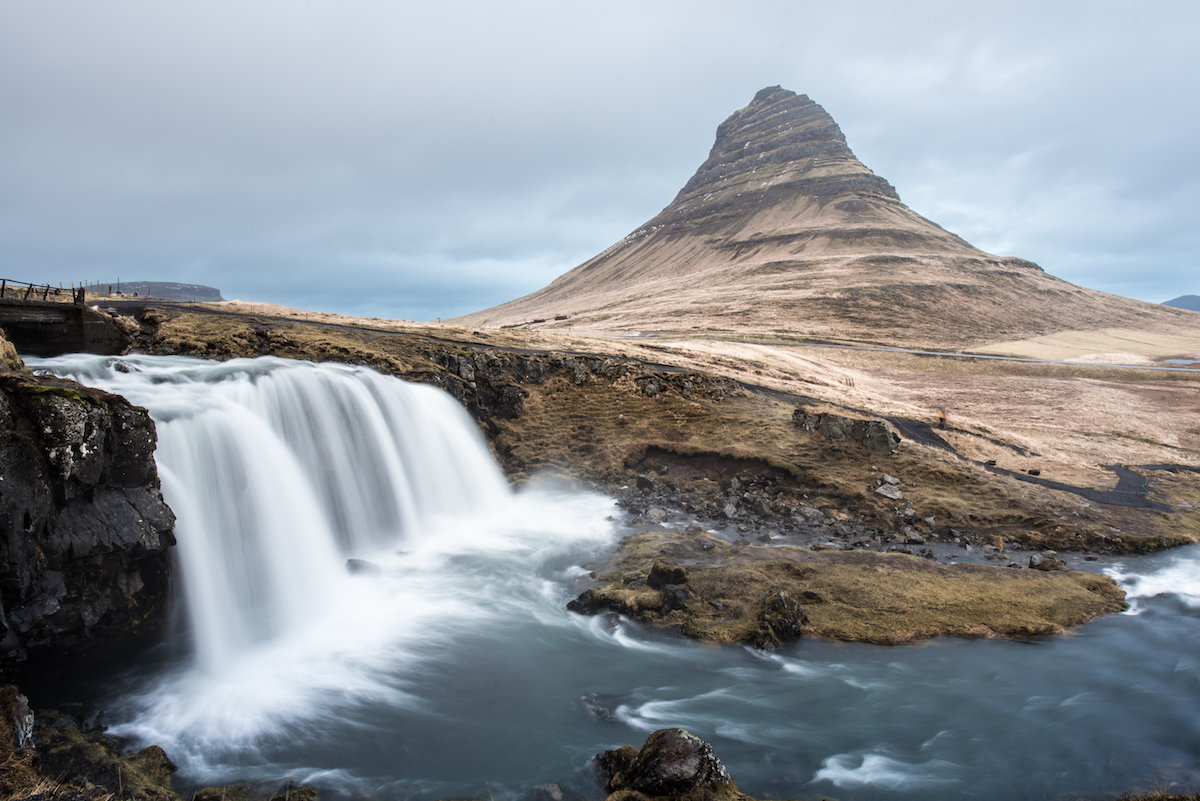
We start Day 2 early by heading to Kirkjufellsfoss, the only time you’ll head northwest, about 2.5 hours from Reykjavik. Kirkjufellsfoss is particularly recognizable for having Kirkjufell Mountain in the background with the waterfall. It’s also a favorite spot for photographers for sunsets and the Northern Lights. If you have time, you can explore the surrounding area, including nearby Snaefellsjoekull National Park.
Kirkjufellsfoss
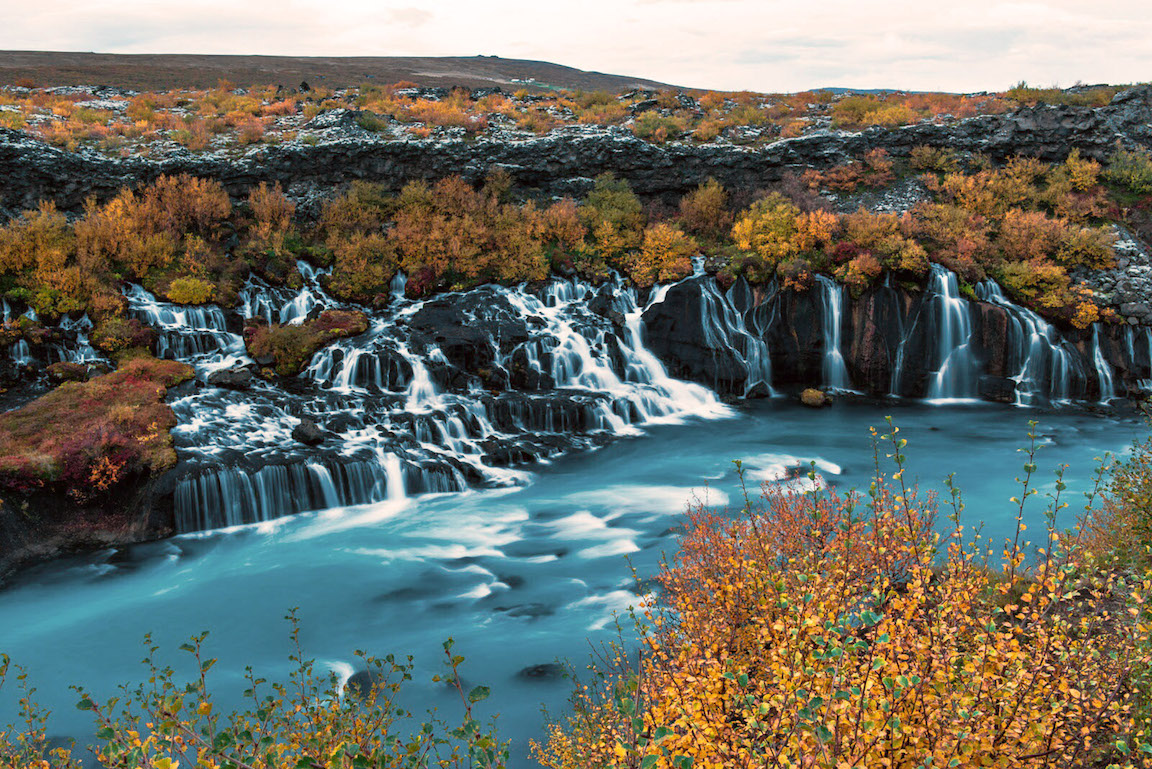
From Kirkjufellsfoss, you can make a 2-hour drive to Hraunfossar, a series of small waterfalls that forms a very picturesque sight. An hour from here, you can head to Glymur, the second tallest waterfall in Iceland that falls into a steep canyon.
Photo by Ming Ge
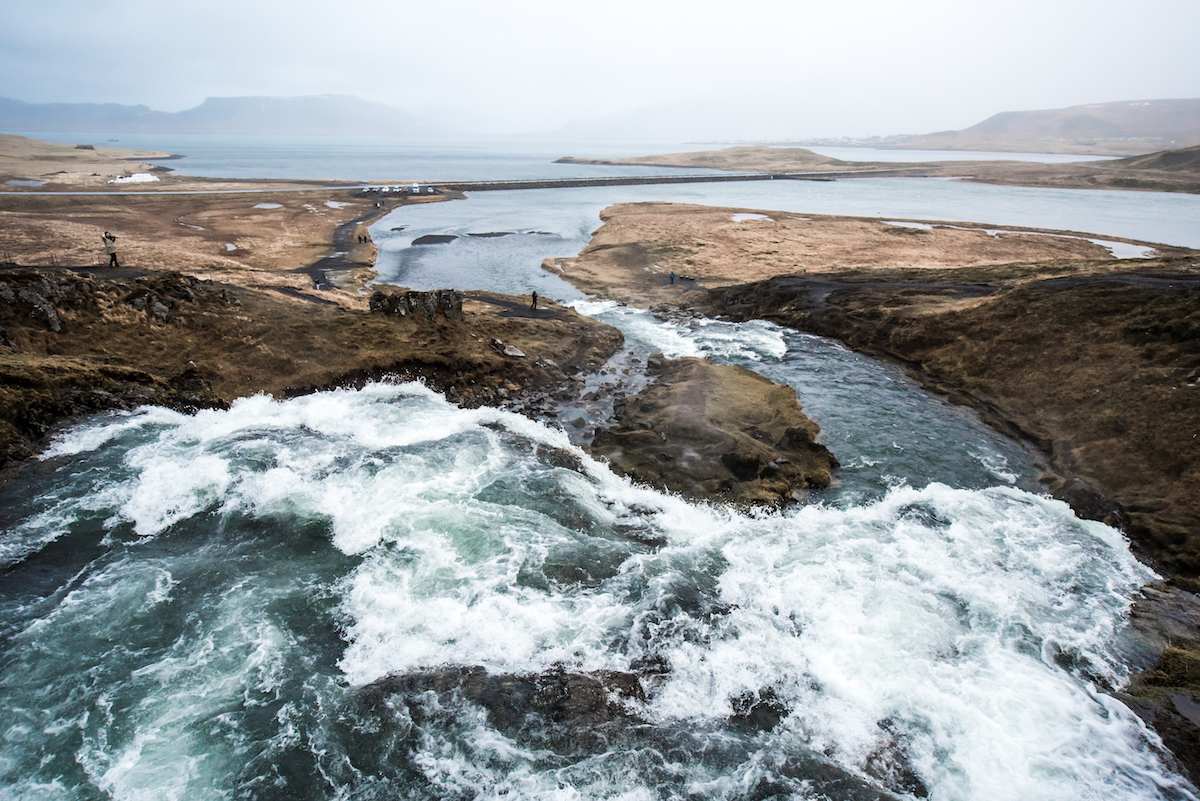
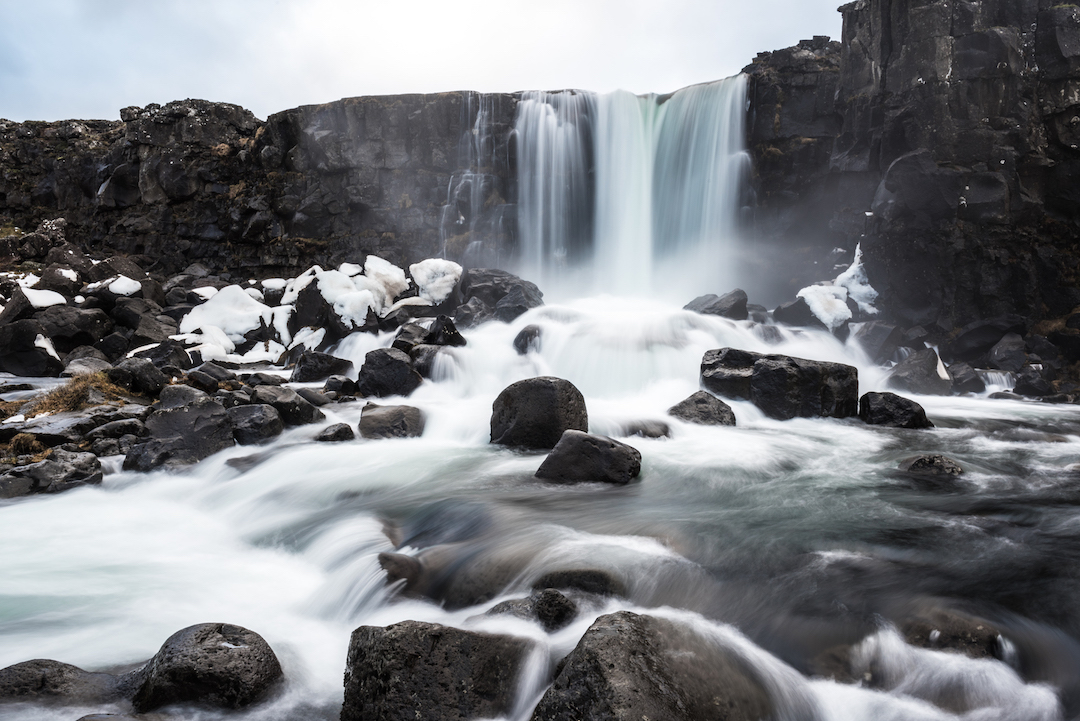
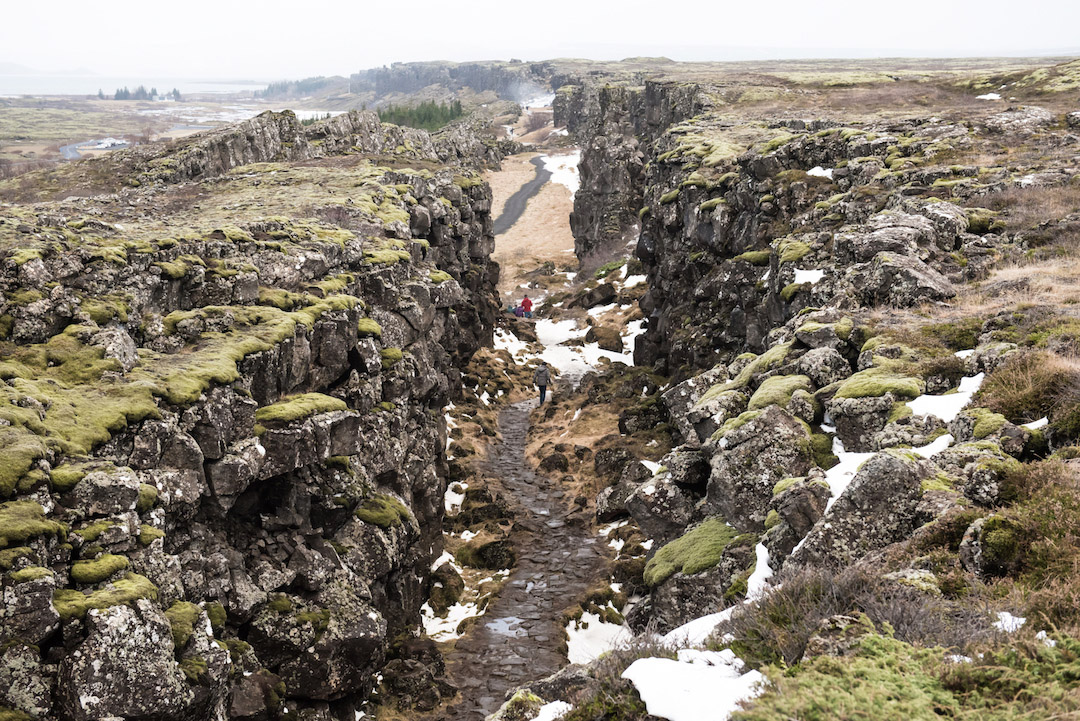
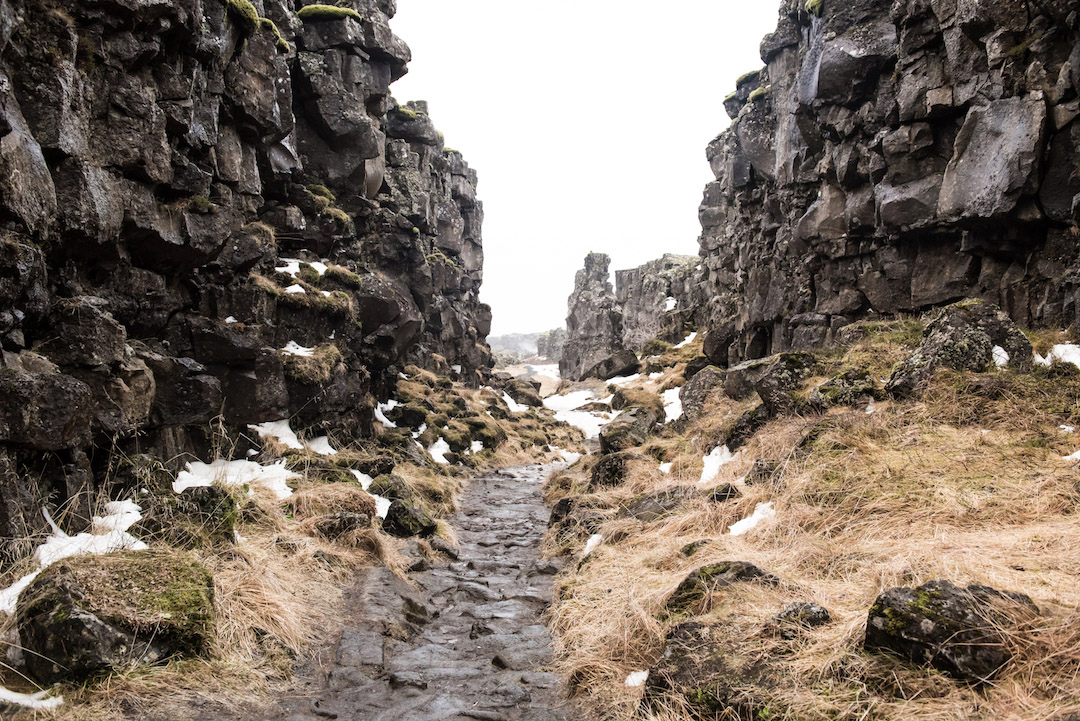
Finally, you can cap your day by heading to Pingvellir, a national park about an hour away from Glymur. A UNESCO Heritage Site, you will discover rock and canyon formations from the movement of tectonic plates, as well as the Oxararfoss Waterfall. There is also a unique experience here where you can snorkel or scuba dive at Silfra canyon, a rare opportunity to dive between two continental plates!
Oxararfoss
Pingvellir National Park
For your accommodation, I would look to stay in Laugarvatn, a town only 20 minutes away from Pingvellir. You can check out the Heradsskolinn Boutique Hostel, and also look to enjoy a bath at Laugarvatn Fontana.
Day 3: Bruarfoss, Geysir, Gullfoss, Haifoss
What’s nice about Day 3 is there’s plenty of flexibility for how you’ll want to spend your day. You can start by either revisiting Pingvellir or start heading to some of the other locations. Between Pingvellir, Bruarfoss, Geysir, and Gullfoss it’s only an hour total drive distance, so you can see a lot in a pretty short timeframe.
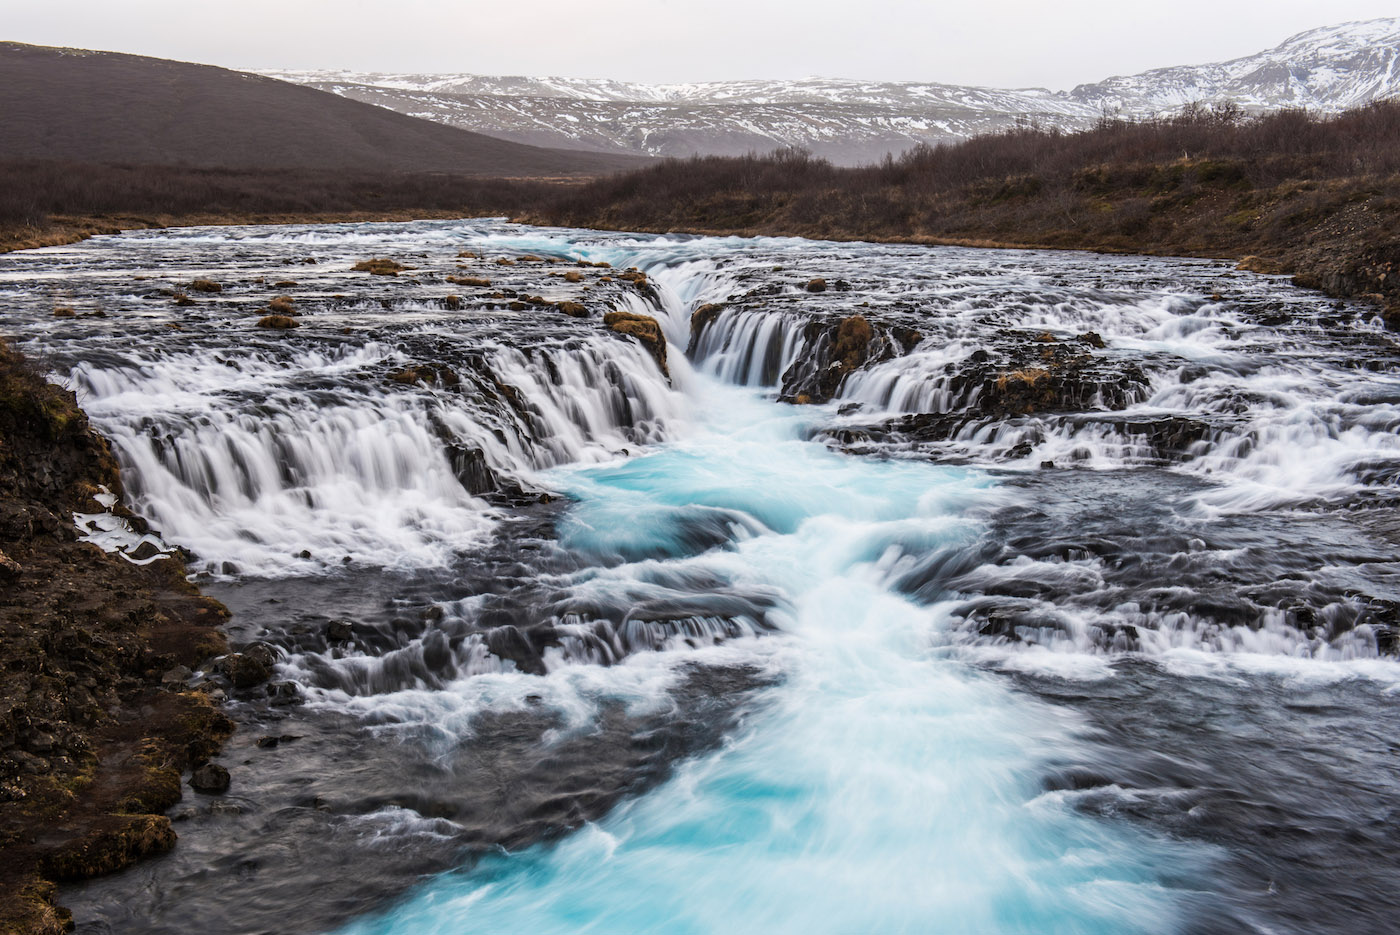
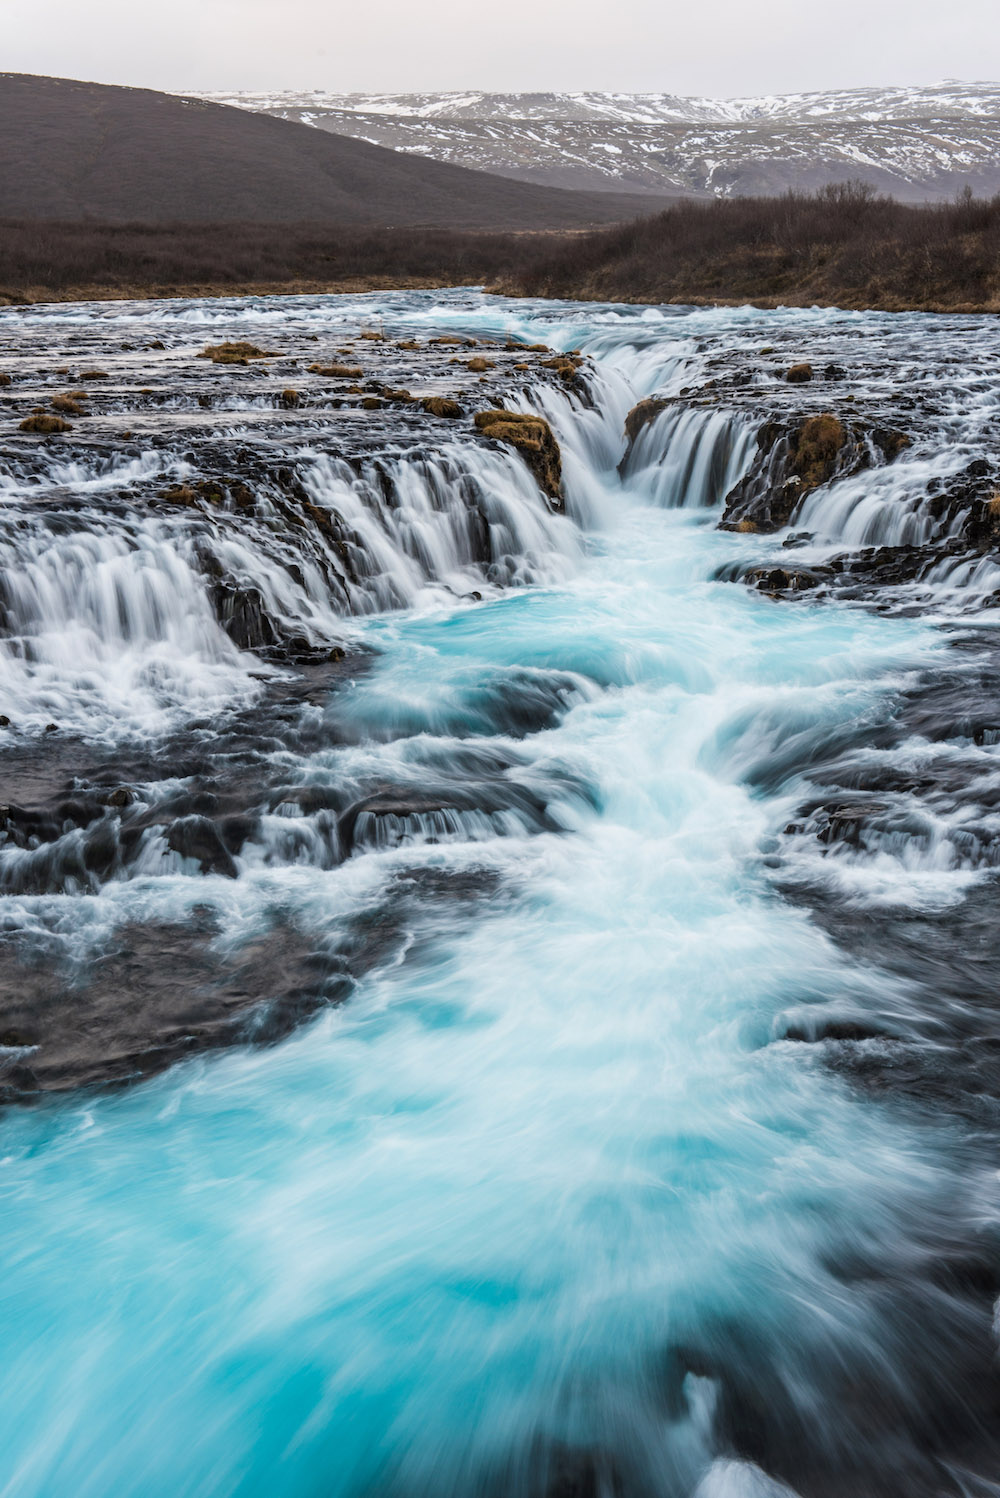
If you want to start towards Bruarfoss, it’s a little more hidden to find compared to other sites. From Laugarvatn, head east for about 20 minutes and look for the road, Brekkuskogur. There is no sign on the main road pointing to Bruarfoss, so be sure to look for this road. Your GPS should help you find it; however, once we entered the road, the GPS went haywire and couldn’t pinpoint our location. If this happens, just continue straight on the road. You will come to the end of a 3-way intersection and make a left turn. Continue on this road and look for a small sign on your left that says “Bruar.” This is the pathway to the falls, which requires a bit of a walk, possibly through mud and water depending on the weather. But it is worth it, as it is an incredibly beautiful waterfall and there is virtually no people around.
Bruarfoss
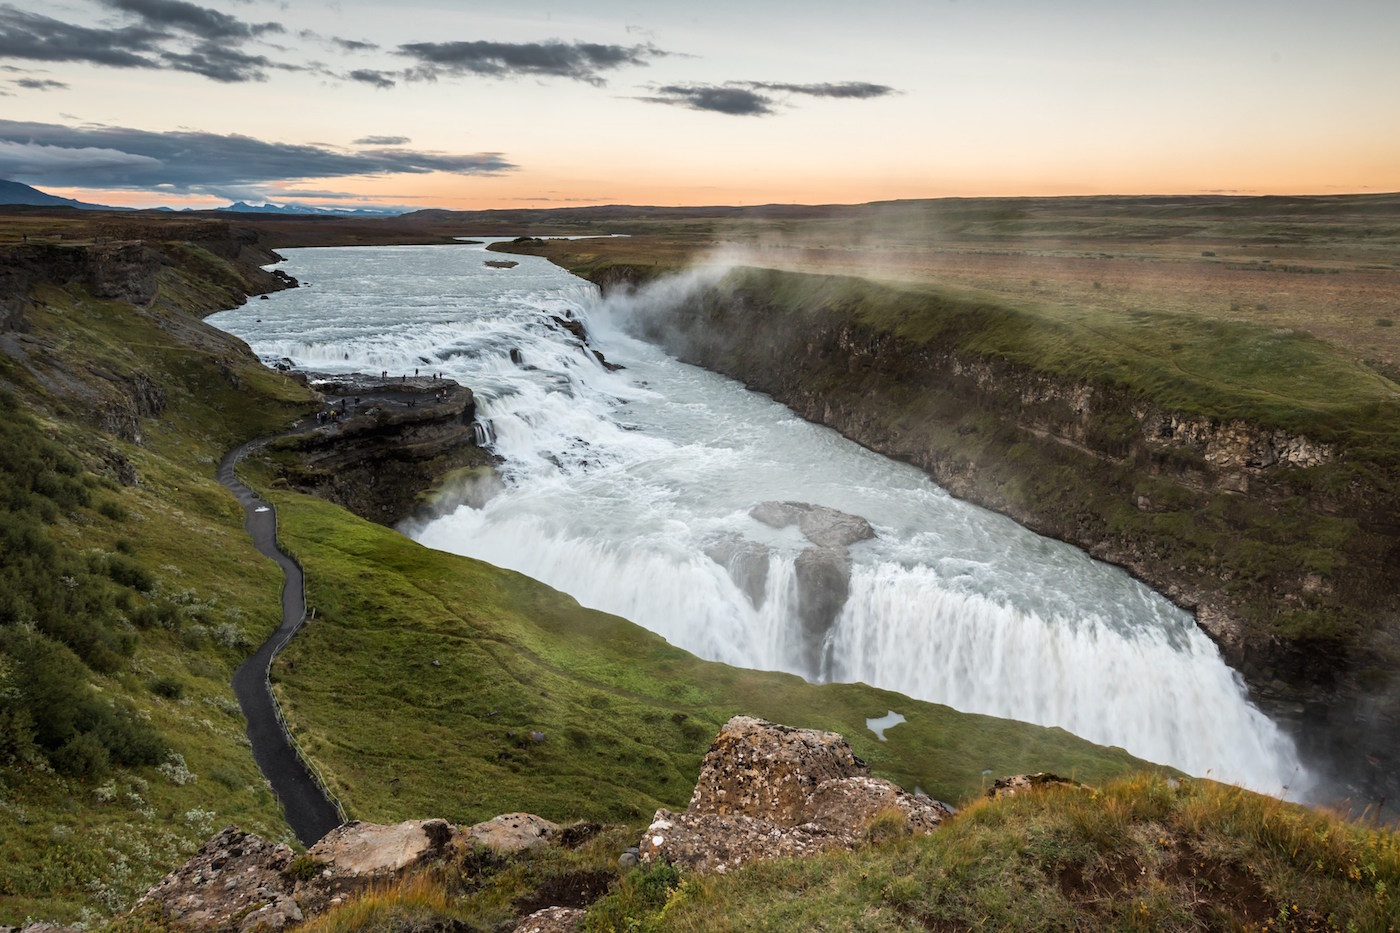
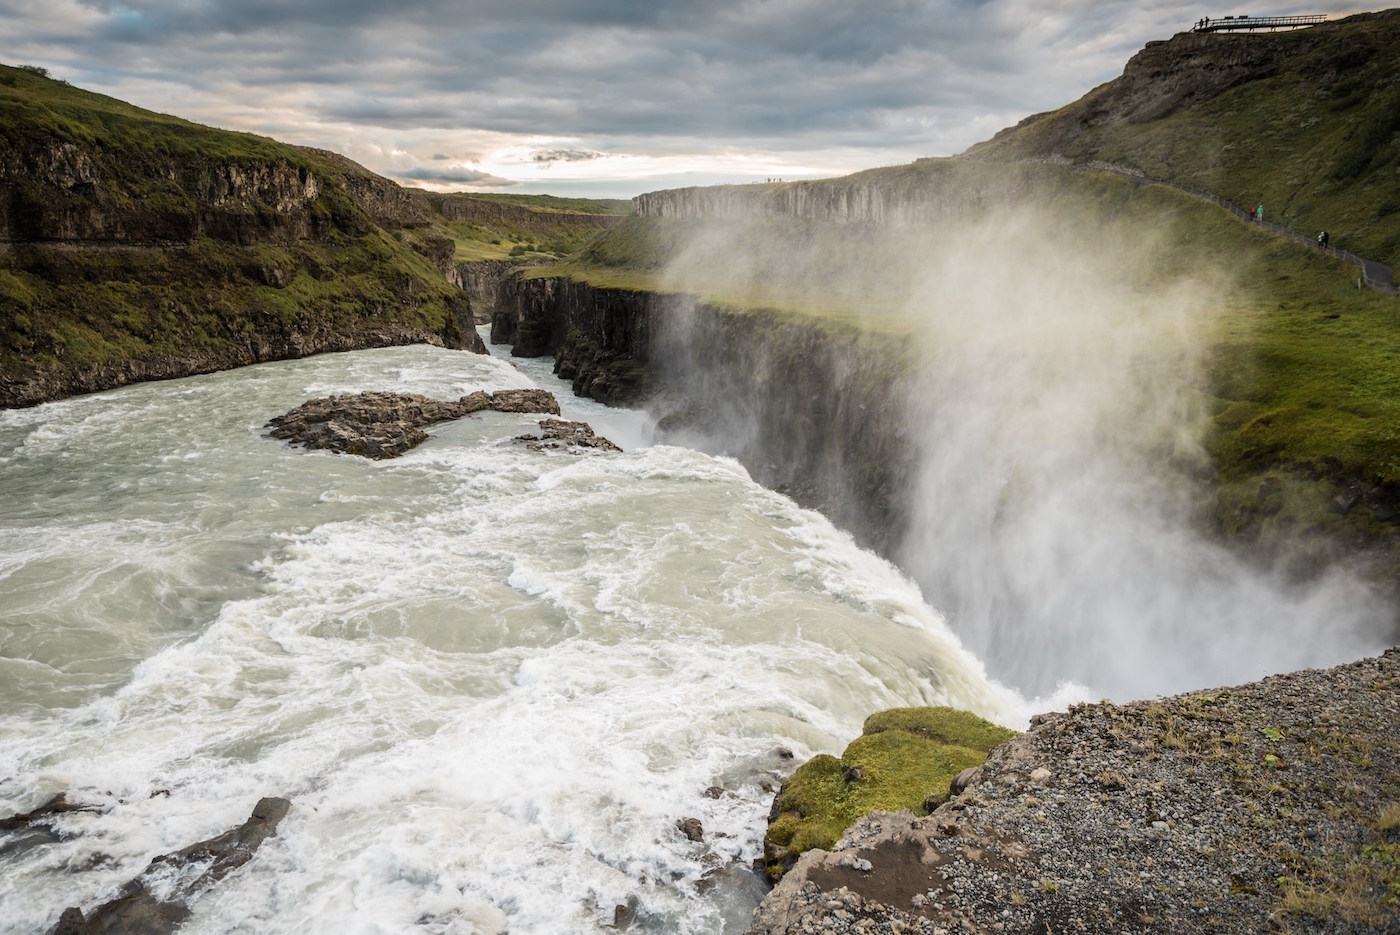
Once you finish at Bruarfoss, you can head 15 minutes east to Geysir. Geysir will be much easier to find, as it is a very popular spot for tourists. Here you can see the “Great Geysir” periodically erupt, spewing hot boiling water up to 200 feet in the air! Afterward, head just 10 minutes east to see one of Iceland’s most iconic waterfalls, Gullfoss. Gullfoss is made of two smaller falls before plunging 105 feet into a canyon. Anywhere from 30,000 to 500,000 gallons can be flowing into the canyon. Even from a distance, you can feel the sheer force of wind and mist from the falls. It’s definitely one of the greatest spectacles you’ll see in Iceland.
Gullfoss
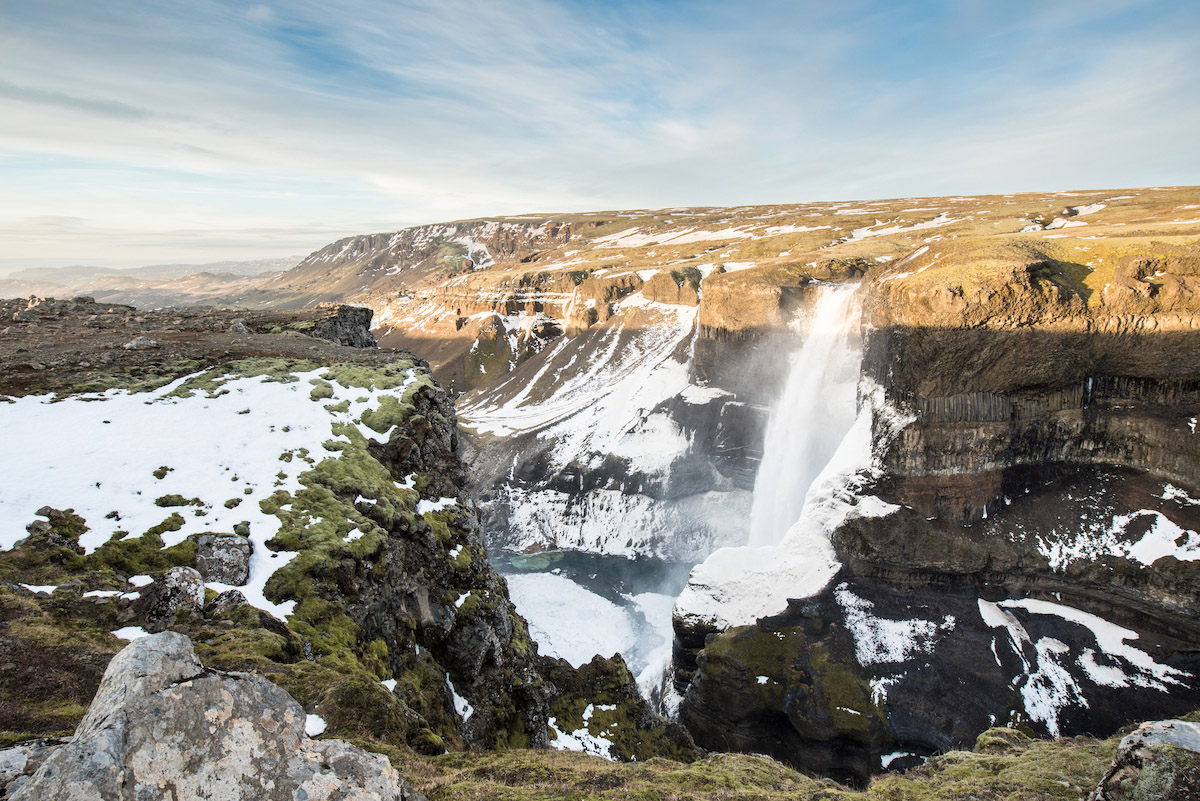
Next, you can head towards Haifoss, a waterfall off from the main roads and about 1.5 hours away, but absolutely worth it. However, you’ll need a 4×4 vehicle to get to this waterfall, since the terrain is very uneven and the road can be prone to shallow flooding. You’ll need to watch for reports whether or not the road is impassable, but if you make it there, you’ll be treated to another spectacular sight. Because of its difficult accessibility, you’ll see very few people here too so you can enjoy the sights to yourself!
Haifoss
To conclude your day, you can look for accommodation in the towns, Hella or Hvolsvöllur.
Day 4: Seljalandsfoss, Skogafoss, Vik
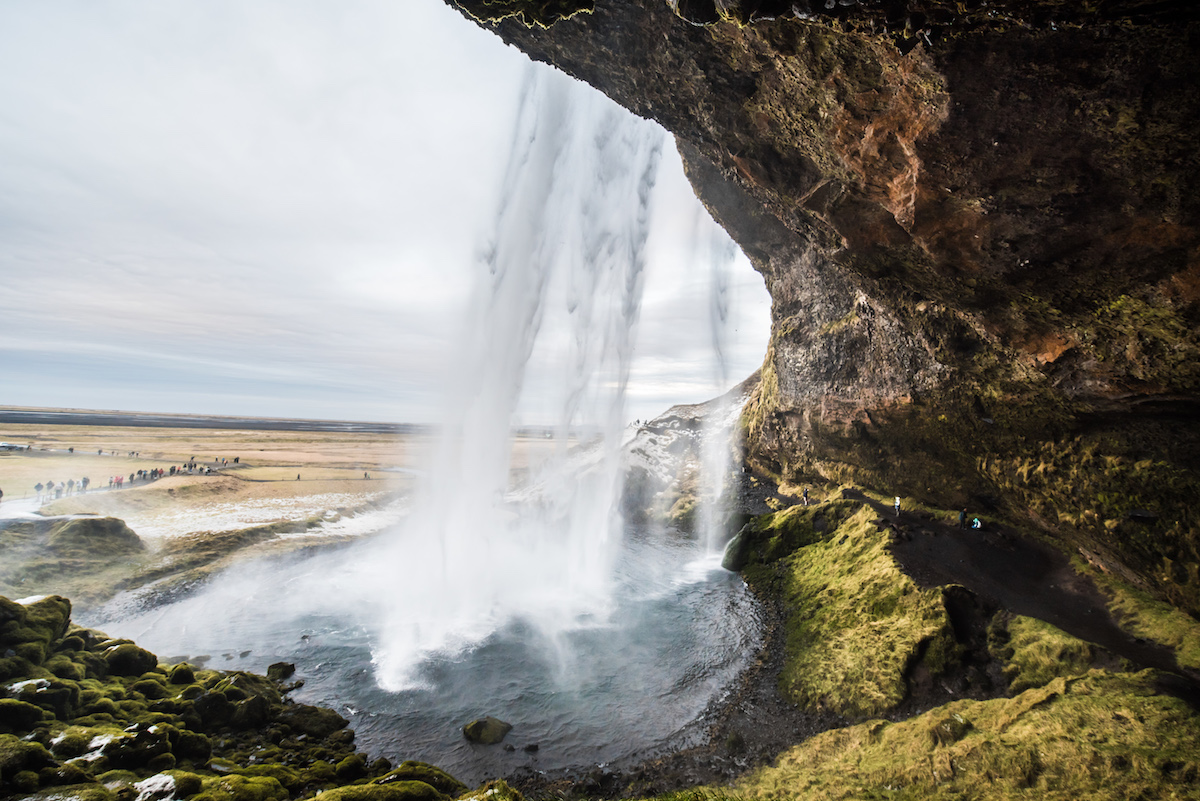
Day 4 also allows you plenty of flexibility to go at a flexible pace, but it provides plenty of things to see! 30 minutes east of Hella, you can visit Seljalandsfoss. Another iconic waterfall, you will be able to see this from the main road, as well as many signs pointing to its location. Seljalandsfoss is unique in that you can actually walk in the cave behind the waterfall.
Seljalandsfoss
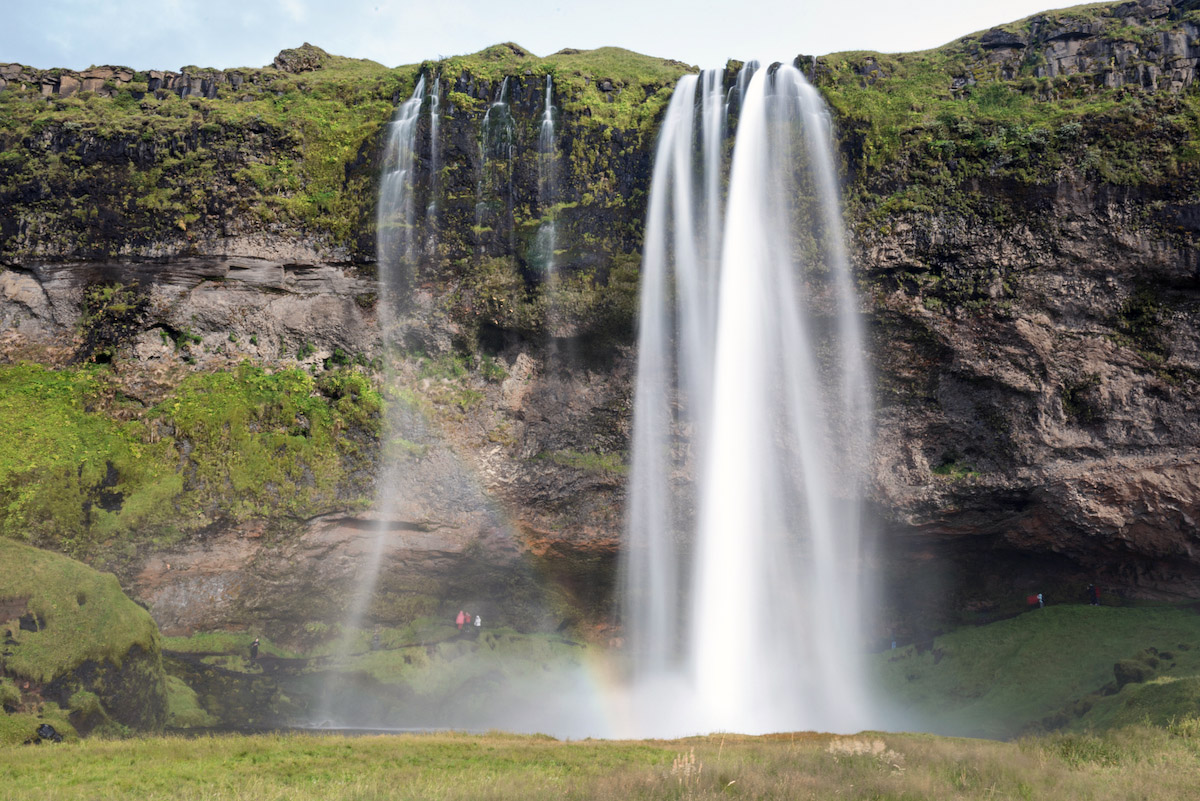
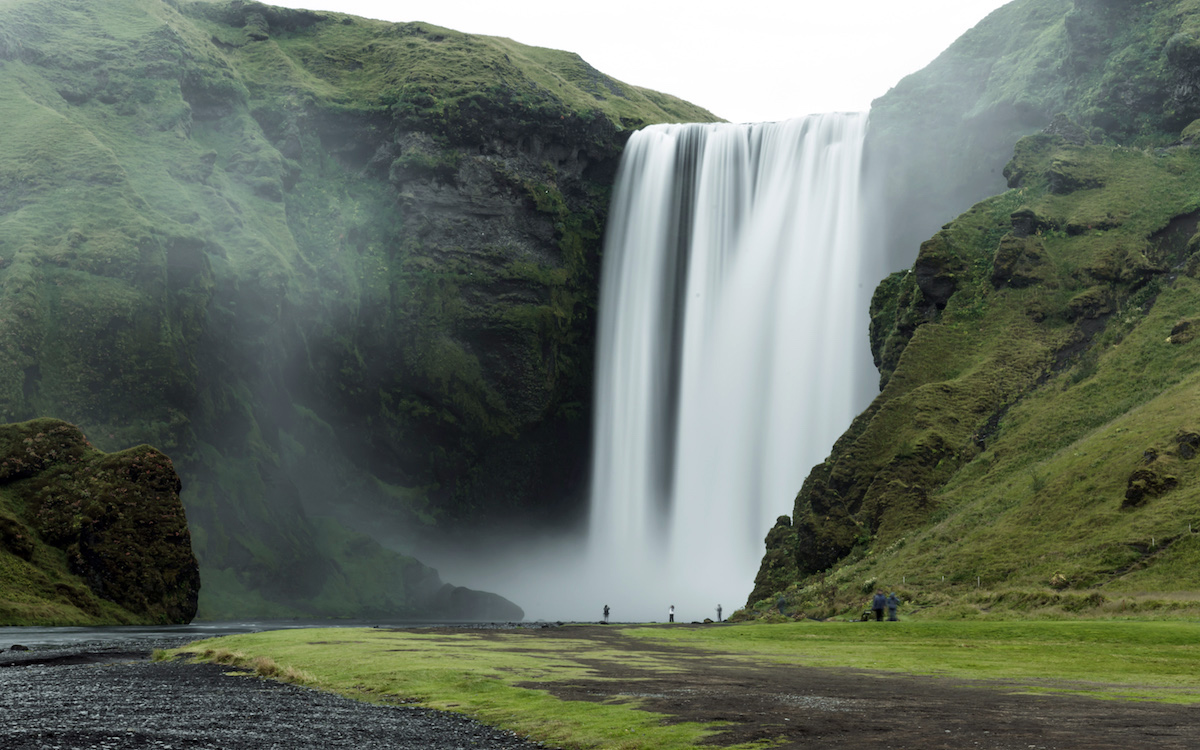
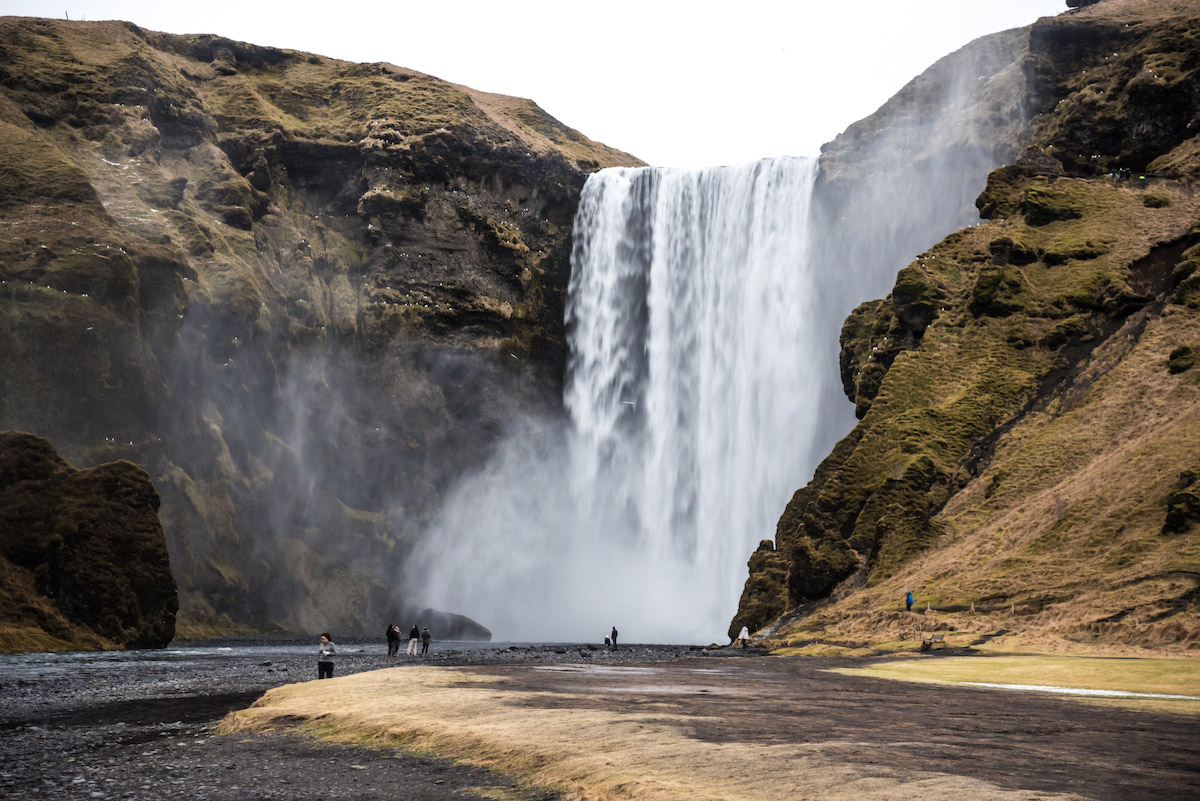
Just 30 minutes further east, you’ll reach the stunning and also iconic Skogafoss, one of my favorite waterfalls. Nicknamed the “Curtain Waterfall” for being shaped like drapery, you can experience the powerful waterfall by walking right up to it. If that’s not enough, you can take the stairs to the top of the falls, where you’ll be greeted with a spectacular view of the landscape.
Skogafoss
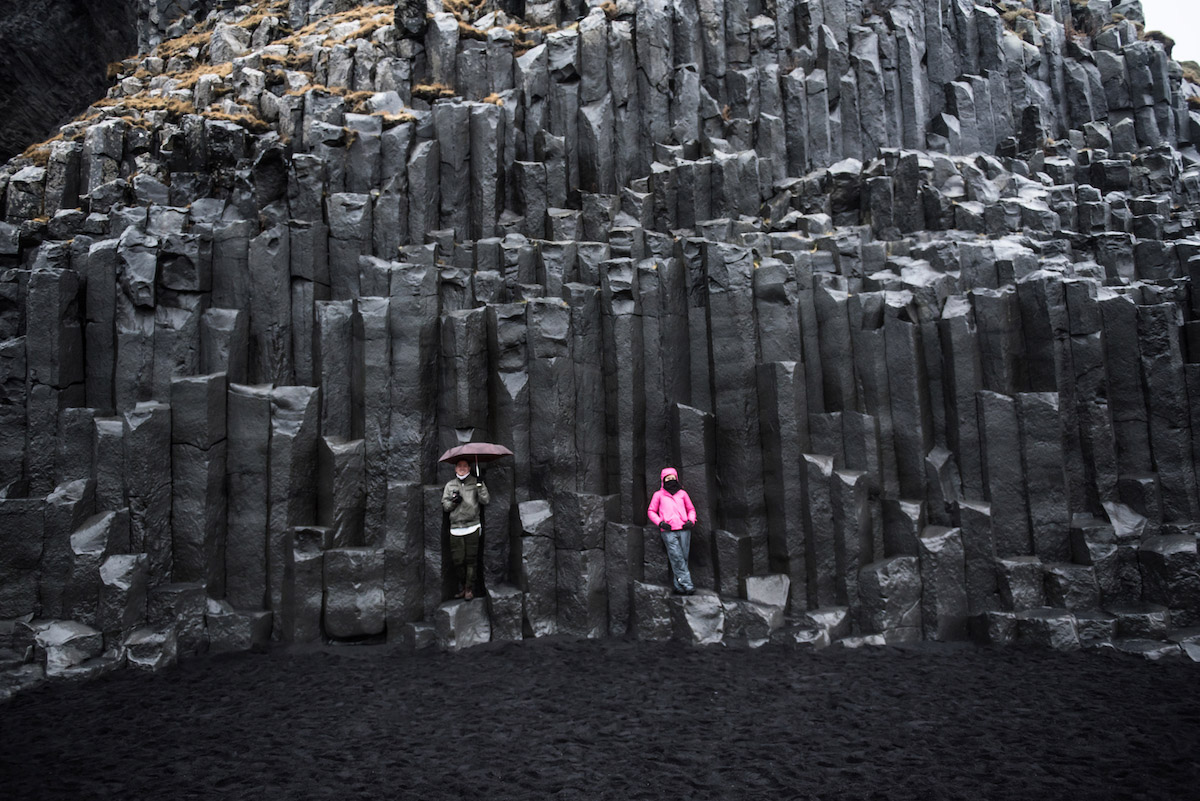
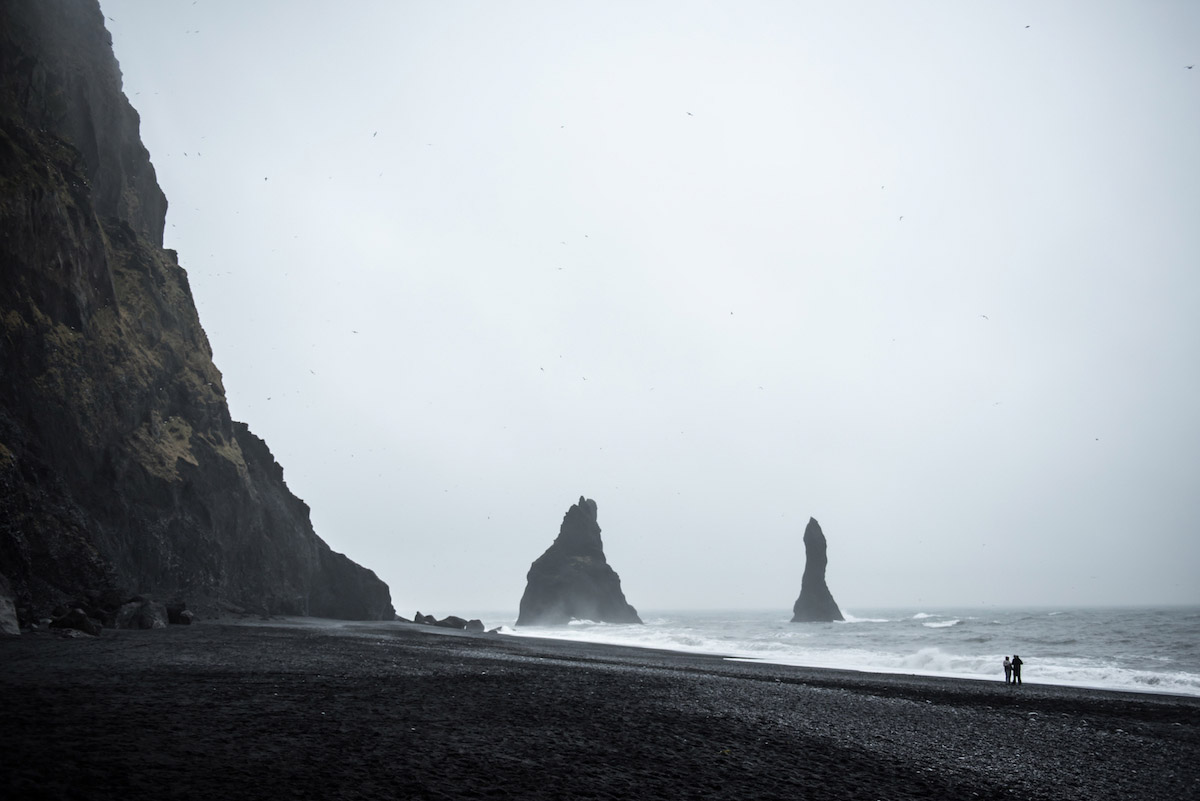
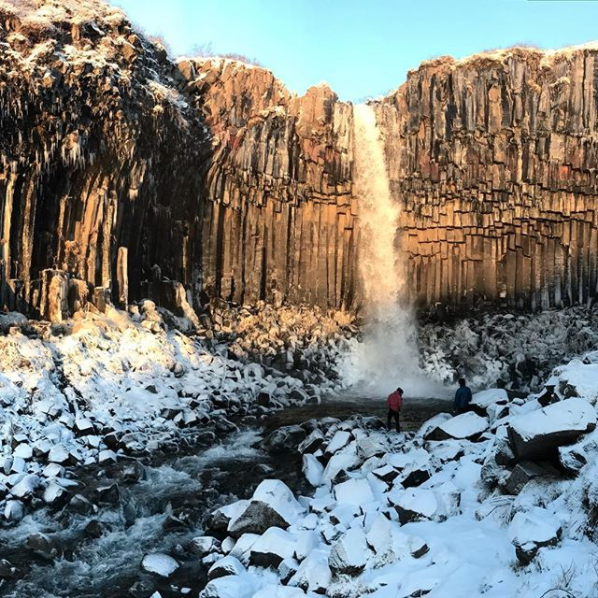
From Skogafoss, you’ll head towards Vik, where there are several places to visit. First, you can check out the viewpoint that overlooks Dyrhólaey Arch. Next, head to Reynisfjara Beach, also known as Black Sand Beach, where you can see the uniquely recognizable basalt rock formations and giant rock formations jutting out in the background. Finally, you can explore the town of Vik, a charming town with exception views of the surrounding landscape, and a place to search for accommodation.
Basalt Rock Formations at Reynisfjara Beach
Other places to check out: because these places are very close to each other, you may have time to do other things. Try looking for the hidden hot spring, Seljavallalaug (by the road Raufarfellsvegur) or the Solheimasandur Plane Wreck.
Day 5: Skaftafell, Svartifoss, Vatnajokull & Jokulsarlon
Next, we’ll head east towards Skaftafell. You can choose to hike on the Skaftafell Glacier, which can take up to half a day, or you can go see Svartifoss, a unique waterfall that’s surrounded by basalt rock formations.
Credit: Annie Ngo
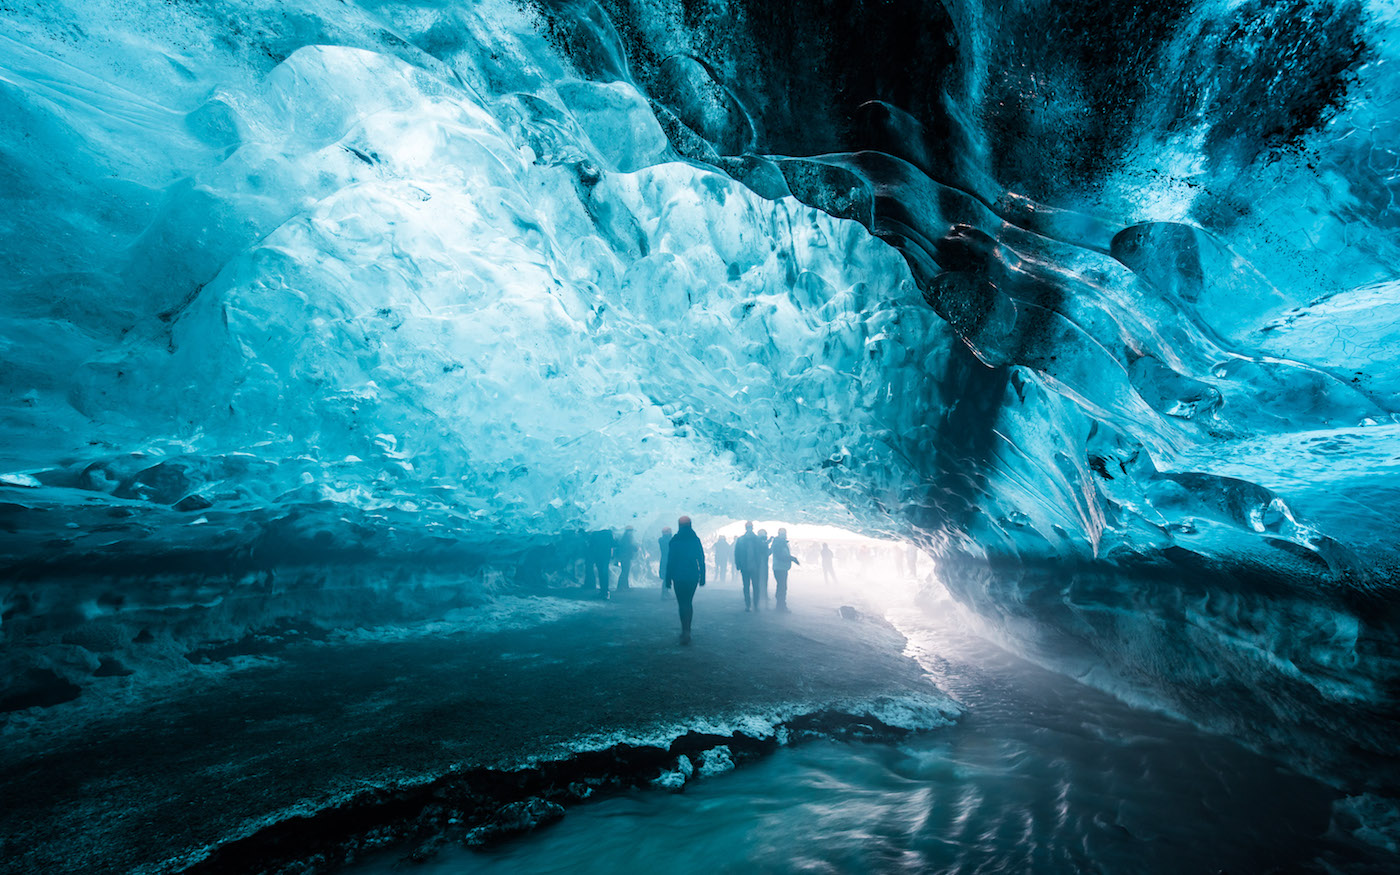
From Skaftafell, you can head towards Hof, a town that’s a frequent meeting place for tour groups for a variety of activities on the Vatnajokull Glacier. You can also hike the glacier, but I highly recommend doing an ice cave tour to see the incredible cave formations within the glacier.
Ice Cave Tour, Vatnajokull Glacier
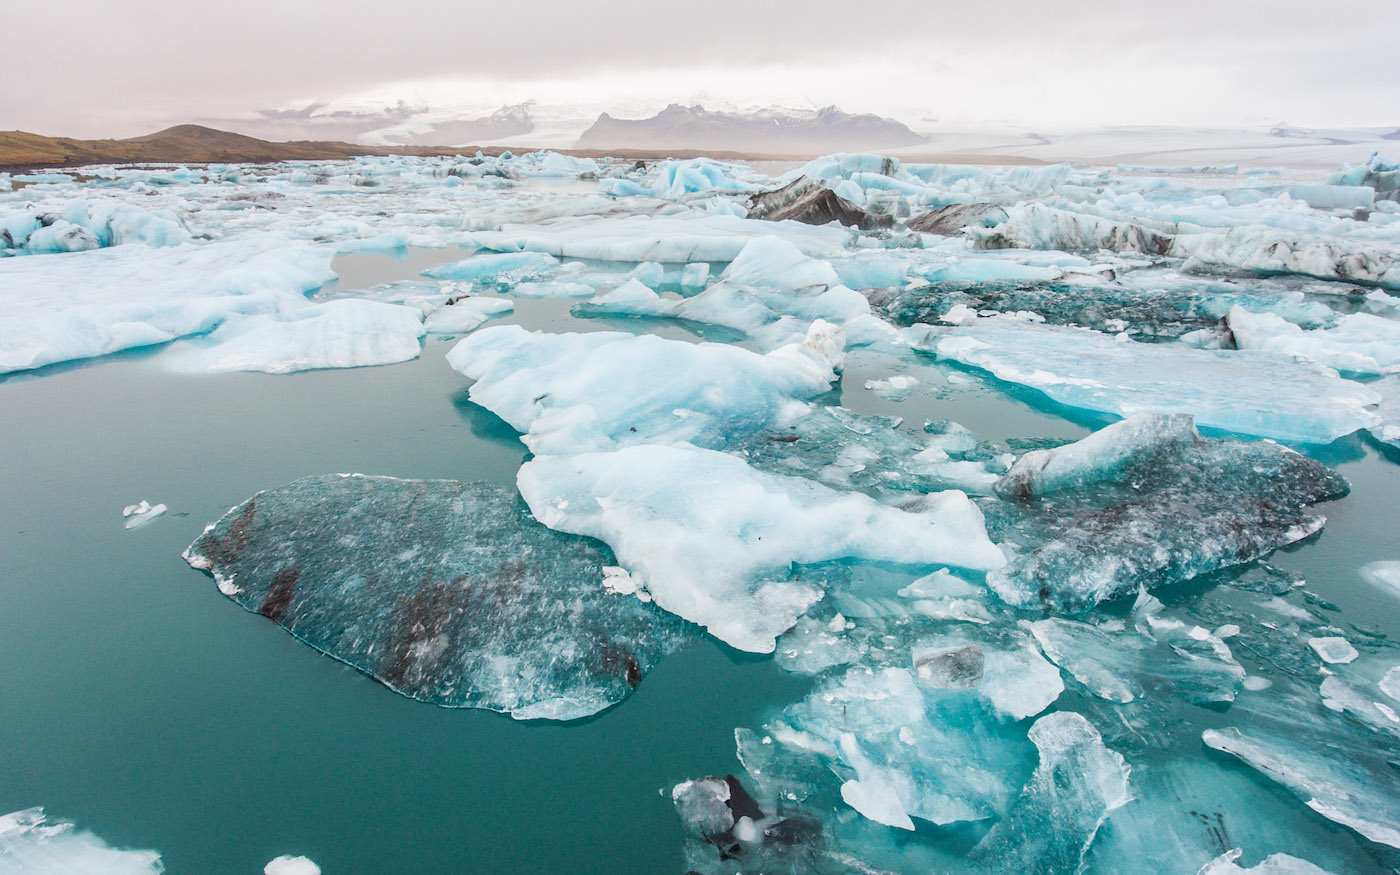
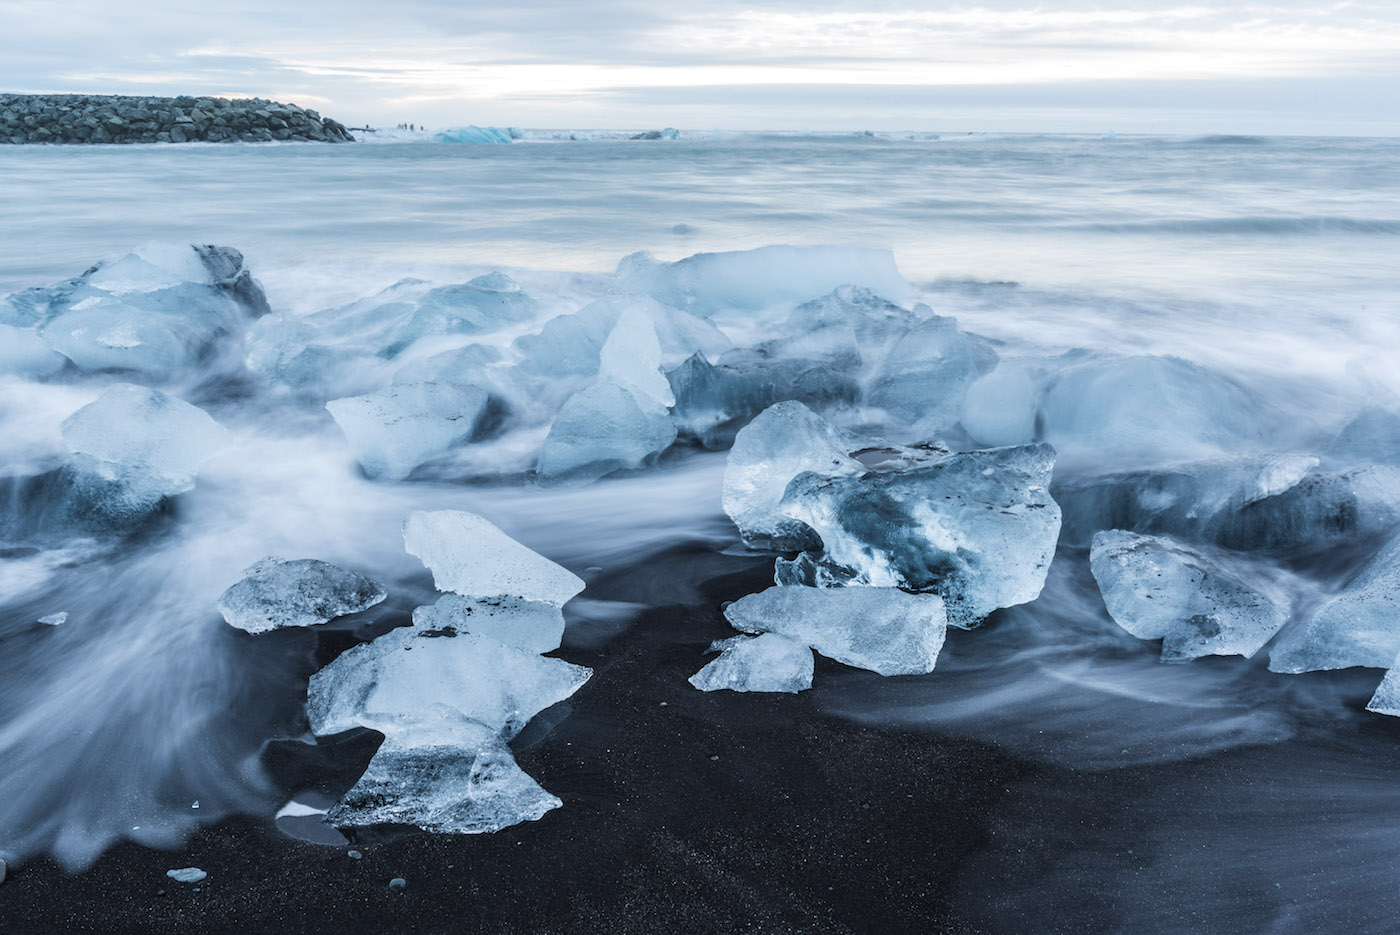
Finally, the last spot of this road trip leads to Jokulsarlon Glacier Lagoon. This lake holds large icebergs that have broken away from the Vatnajokull Glacier. In the summer, you can take boat tours to ride up close to the ice. Just across the lagoon towards the ocean, you’ll find Diamond Beach, aptly named because of the crystal clear ice fragments that wash up on the beach.
Jokulsarlon Glacier LagoonDiamond Beach
For your accommodation, there’s plenty of inexpensive places in Hof, but if you have room the splurge, check out Fosshotel Glacier Lagoon.
Day 6: Free/Flex Day
Potentially on your 5th day of the road trip, you could see all of the things listed. However, depending on the season, weather conditions, activity schedule or if you decided to pace yourselves, you can be using this 6th day for the latter parts of your journey or visit anything you may have missed.
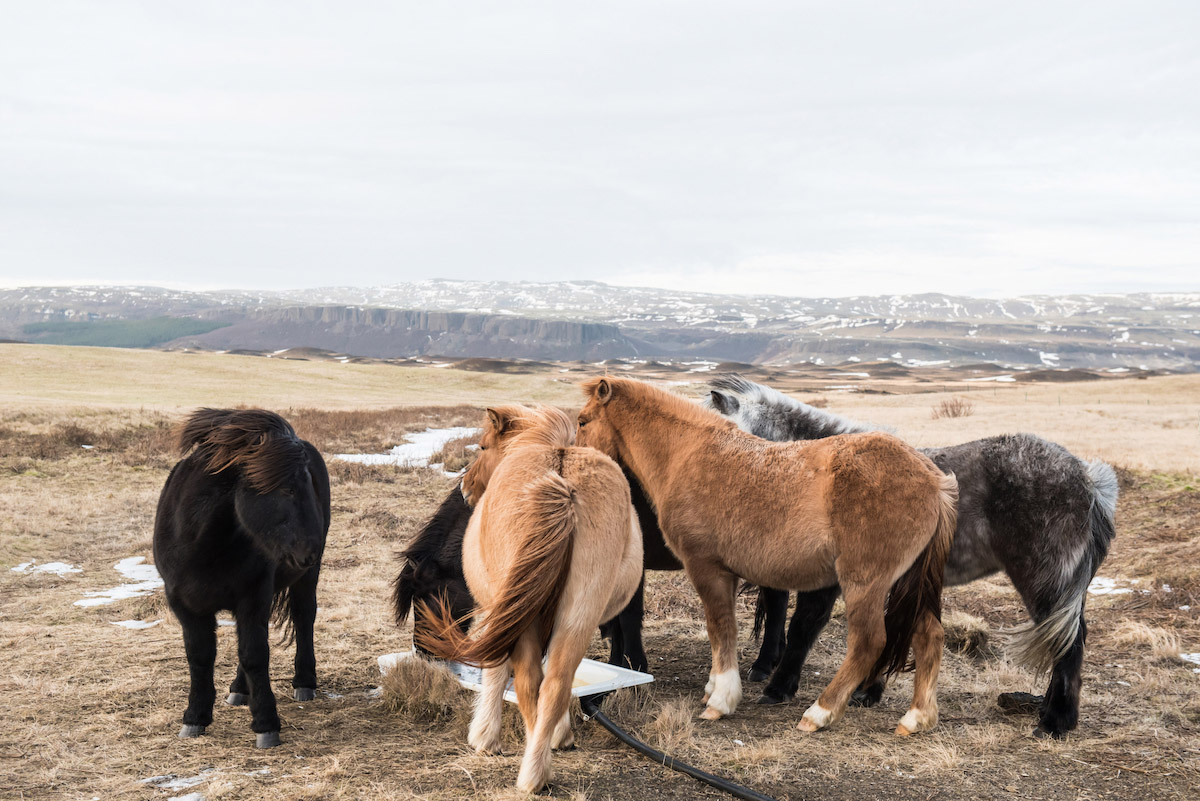
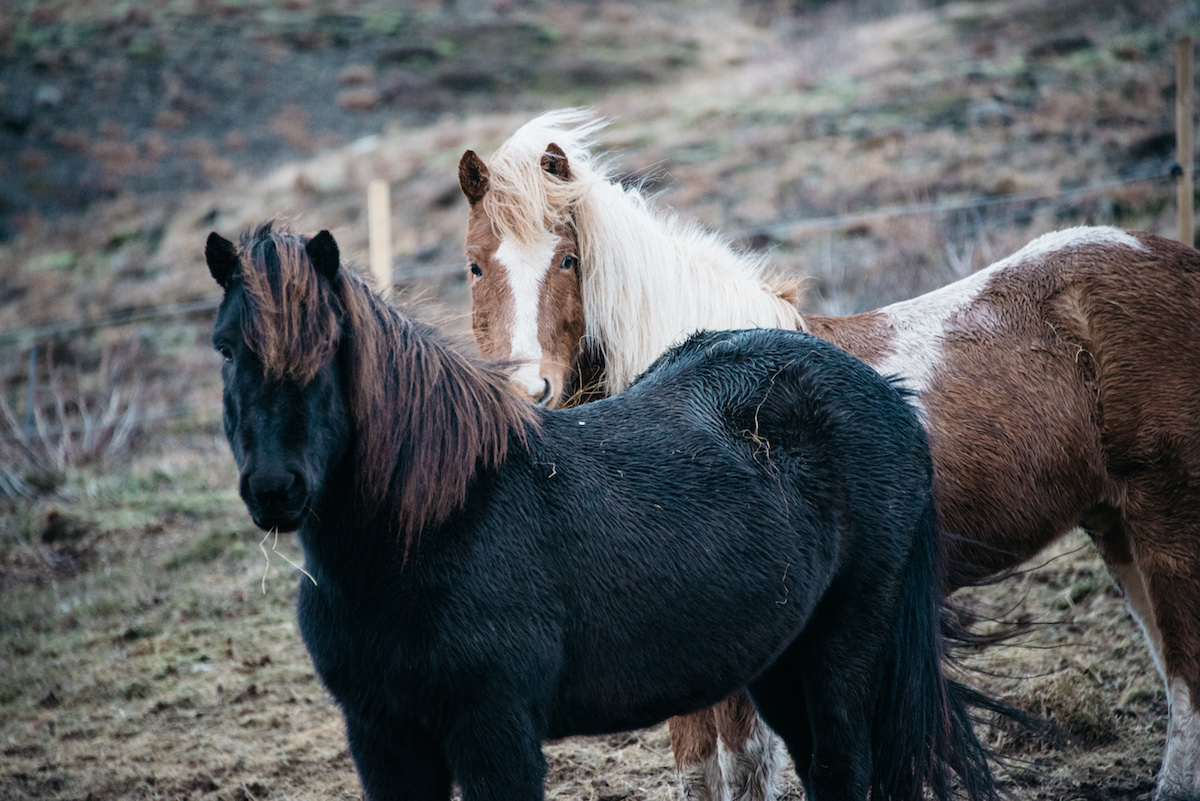
Plenty of Icelandic Horses
You may start heading back towards Reykjavik as you prepare to wrap up your trip. From Hof, it would normally take 4 hours straight to get back to Reykjavik. However, if conditions aren’t ideal, it could take longer. When we made our visit this past November, it was raining and snowing, which slowed our drive to over 6 hours.
Since Iceland is so photogenically beautiful, you probably will make several stops to enjoy the scenery and there are still other sites you can check out on your way back. You can pass by Foss a Siou, a tall but thin waterfall that’s in someone’s backyard. There’s also Fjaðrárgljúfur, a massive canyon that measures 100 meters deep. A town not covered in the main itinerary that you could visit is Selfoss, where you can see the Selfoss waterfall.
Day 7: Epic Iceland Road Trip Completed!
Congratulations! You completed your epic road trip of Southern Iceland! By this point, you are likely spending a little more time in Reykjavik before you fly back home.
Although our itinerary covers a lot of spectacular sights, it still only visits the southern part of Iceland! There’s still so much beauty to be seen that one visit isn’t enough, so I’m sure I’ll be back crafting another itinerary to see the rest of this amazing country.
Additional Tips
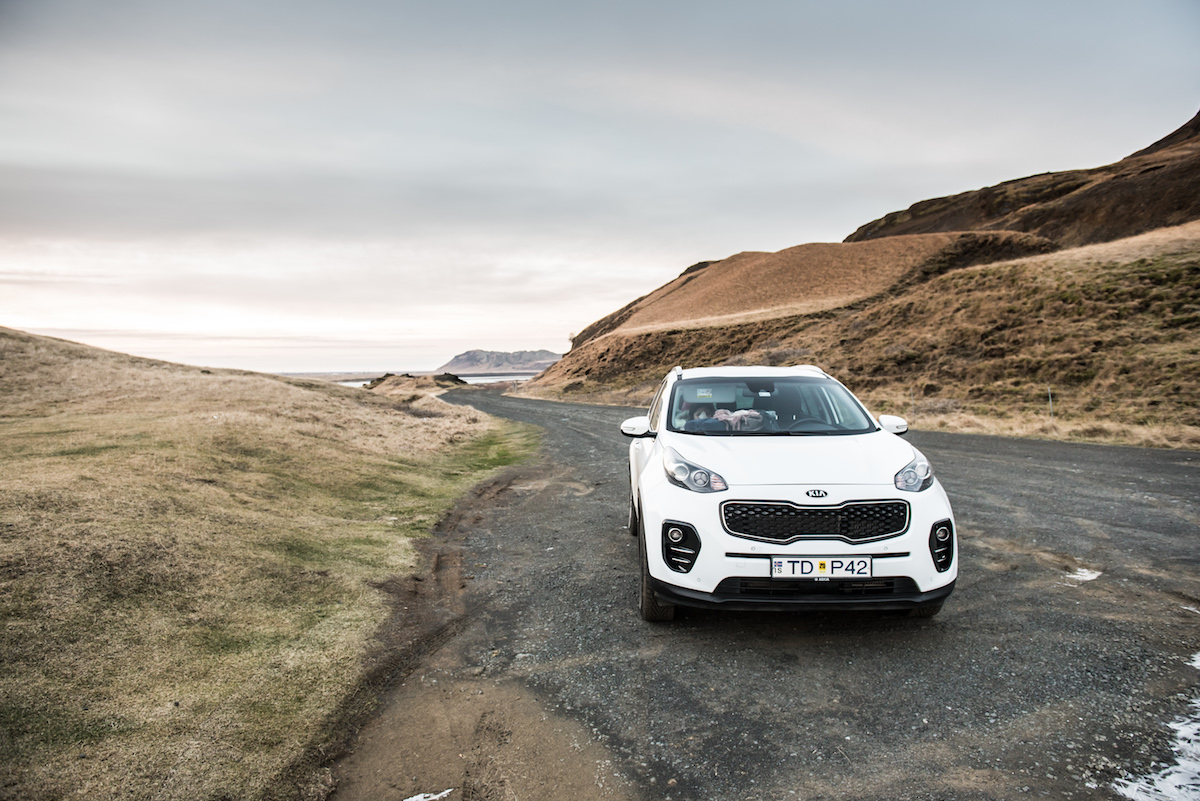
Although most vehicles will be fine to use, I recommend getting a 4×4 so you are able to trek over tougher terrain, such as Haifoss, and also for poor weather conditions like rain and snow. Keep in mind they are a bit more expensive than compact cars/sedans. I’d recommend Blue Car Rental for great pricing and excellent service. Also, opt for the Mobile Wi-Fi (around $10 a day), so you can use your phone’s GPS, as well as look up various destinations and booking accommodation.
Leave your itinerary at http://safetravel.is/ and download the 112 app so you get all your up-to-date information about Iceland conditions and so they know where you are and in case you need emergency services.
You pretty much don’t need cash, as just about every place takes credit card. If you’re coming from the US, you can use your dollars for cash and don’t need to exchange to Icelandic Krona.
As I mentioned, this itinerary is good for any season. However, because the days are so short in winter, you may be rushed in order to see many of these sites. So if you prefer a more relaxed, slower pace, then you may want to consider visiting in the spring or summer.
Let us know what you think of our itinerary and where are some of your favorite places to see! If you like it, Pin it below!
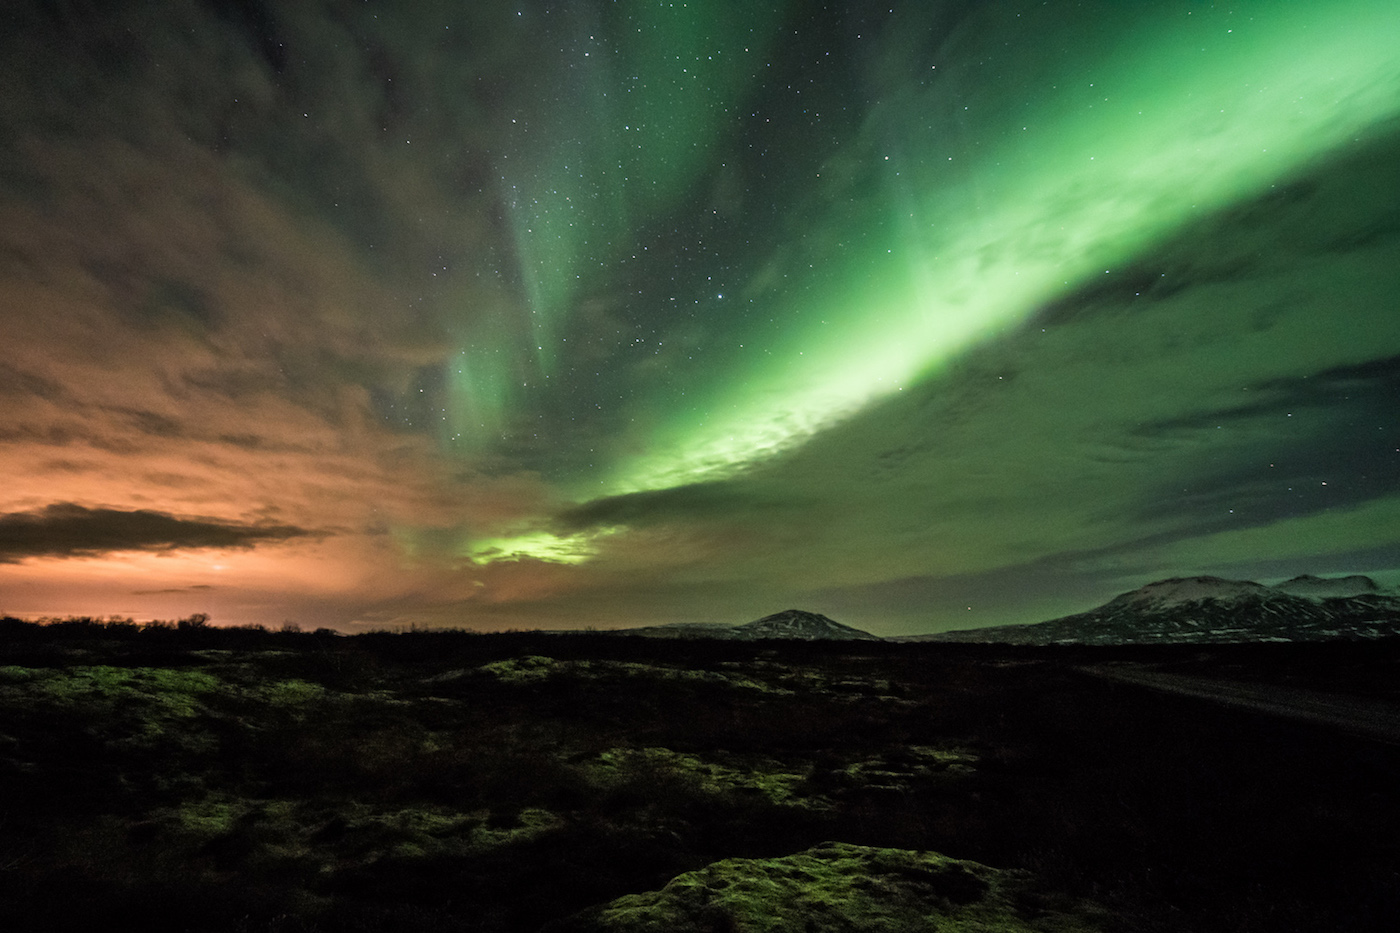
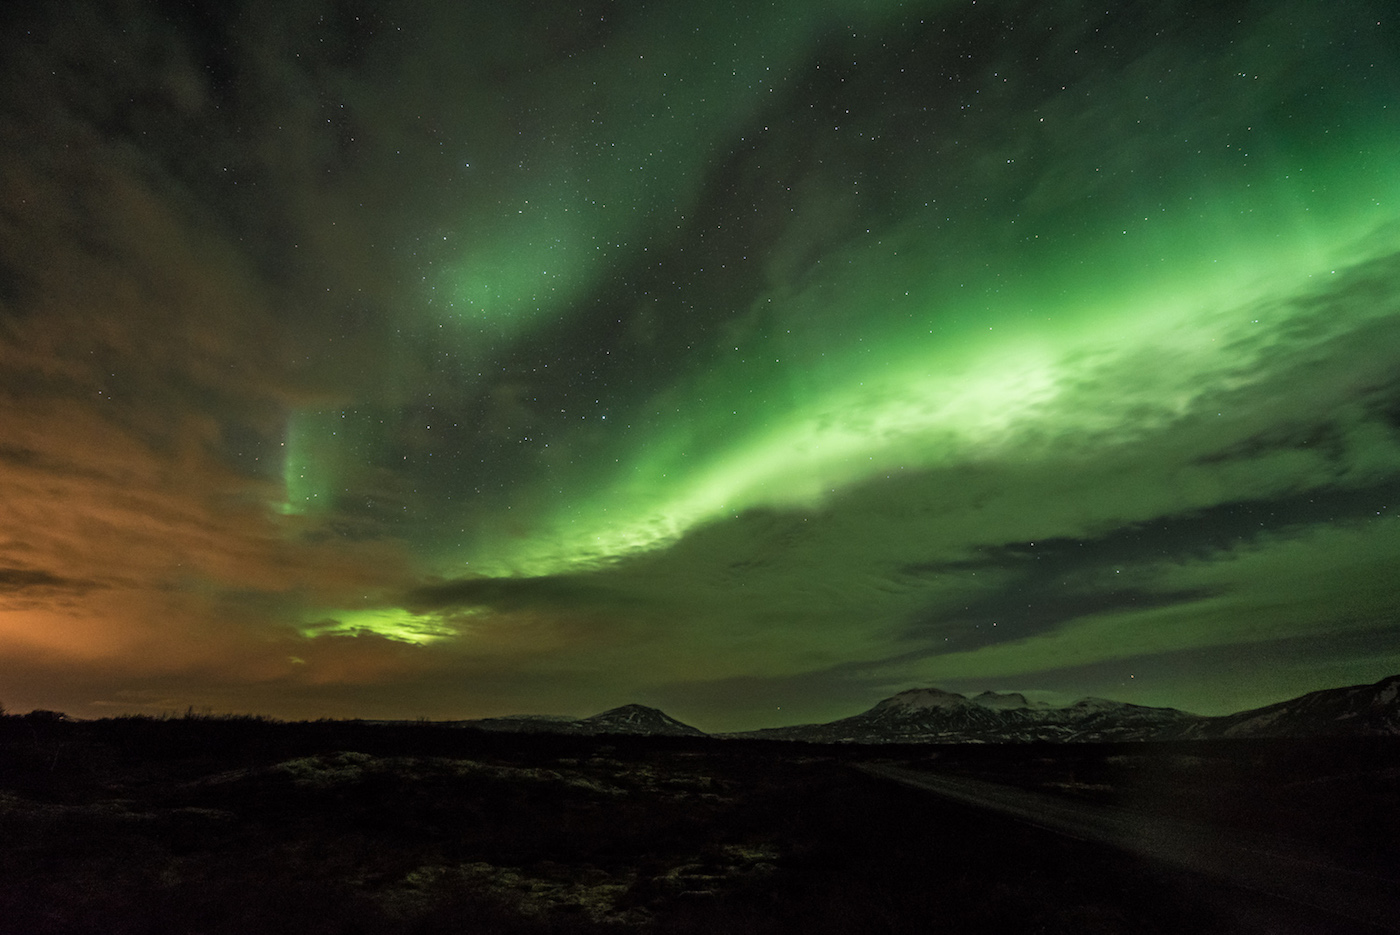
When making a visit to Iceland, one of the great natural wonders that everyone wants to see is the Aurora Borealis, more commonly known as Northern Lights. The northern lights are a spectacle unlike any other with the intense swirling movement of green lights “dancing” in the starry skies. We were fortunate enough to see it again during our latest visit and it was a dazzling couple of nights.
But finding the northern lights and attempting to photograph them can be very challenging tasks, so we’re going to prepare you in the best way possible. Here are 7 tips for finding and photographing the Northern Lights during your visit to Iceland:
1. Download the Aurora Alerts Northern Lights App,
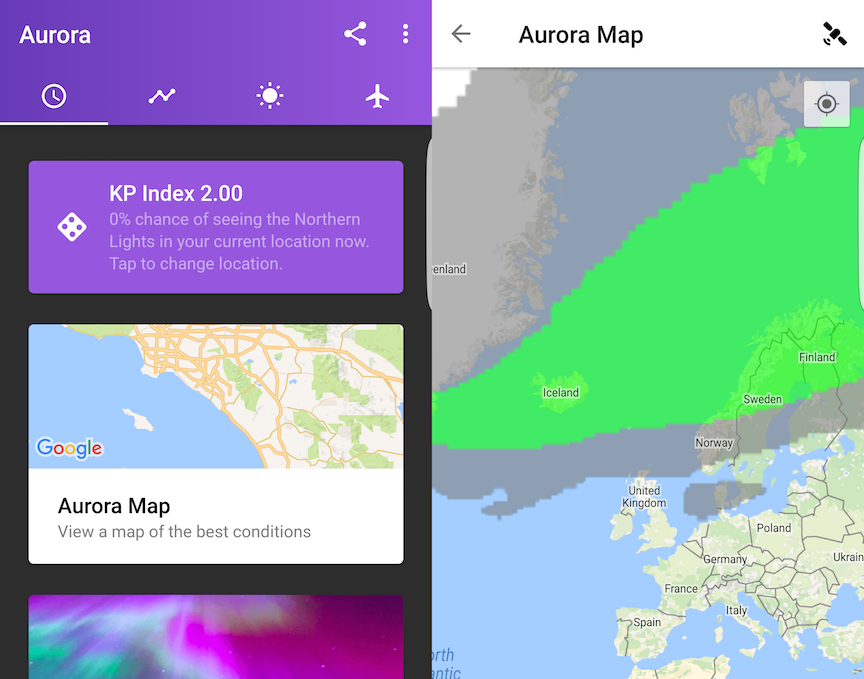
This could be one of your best resources to track the northern lights. The Aurora Alerts Northern Lights App is a free app provides live up-to-date information of the northern light activity, including the probability of seeing the lights based on location, geomagnetic conditions (KP Index) on a scale of 1-9, hourly to long-term forecasts, and projected northern light coverage worldwide.
You’ll want to go out when the KP Index reads 3 or higher for the best conditions. You can also set up alerts that will tell you when the best chance is to see the lights. This app also works for other countries as well.
Aurora Alerts Northern Lights App
Just about the only thing it doesn’t do is provide a weather report, so it’s good to have an app or website to show the weather. I liked using the Rainy Days App and also used the Icelandic Met Office website, both showing project cloud coverage throughout the country by the hour. With a combination of these resources, you’ll have everything you need to track the northern lights.
2. Find dark clear skies away from the city
The best places to see the northern lights are places that are away from the city to avoid light pollution. This way your eyes will adjust to the darkness and it’ll be easier to see and photograph the northern lights. That’s simple enough to do since there are plenty of places in Iceland that are far from the city.
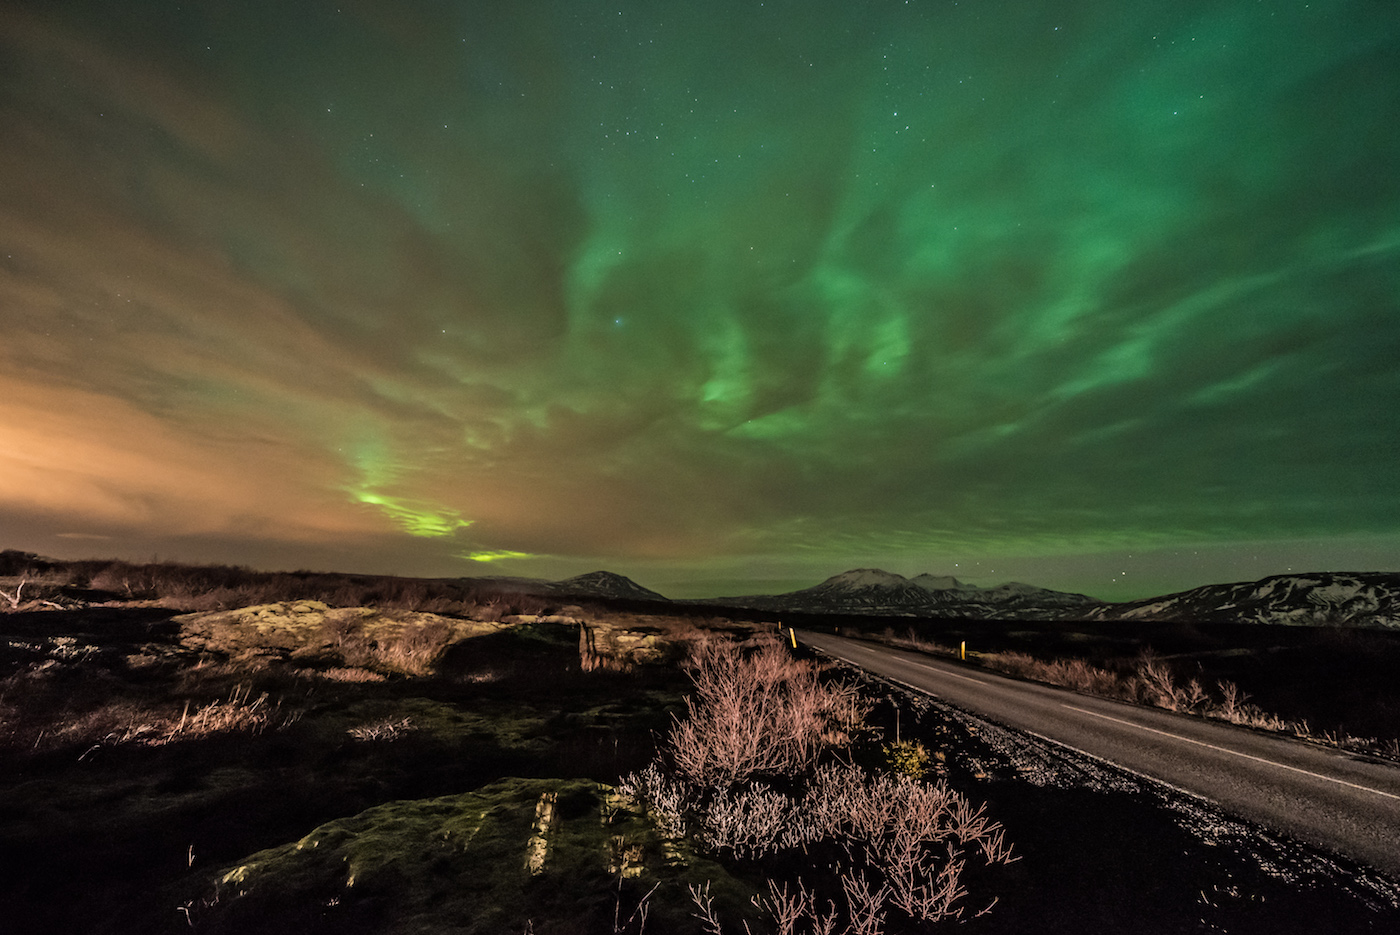
The more challenging part may be trying to find dark clear skies. As the locals would say, “If you don’t like Iceland’s weather, wait 5 minutes.” The weather can be particularly fickle, going from very clear skies one moment and then raining minutes later. During our recent visit, it rained 5 of the 7 days we were there and in some instances, it can be cloudy/rainy for days or weeks at a time!
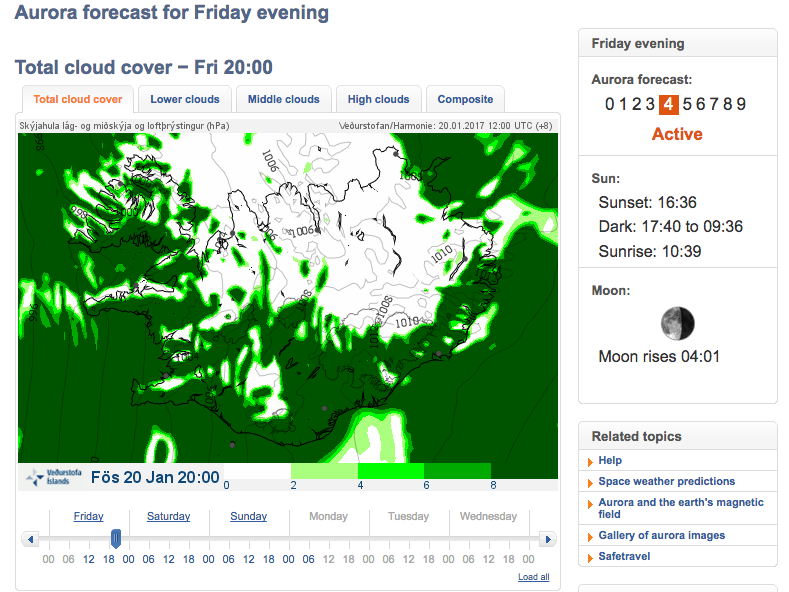
Having the Rainy Days App or the Icelandic Met Office website can help you showing projected cloud coverage and find an area with clear skies. Even partial covered skies can give you some great shots of the northern lights, as long as you have some open sky to show the lights.
Icelandic Met Office Website. This shot indicates it will be may be a good night to see the northern lights in southern Iceland.
Another thing to remember is to not go to Iceland in summer if you specifically want to see the northern lights because the days are very long and at night, it doesn’t get completely dark. It would be very difficult to see the lights under these conditions. The best time to see them would be during fall or winter when the nights are longer and darker.
3. The Northern Lights are not always easily visible
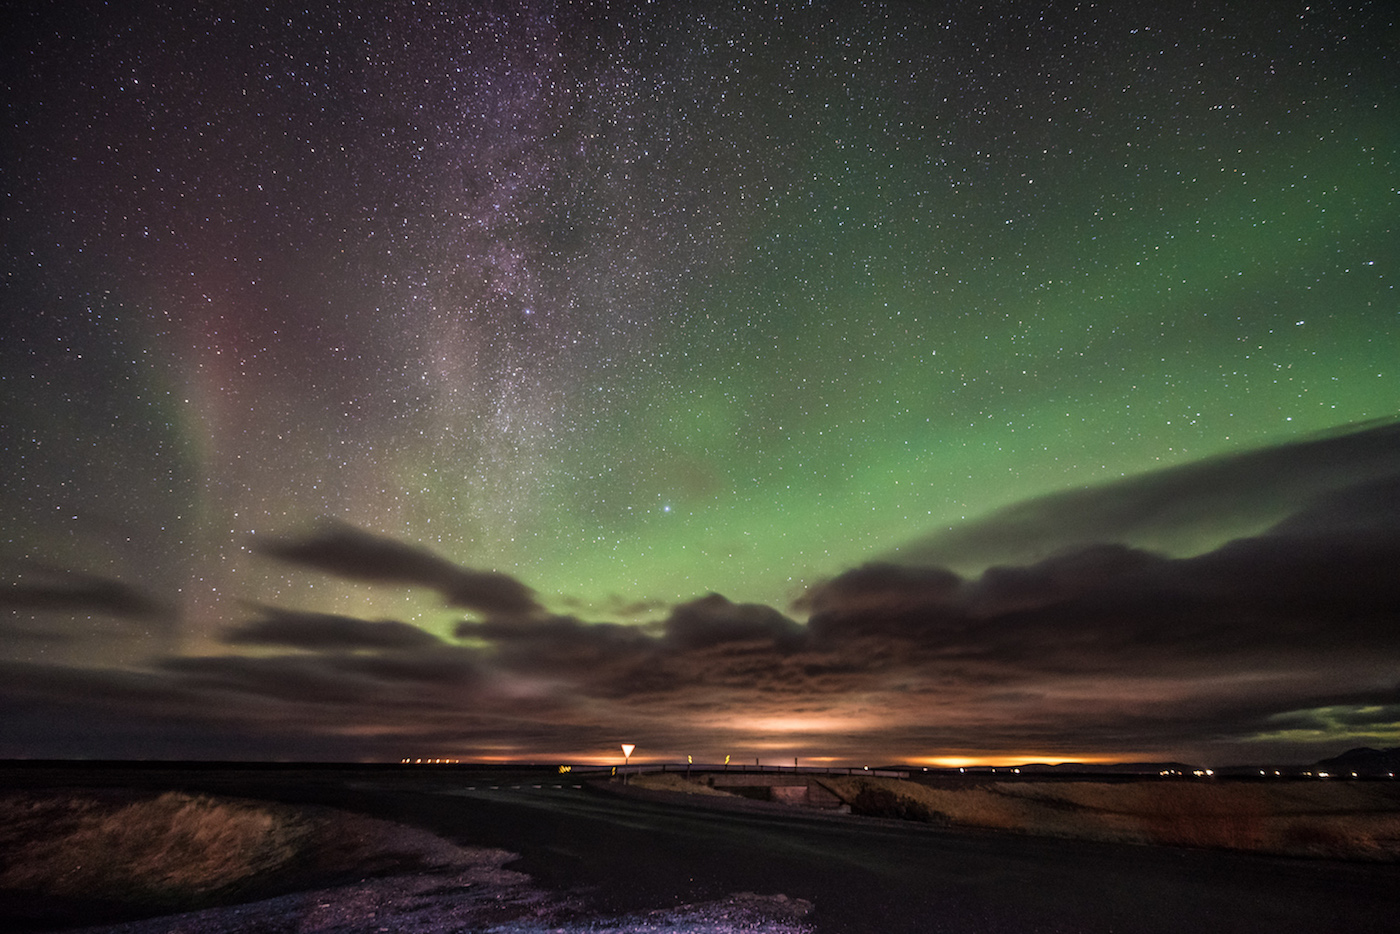
When the northern lights are VERY bright, they are very visible and can illuminate the entire sky. However, sometimes even if the sky looks dark, the lights can still be there. They will be very faint and pretty difficult to see, especially if you’re driving and your eyes are not adjusted to the dark.
These lights were too faint to see clearly with my eyes. Only my camera could capture this low activity
If you want to be sure whether or not the lights are there or not, then stop to the side on occasion and let your eyes adjust to the dark. If you can see a faint streak of color in the sky, it is possible those are the northern lights. If you have a camera with the right settings, you can confirm it with a test shot. While the lights may look very weak initially, you can wait a bit and see if the activity gets stronger. In both instances I’ve seen the northern lights, they started out as faint trails, but then intensified into much brighter lights.
4. Having the right camera and equipment
So you found the northern lights! You’re enjoying the wondrous spectacle of dancing lights dazzling through the sky! You bring out your phone or point-and-shoot camera to take a picture and…it’s almost pitch black…you can barely see the lights on your screen…it’s blurry…
Shooting photos at night are not the best conditions for a phone or point-and-shoot camera. If you really want to capture vivid shots of the lights, you need the right equipment. Here is the basic gear you should carry:
Tripod – Any tripod generally will be OK, but it’s highly recommended to bring a strong and sturdy tripod and prevent any vibration causing blurry images and especially on nights when it can be windy and will blow away any cheap tripod. You’ll be working with exposures from 5-20 seconds, so you need to be sure your tripod will keep your camera completely still.
Camera with Manual Mode – You need a camera that you can adjust the settings manually, primarily shutter speed, F-stop, and ISO. Auto will not help you here.
Although it’s still recommended to have a full-frame camera because of better low-light capabilities, better ISO performance and image quality, and more lens selection, you can still get shots with an advanced mirrorless or point-and-shoot camera as long as they have manual capabilities. I used full-frame cameras, including a Nikon D750 and a Sony A7s. However, if you’re on a budget, you can do well with a non-full-frame mirrorless camera like a Sony D6300 or Fujifilm XT1, or even use an advanced point-and-shoots like the Sony RX100 series or a Canon GX7.
Wide Angle Lens – A wide angle lens will help you capture a good amount of the foreground as well as the sky. When looking for a lens, anything 24mm or lower is ideal, and you want to look for F-stops as low as 2.8.
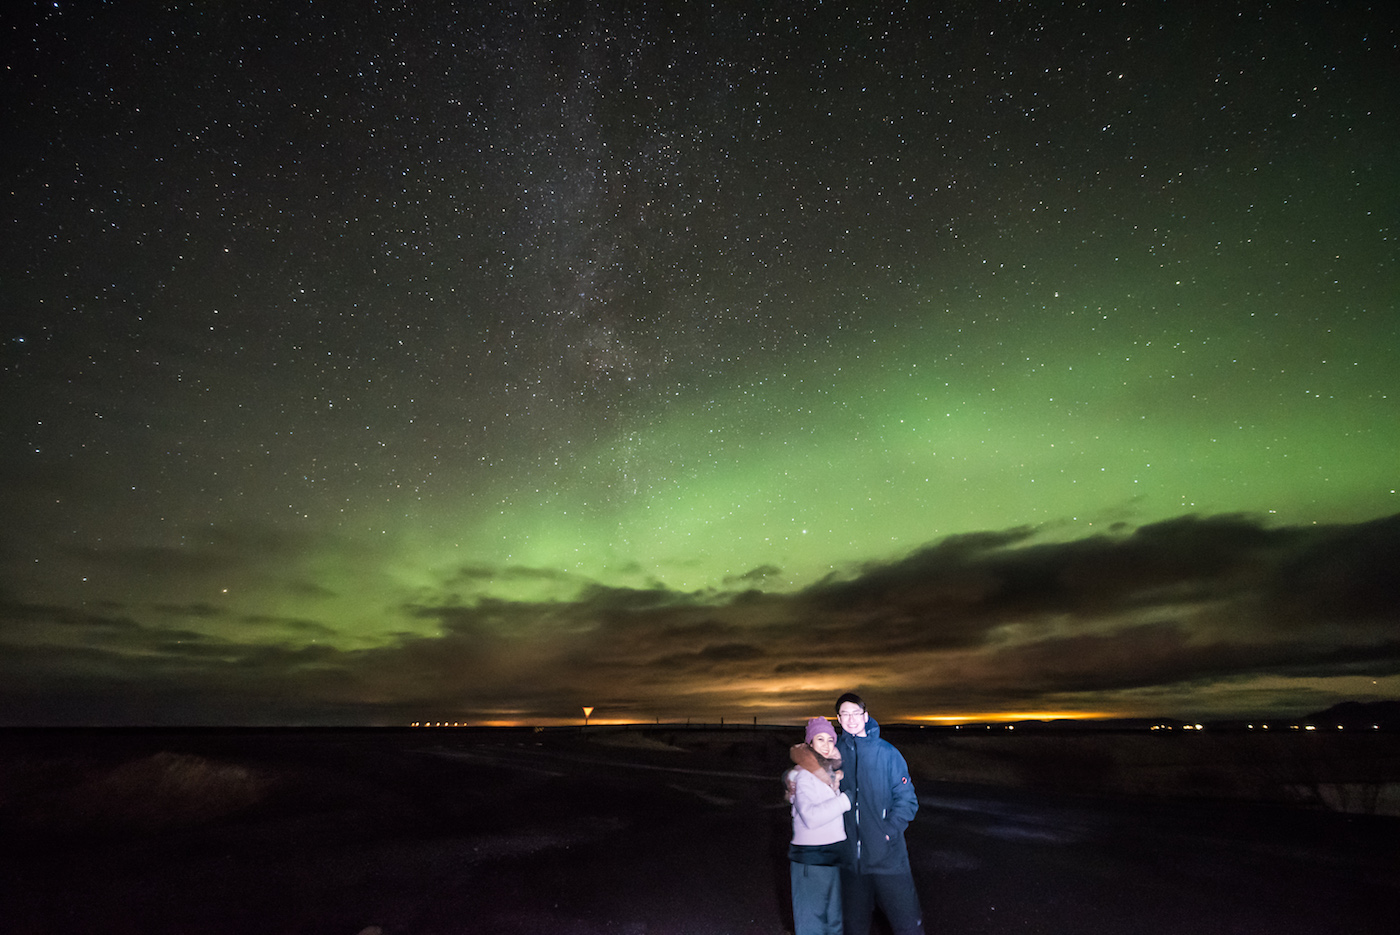
Remote Trigger (Optional) – It’s good to have if you want to take selfies and also to take a shot without pushing the camera button to prevent any vibration. If you don’t have a trigger, you can use the camera self-timer to take a shot.
Powerful flashlight (Highly Recommend)– We’ll get into more of this in the next tip.
5. Setting up your focus
Perhaps the most challenging part of night photography is focusing in the dark. In pitch black darkness, cameras are not able to properly autofocus on a particular object. Thus, you have to figure out how to manually focus your lens.
An easy way to set up your focus is to do it before dark sets. You can use your camera to autofocus on a distant point. Once the lens is focused, switch your lens to manual focus and do not touch it for the rest of the night. You can use tape to hold the lens’ focus ring or use a marker to mark the focus point on your lens. You’ll be good to go when shooting the northern lights in any direction.
If you did not focus before dark, then you’ll have to figure out how to focus at night. My favorite method is using a powerful flashlight that can illuminate an object at a distance. If you can light a distant object, many cameras will be able to autofocus on the object, which then you can switch back to manual focus. If your camera cannot focus on the illuminated object, have someone take the flashlight and walk 50-100 feet away. Your camera should be able to autofocus at the brightest point this way, and you can fine-tune the focus manually. I love Maglite flashlights because they are incredibly powerful and make it easier to focus at night at a distance, but a good headlamp will do the job too.
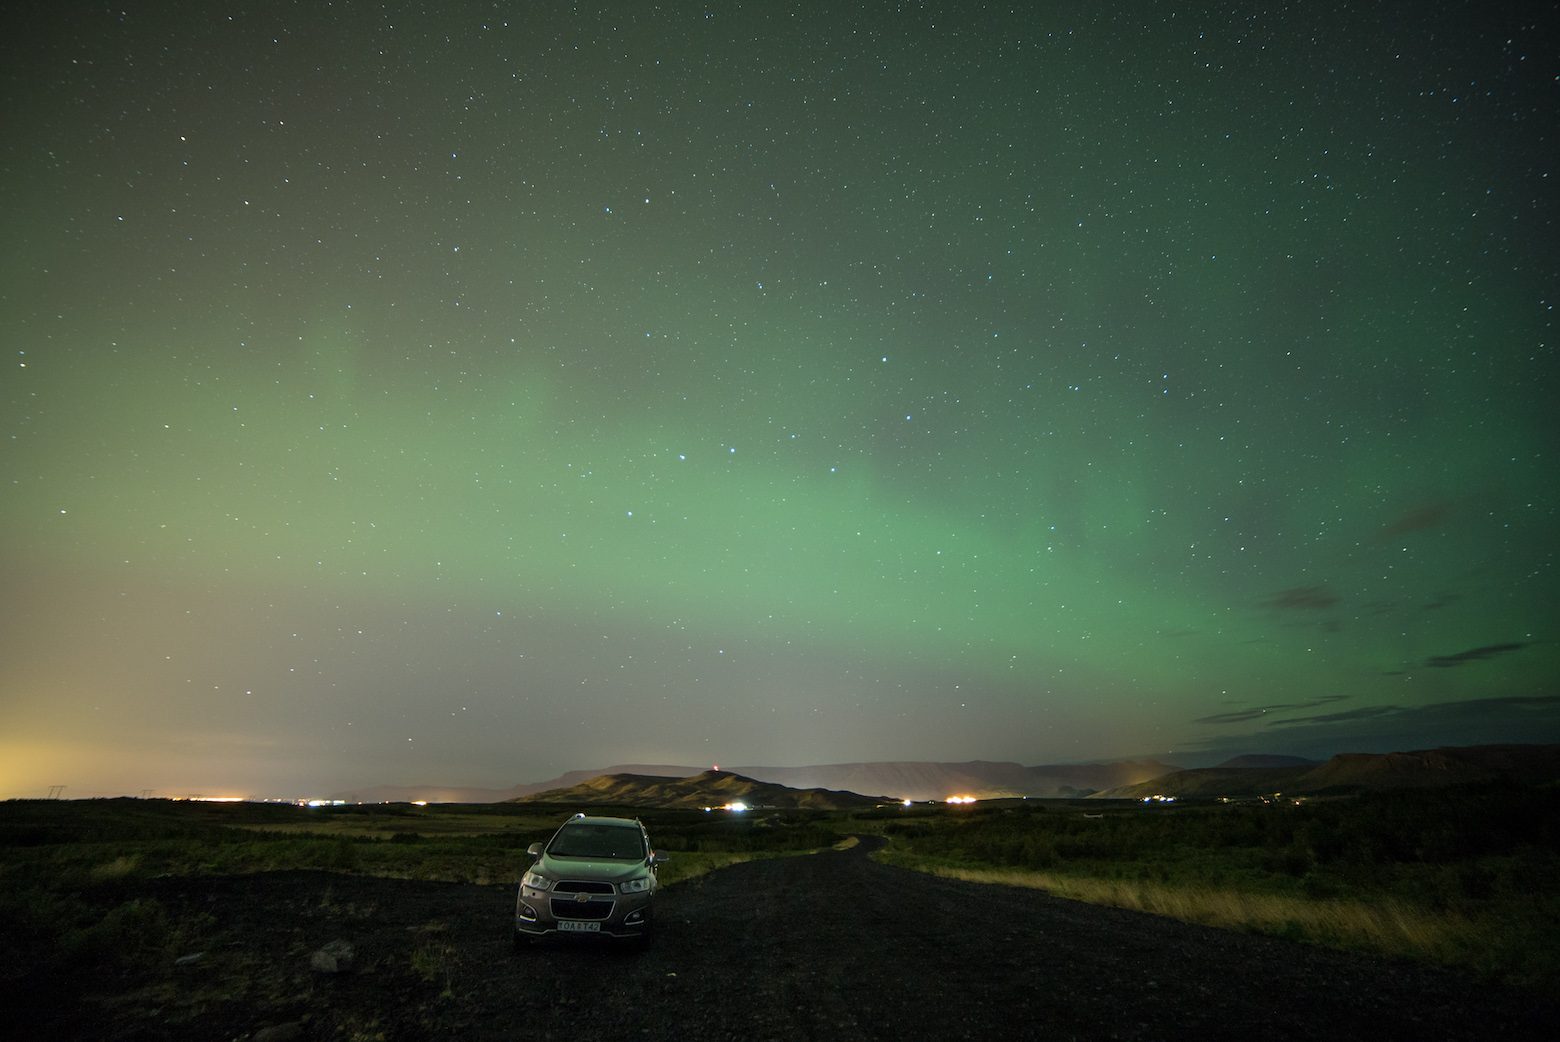
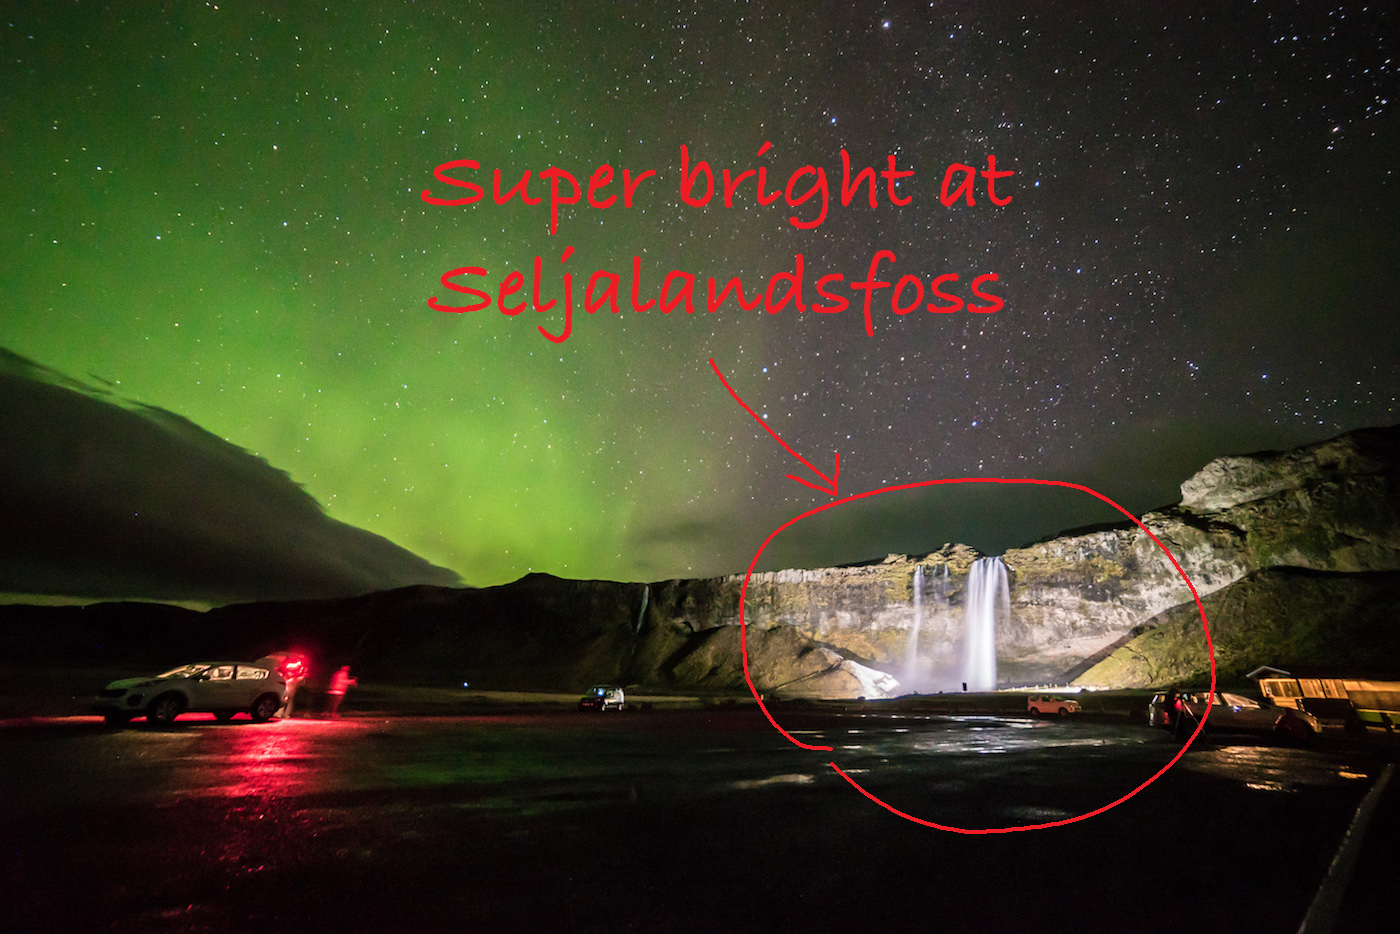
Seljalandsfoss brightly lit with flood lights. Easy for cameras to focus
Without at least flashlight, focusing can be a little trickier. Some full-frame cameras have excellent live-viewfinders that perform remarkably well at night, so it can be easy to find the brightest star and bring it into focus. If you don’t have that, then the next best option is to start your lens from ∞ (infinity symbol) and adjust by trial and error with minuscule adjustments after each trial shot.
6. Manual Settings to use
The best combination of settings to use to shoot the northern lights is a large aperture (f2.8 – 4), longer shutter speed (5-20 seconds), and relatively high ISO (800-6400, though ideally around 1600 ISO). You can start with something like f2.8, 15 seconds, 1600 ISO and work from there. If you stick around those ranges and make the necessary adjustments, you will be able to get good shots of the northern lights. You should also manually set your color temperature (K) to around 2800-4800.
f2.8, 6 seconds, 3200 ISO
f2.8, 6 seconds, 6400 ISO
f2.8, 13 seconds, 3200 ISO
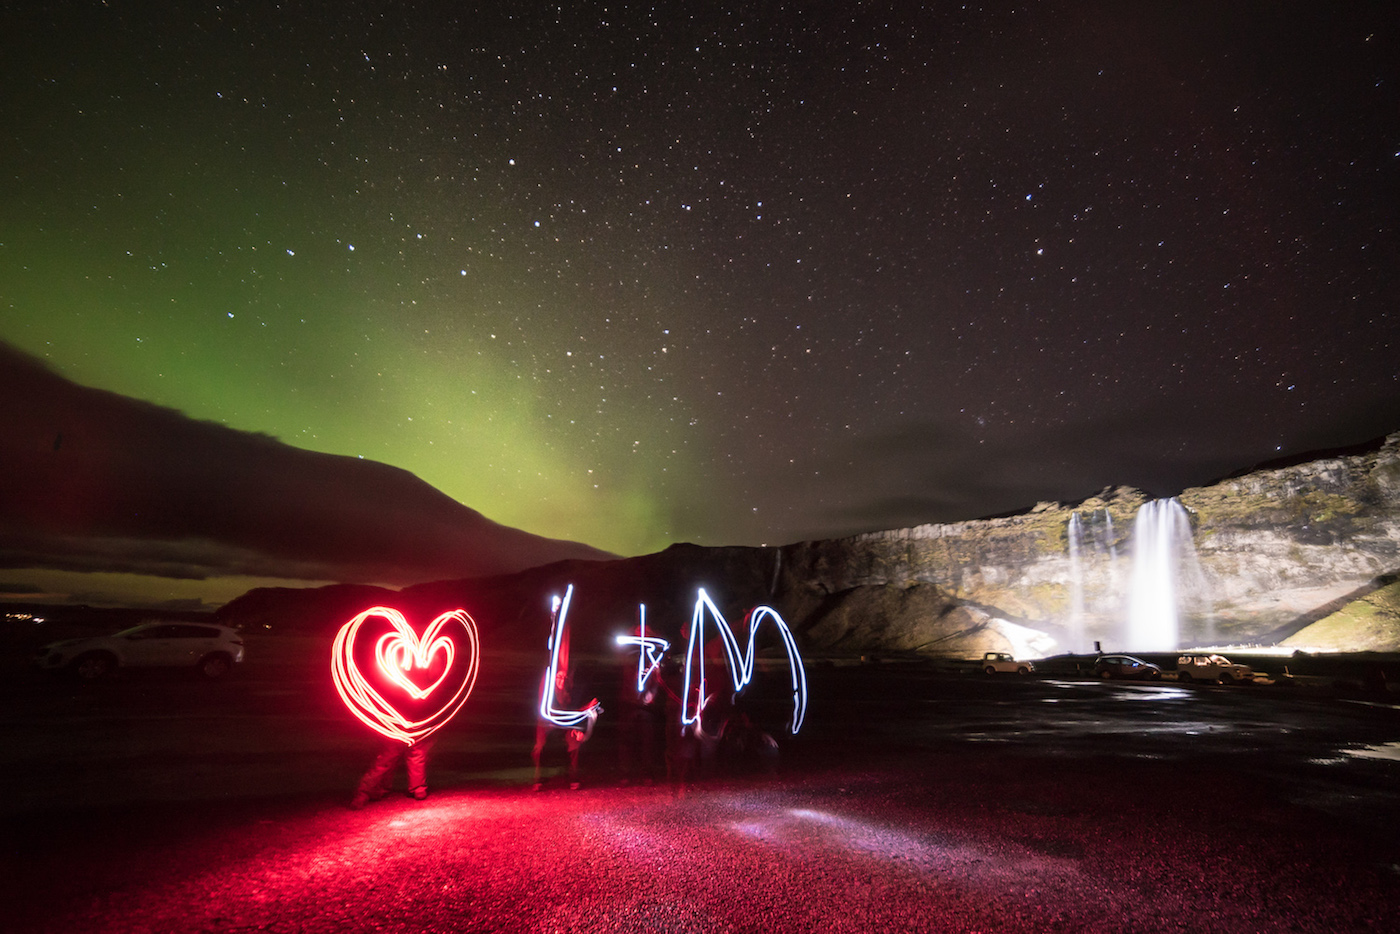
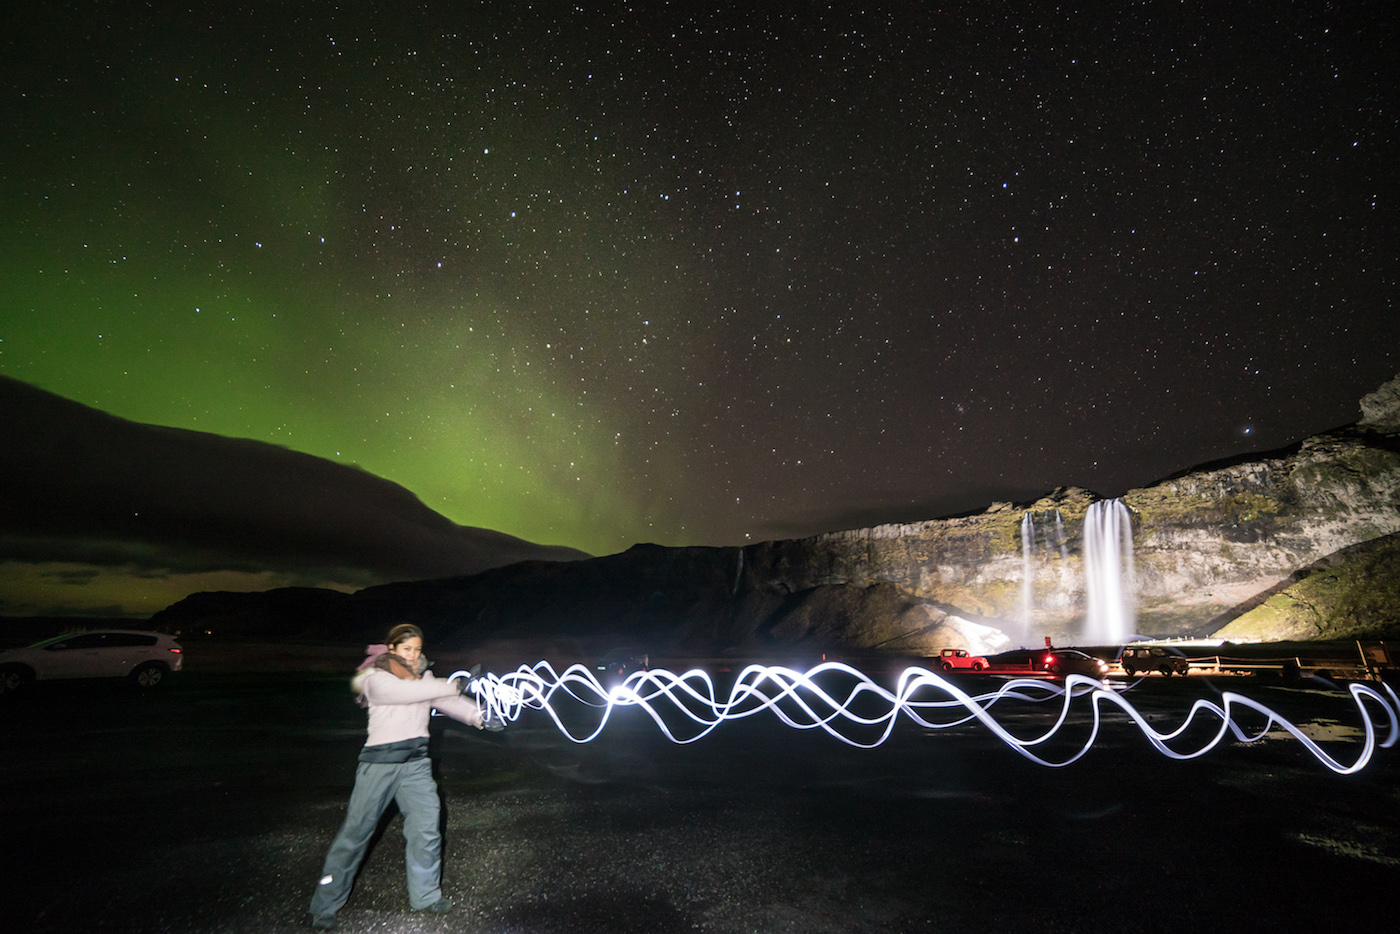
As an added bonus, if you have long enough shutter speeds, you can do light painting and make doodles in your images. When you turn on a light, the camera will capture the movement of the lights until you turn off the light. Try this out when you do long exposures!
<3 Ling + Mat
KAMEHAMEHAAA!!!
KAMEHAMEHAAA PART 2!!!
7. ALWAYS Shoot Raw
One of the biggest mistakes I see people make while taking photos at night (and in general) is only shooting in JPEG. You should always shoot in RAW, which creates a digital negative of your image. This file allows you to make much more adjustments in post-processing with Photoshop or Lightroom, whereas adjusting a JPEG image is very limited and will hurt the quality of the image. Most advanced cameras offer the ability to shoot RAW, so although it takes up significantly more space, it is still almost a necessity to shoot in that format.
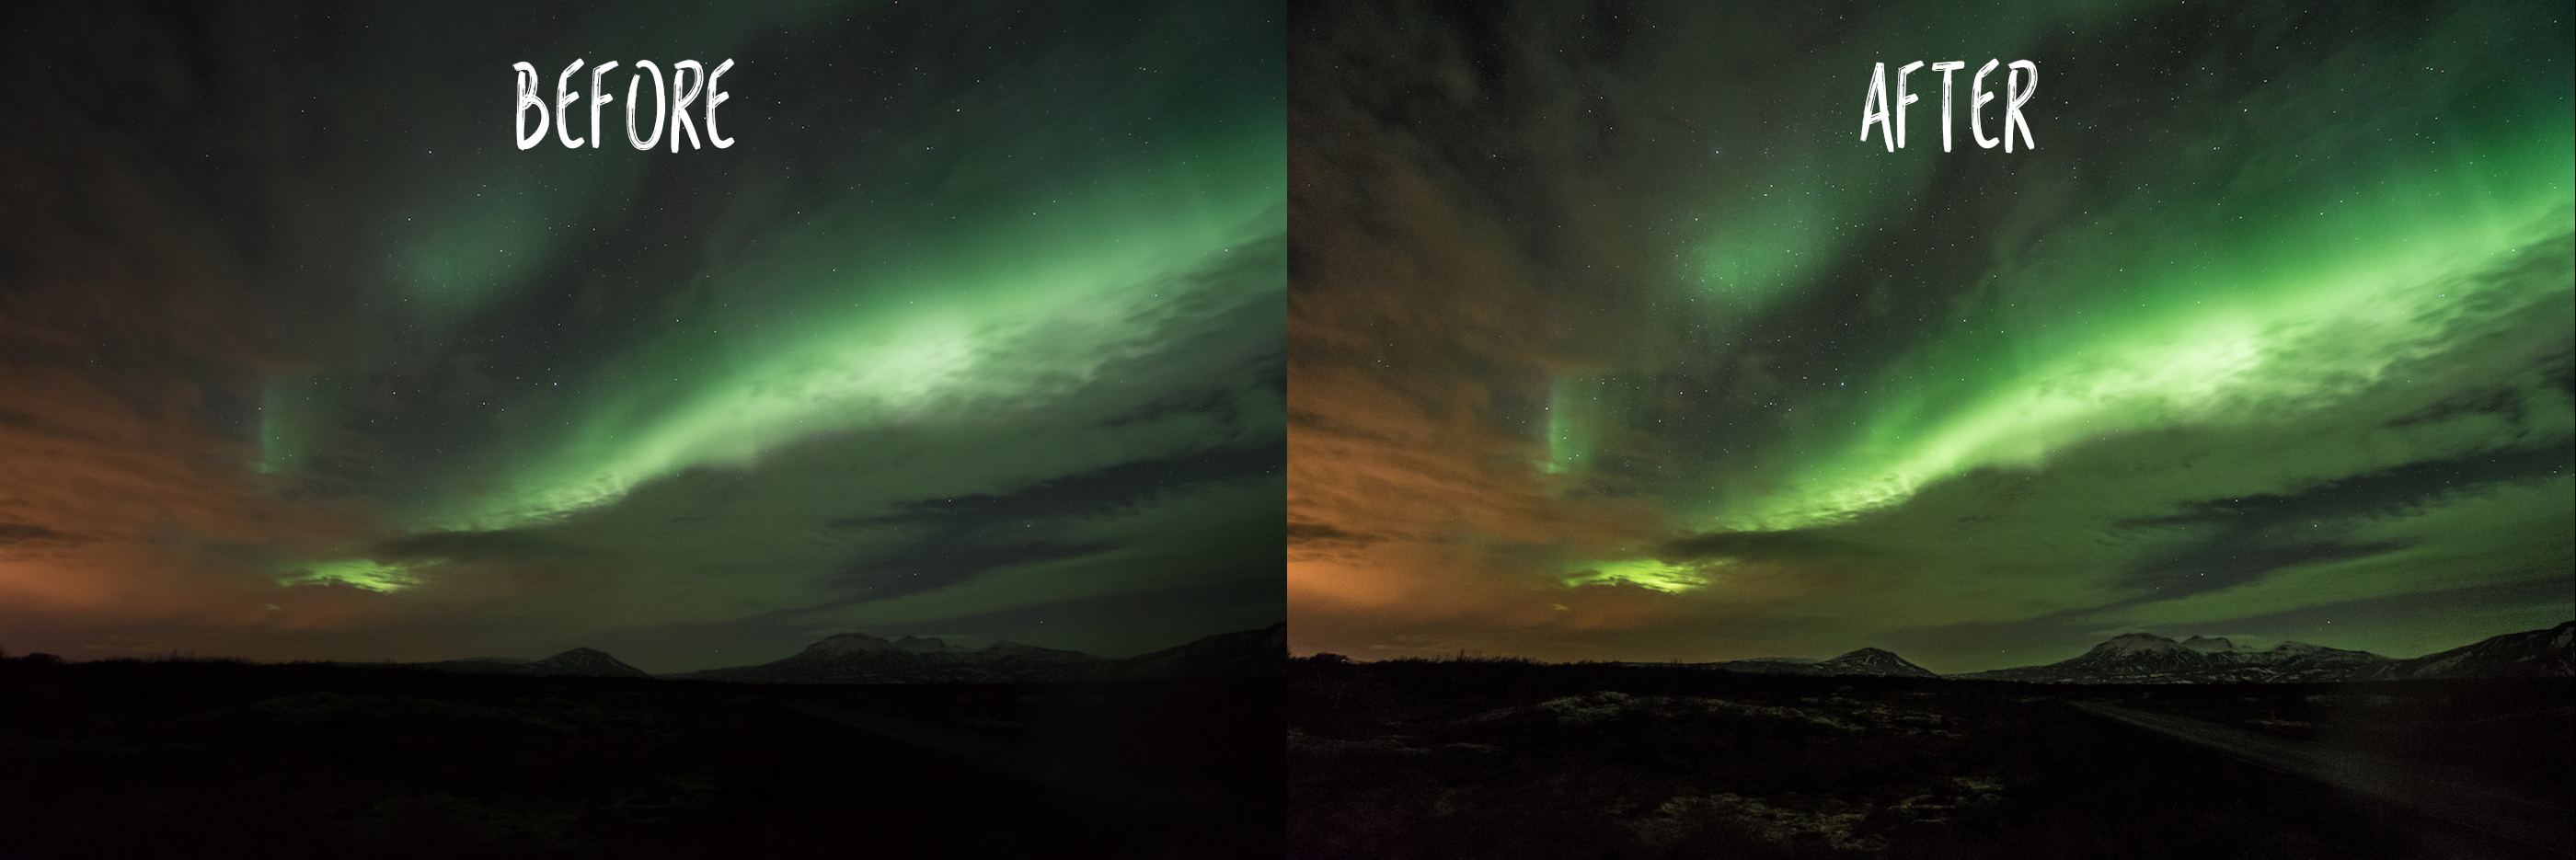
Adjustments made with a RAW file. Cannot be easily done with a JPEG
Hope these tips will help you when you’re out searching for the Northern Lights. Ask us any questions and let us know what helped you photograph the lights!


 Chuck Norris Grill, Reykjavik